
Windows
Hyper-V Performance Hack: The Essential Antivirus Exclusions List | Lazy Admin Blog
Running antivirus on your Hyper-V host is a security must, but if you don’t configure it correctly, you’re asking for trouble. We’re talking “disappearing” VMs, corrupted virtual disks, and performance so sluggish you’ll think you’re back on physical hardware from 2005.
The culprit is usually the Real-Time Scanning engine trying to “inspect” a 100GB .vhdx file every time the guest OS writes a single bit. Here is the definitive “Lazy Admin” guide to Hyper-V AV exclusions.
1. File Extension Exclusions
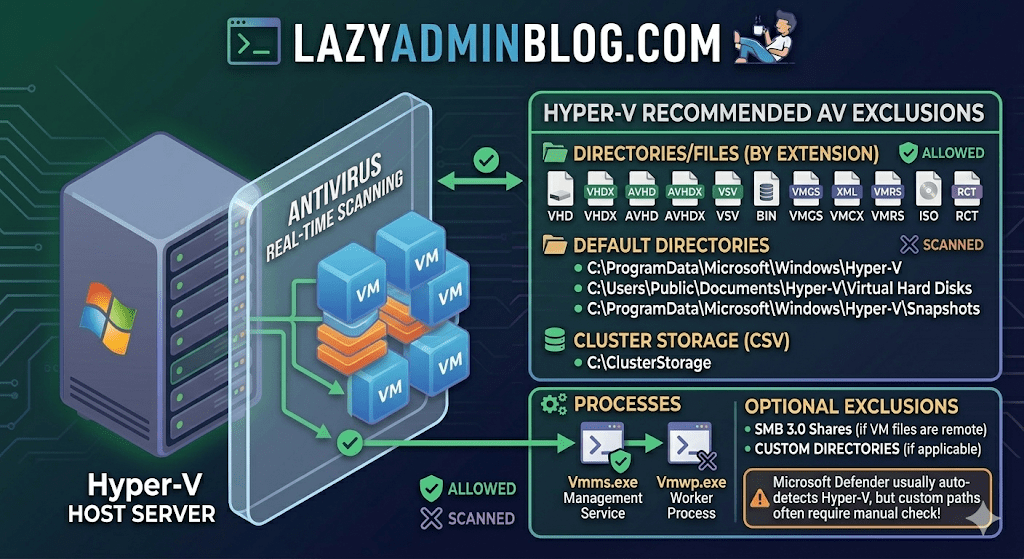
Tell your AV to keep its hands off these specific virtual machine file types:
- Virtual Disks:
.vhd,.vhdx - Snapshots/Checkpoints:
.avhd,.avhdx - Saved State:
.vsv,.bin,.vmgs - Configuration:
.xml,.vmcx,.vmrs - ISO Images:
.iso - Tracking:
.rct(Resilient Change Tracking)
2. Directory Exclusions
If you are using the default paths, exclude these. If you have a dedicated D:\VMs drive (which you should!), exclude that entire custom path as well.
- Default Configs:
C:\ProgramData\Microsoft\Windows\Hyper-V - Default VHDs:
C:\Users\Public\Documents\Hyper-V\Virtual Hard Disks - Default Snapshots:
C:\ProgramData\Microsoft\Windows\Hyper-V\Snapshots - Cluster Shared Volumes (CSV):
C:\ClusterStorage - Hyper-V Replica: Any custom replication data folders.
- SMB 3.0 Shares: If your VMs live on a remote file server, apply these same exclusions to that file server!
Lazy Admin Pro-Tip: If you’re using a Cluster, don’t just exclude the
C:\ClusterStoragefolder by path. Use the Volume ID (get it viamountvol) to ensure the exclusion sticks even if drive letters or paths shift.
3. Process Exclusions
Sometimes excluding the file isn’t enough; you need to exclude the “person” opening the file. Exclude these core Hyper-V executables:
- Vmms.exe: The Virtual Machine Management Service.
- Vmwp.exe: The Virtual Machine Worker Process (one runs for every active VM).
- Vmcompute.exe: (For Windows Server 2019+) The Host Compute Service.
Why this matters (The “Error 0x800704C8”)
If you don’t set these, you’ll eventually see the dreaded Error 0x800704C8 (The process cannot access the file because it is being used by another process). This happens when your AV locks the VM’s configuration file exactly when Hyper-V tries to start it.
What about Windows Defender?
Good news for the truly lazy: if you are using built-in Microsoft Defender on Windows Server, it automatically detects the Hyper-V role and applies most of these exclusions for you. However, it does not always catch your custom storage paths (like E:\MyVMs), so always double-check your work!
Windows Server 2008 R2 Stuck in Recovery Loop? Here’s the Fix | Lazy Admin Blog

A sudden power failure is the ultimate “stress test” for a server, and sometimes the OS fails that test, landing you in an endless loop of Startup Repair. If F8 > Last Known Good Configuration didn’t save your skin, it’s time to break out the installation media.
The Prerequisites
Before you start, ensure you have your Windows Server 2008 R2 Installation Disc (or a bootable USB) ready.
- Boot from the media.
- Select your language/input settings and click Next.
- Select Repair your computer.
- Choose the OS you want to fix and click Next.
- Select Command Prompt from the System Recovery Options.
Method 1: The System File Checker (SFC)
If the power cut corrupted a core system file, SFC is your first line of defense. It compares your system files against the “known good” versions on the disc.
- In the Command Prompt, type:
sfc /scannow - Wait: This can take a while. If it finds and fixes errors, reboot and see if the loop is broken.
Method 2: Rebuilding the BCD
Sometimes the boot configuration data gets scrambled. This command scans for Windows installations and lets you add them back to the boot list.
- In the Command Prompt, type:
Bootrec /RebuildBcd - If it finds a Windows installation, press Y to add it to the boot list.
Method 3: The “Nuclear” Boot Repair
If the Master Boot Record (MBR) or the boot sector itself is toast, you need to rewrite them entirely. This is the heavy-duty fix for when the BIOS simply can’t find where Windows starts.
Run these three commands in order:
- Fix the MBR:
BOOTREC /FIXMBR - Fix the Boot Sector:
BOOTREC /FIXBOOT - Force the Update:
D:\boot\Bootsect.exe /NT60 All(Note: Replace D: with the actual drive letter of your installation disc).
Stop Brute Force Cold: How to Rename the Local Administrator via GPO | Lazy Admin Blog

The “Administrator” account is a universal target. Because every Windows machine has one by default, hackers already have 50% of the login equation—the username. By renaming this built-in account across your entire Active Directory domain, you significantly lower the risk of automated brute-force attacks.
Best of all? You don’t have to touch a single workstation. We can do this globally using Group Policy Preferences (GPP).
Step 1: Create or Edit your GPO
- Open the Group Policy Management console (
gpmc.msc). - Create a new GPO (e.g., “Security – Rename Local Admin”) or edit an existing one linked to your target Workstations or Servers OU.
- Right-click the GPO and select Edit.
Step 2: Configure the Local User Preference
Navigate to the following path within the editor: Computer Configuration > Preferences > Control Panel Settings > Local Users and Groups
- Right-click Local Users and Groups and select New > Local User.
- Configure the following settings in the dialog box:
- Action: Select Update.
- User name: Select Administrator (built-in) from the dropdown. (Using the built-in identifier ensures the rename works even if the account was previously renamed).
- Rename to: Enter your new, non-obvious username (e.g.,
SrvManager_Admin). - Full name: Enter a descriptive name.
- Password: You can optionally reset the password here, though using LAPS (Local Administrator Password Solution) is recommended for password management.
Step 3: Deployment & Verification
By default, Group Policy refreshes every 90 minutes. If you want to see the change immediately on a specific client, run the following command in an elevated prompt:
DOS
gpupdate /force
Is it working?
If the name hasn’t changed, use the GPResult tool to see if the policy is being applied to the computer object:
DOS
gpresult /r
Troubleshooting Tips:
- OU Check: Ensure the Computer object is actually inside the OU where the GPO is linked.
- Security Filtering: Verify that Authenticated Users or Domain Computers have “Read” and “Apply Group Policy” permissions in the GPO’s Delegation tab.
- Replication: If some sites see the change and others don’t, check your Domain Controller replication status.
Why this is a “Lazy Admin” Win
Instead of using scripts or manual intervention, GPO Preferences handle the logic for you. If you ever need to change the name again, you update one field in the GPO, and the entire domain follows suit.
Standard Windows Monitoring Threshold Parameters | Lazy Admin Blog

Monitoring thresholds are often dictated by the Service Level Agreement (SLA) or Statement of Work (SoW) signed with your client. However, if you are setting up a new environment or looking for baseline recommendations, these industry standards are a great place to start.
The Performance Monitoring Matrix
Below are the typical thresholds used for enterprise Windows environments. These are designed to minimize “alert fatigue” while ensuring you have enough time to react before a service failure occurs.
| Metric | Polling Interval | Warning (Yellow) | High/Critical (Orange) | Alert/Emergency (Red) |
| CPU Utilization | 5 Minutes | > 80% for 3 polls | > 90% for 2 polls | > 95% for 2 polls |
| Memory (Available MBytes) | 5 Minutes | < 100 MB | < 50 MB | < 20 MB |
| Memory (Pages/sec) | 5 Minutes | > 500 | > 1000 | > 5000 |
| Disk Free Space (%) | 15 Minutes | < 15% | < 10% | < 5% |
| Disk Queue Length | 5 Minutes | > 2 per spindle | > 5 per spindle | > 10 per spindle |
| Network Utilization | 5 Minutes | > 60% | > 80% | > 90% |
| Service Status | 1 Minute | N/A | Stopped (Manual) | Stopped (Automatic) |
Understanding “Remedy on Demand” (RoD) Integration
In many enterprise environments, these thresholds are tied directly to an ITSM tool like Remedy on Demand (RoD).
- Warning levels usually trigger an email notification or a low-priority ticket.
- Alert levels generate a high-priority incident in RoD, often triggering an automated page to the on-call engineer.
Key Considerations for Polling Intervals
- Short Intervals (1-2 mins): Great for critical services, but increases the load on the monitoring server and the target agent.
- Long Intervals (15-30 mins): Ideal for Disk Space or non-critical capacity trends.
- The “3-Poll Rule”: To avoid alerts caused by temporary spikes (bursty CPU usage), set your monitoring tool to only trigger a ticket if the threshold is exceeded for 3 consecutive polling intervals.
A Sample Template:

No Reboot Required: Configuring Dell iDRAC via RACADM | Lazy Admin Blog

Configuring the Integrated Dell Remote Access Controller (iDRAC) is usually a “Day 1” task performed in the BIOS. But what if you’ve already deployed the server and realized the NIC isn’t configured, or the IP needs to change?
By using the Dell RACADM (Remote Access Controller Admin) utility, you can modify network settings, reset credentials, and pull system health logs directly from the command line without a single second of downtime.
Getting the Tools
To start, download the Dell EMC OpenManage DRAC Tools. This package includes the RACADM executable. You can install this on the local server or on your management workstation to manage servers over the network.
1. Remote RACADM (From your Workstation)
If you have the current credentials but need to change settings remotely, use the -r (remote), -u (user), and -p (password) flags.
Example: Get System Information
Bash
racadm -r 10.1.1.1 -u root -p calvin getsysinfo
Note: If you get an SSL certificate error, the command will still run. To force the command to stop on certificate errors for security, add the
-Sflag.
2. Local RACADM (From the Server OS)
If you are logged into the Windows or Linux OS on the Dell server itself, you don’t need credentials. The tool communicates directly with the hardware via the IPMI driver.
Example: Quick Network Setup
Bash
# Check current configracadm getniccfg# Set a new Static IP, Subnet, and Gatewayracadm setniccfg -s 192.168.1.50 255.255.255.0 192.168.1.1
3. Deep Configuration (The Config Group Method)
For more granular control (like setting DNS servers or the DRAC name), you can target specific configuration groups.
The “Lazy Admin” DNS Setup Script:
Bash
racadm config -g cfgLanNetworking -o cfgNicIpAddress 172.17.2.124racadm config -g cfgLanNetworking -o cfgNicNetmask 255.255.252.0racadm config -g cfgLanNetworking -o cfgDNSServer1 172.17.0.6racadm config -g cfgLanNetworking -o cfgDNSRacName MyServer-iDRACracadm config -g cfgLanNetworking -o cfgDNSDomainName corp.company.com
4. SSH / Serial RACADM
If you are already connected to the iDRAC via SSH, you don’t need to repeat the racadm command prefix. Simply type racadm and hit enter to enter the RACADM shell:
Bash
admin@idrac-web-01: racadmracadm>> getsysinforacadm>> serveraction powercycle
Why this is a “Lazy Admin” Win
Instead of walking to the cold aisle with a crash cart or waiting for a 20-minute reboot cycle, you can script the iDRAC configuration of an entire rack in seconds.
#DellEMC #PowerEdge #iDRAC #SysAdmin #DataCenter #RACADM #Infrastructure #ITOps #LazyAdmin #ServerManagement
HPE Support 101: A Step-by-Step Guide to Raising ProLiant & Blade Server Cases | Lazy Admin Blog

Is your ProLiant DL360 Gen11 throwing a pre-failure alert? Or perhaps a BL460c blade has gone “No Power” in the chassis? Since the segregation of HP into HP Inc. and Hewlett Packard Enterprise (HPE), the support portal has evolved.
If you are a “Lazy Admin,” you want to get your ticket in quickly so you can get back to what matters. Here is the streamlined approach to navigating HPE Support.
Step 1: Identify Your Product Family
Before heading to the portal, confirm which category your hardware falls into. HPE generally groups them as:
- BL Series: ProLiant Server Blades (Enclosure-based)
- DL Series: Rack-mount Servers (Multi-node and Standard)
- ML Series: Tower Servers
- MicroServer: For small office/home office environments
- Apollo/Scalable Systems: High-density computing
Step 2: Use the Global Search
If you aren’t sure which specific “Packaged Cluster” or “Scalable System” you have, use the HPE Support Center search bar. Enter your specific model (e.g., ProLiant DL380 Gen10).
Why this page is useful: Before you even raise a case, the product page provides:
- Top Issues & Solutions: Often, the fix for a known firmware bug is already listed here.
- Drivers & Software: Essential for getting the latest SPP (Service Pack for ProLiant).
- Warranty Check: Crucial! HPE will not open a case for hardware replacement if the serial number isn’t linked to an active contract or warranty.
Step 3: The HP Passport Login
To submit or manage cases, you must have an HPE Passport account. This is a single sign-on (SSO) service.
You can access the login page directly here: https://support.hpe.com/hpesc/public/home/
- Tip: Link your company’s Support Agreement IDs (SAID) or Service Agreement IDs (SAR) to your Passport account before the server fails. It saves massive amounts of time during an actual emergency.
Step 4: Submitting the Case
Navigate to the Submit or manage support cases section. You will need:
- Serial Number (S/N): Found on the pull-out “luggage tag” on the front of the server or via iDRAC/iLO.
- Product Number (P/N): The specific hardware SKU.
- Logs: HPE will almost always ask for an Active Health System (AHS) log. Download this from the iLO before you start the ticket.
#HPE #ProLiant #ServerSupport #SysAdmin #DataCenter #ITOps #HPEPassport #Troubleshooting #LazyAdmin #EnterpriseIT
Fixing Server Manager Error 0x800706BE: The Missing MUM/CAT Mystery | Lazy Admin Blog

If your Server Manager is blank, showing a yellow bang, or refusing to refresh with a “Remote Procedure Call Failed” error, you aren’t looking at a network issue—you’re looking at a corrupted Windows Update store.
When Windows cannot validate the files in the C:\Windows\Servicing\Packages directory, the Server Manager discovery process crashes. Here is how to perform manual surgery on the CBS store to fix it.
The Symptom
- Error Code: 0x800706BE
- Event ID: 1601 (Microsoft-Windows-ServerManager/Operational)
- Message: Could not discover the state of the system.
Step 1: The Diagnostics (CheckSUR)
First, we need to know exactly which files are broken.
- Download and run the System Update Readiness Tool (CheckSUR) (KB947821) or, on newer versions of Windows Server, run:
DISM.exe /Online /Cleanup-image /Scanhealth - Once finished, open the log file:
%Systemroot%\Logs\CBS\Checksur.log - Look for lines starting with
(f) CBS MUM Corruptor(f) CBS MUM Missing. These are your “targets.”
Step 2: Gain Control of the Packages Folder
By default, even an Administrator cannot write to the Servicing folder. You must take ownership:
DOS
takeown /F C:\Windows\Servicing\Packages /D y /Ricacls C:\Windows\Servicing\Packages /save %temp%\AclFile /Ticacls C:\Windows\Servicing\Packages /grant %username%:F /T
Step 3: Extract and Replace the “Grafts”
Now you need to “borrow” healthy files from the original Update files to replace your corrupt ones.
- Download the KB: Download the
.msufile for the KB number listed as corrupt in your log. - Expand the MSU:
expand -F:* Windows6.1-KB978601-x64.msu C:\Repair - Expand the CAB: Inside that folder, find the
.cabfile and expand it too:expand -F:* Windows6.1-KB978601-x64.cab C:\Repair\CAB - The Extraction: Inside the
CABfolder, findupdate.mumandupdate.cat.
Step 4: The Rename and Replace
This is where precision matters. You must rename those generic files to match the exact long string found in your Checksur.log.
- Example Rename:
- From:
update.mum - To:
Package_for_KB978601~31bf3856ad364e35~amd64~~6.0.1.0.mum
- From:
- Move: Copy these renamed files into
C:\Windows\Servicing\Packages.
Step 5: Verify the Fix
Close and reopen Server Manager. It should now trigger a fresh discovery without the RPC error. If it still fails, check the Checksur.log again—you likely have more missing packages to replace!
Lazy Admin Tip 💡
If you have another server running the exact same OS and patch level, you can often just copy the healthy .mum and .cat files from the “Good” server’s C:\Windows\Servicing\Packages folder to the “Bad” one. It’s much faster than manually expanding CAB files!
#WindowsServer #SysAdmin #ServerManager #Troubleshooting #ITOps #Microsoft #TechSupport #LazyAdmin #WindowsUpdate
The Ultimate Robocopy Command for Large-Scale Migrations | Lazy Admin Blog

If you need to move huge files while keeping a close eye on progress, this is the syntax you want. It includes logging, multi-threading for speed, and the ability to resume if the network drops.
The “Power User” Command
DOS
robocopy "D:\Source_Data" "E:\Destination_Data" /s /e /z /mt:32 /tee /log+:"C:\Logs\MigrationLog.txt"
Switch Breakdown: Why We Use Them
| Switch | What it does |
| /s /e | Copies all subdirectories, including empty ones. |
| /z | Restart Mode: If the connection drops mid-file, Robocopy can resume from where it left off instead of starting the file over. Essential for 100GB+ files! |
| /mt:32 | Multi-Threading: Uses 32 threads to copy multiple files simultaneously. (Default is 8). Adjust based on your CPU/Disk speed. |
| /tee | Writes the status to the console window and the log file at the same time. |
| /log+: | Creates a log file. Using the + appends to an existing log rather than overwriting it—perfect for multi-day migrations. |
How to Monitor Progress in Real-Time
Because we used the /tee and /log+ switches, you have two ways to monitor the status:
- The Console: You’ll see a rolling percentage for each file directly in your Command Prompt.
- Tail the Log: Since the log is being updated live, you can “tail” it from another window (or even remotely) to see the progress without touching the active copy session.
Lazy Admin Tip (PowerShell):
Open a PowerShell window and run this command to watch your Robocopy log update in real-time as files move:
Get-Content "C:\Logs\MigrationLog.txt" -Wait
Important Notes for Huge Files
- Disk Quotas: Robocopy doesn’t check destination space before starting. Use
dirordf(if using Linux targets) to ensure you have enough room. - Permissions: If you need to copy NTFS permissions (ACLs), add the /copyall switch.
- Bandwidth: Running
/mt:128(the max) can saturate a 1Gbps link. If you’re copying over a live production network, stick to/mt:8or/mt:16.
#WindowsServer #Robocopy #DataMigration #SysAdmin #ITInfrastructure #StorageAdmin #TechTips #LazyAdmin #CloudMigration
HPE ProLiant Diagnostics: How to Generate a Survey Log (Online & Offline) | Lazy Admin Blog

An HPE Survey Log provides a deep-dive look at your server’s hardware configuration, firmware levels, and error counts. Depending on whether your OS is healthy or the server is “down,” you have two ways to get this data.
Method 1: The Offline Approach (Non-Booting Servers)
Use this method if the OS is corrupted or you need to test the hardware in a “clean” state using the SmartStart CD (Gen8 and older) or Service Pack for ProLiant (SPP).
- Boot the server using the SmartStart CD or SPP ISO.
- Navigate: From the homepage, click Maintenance > HP Insight Diagnostics.
- Default View: The Survey tab will open by default.
- The “Pro” Settings: * Change Category from ‘Overview’ to ‘All’.
- Change View Level from ‘Summary’ to ‘Advanced’.
- Save: Click Save. Note that you will need a USB flash drive plugged in to export the
.htmlor.txtlog file.
Method 2: The Online Approach (Live Production)
If the server is running Windows or Linux, you can pull the logs without a reboot by using the HP Insight Diagnostics Online Edition.
For Windows Admins:
- Via Start Menu: Go to
Start > All Programs > HP System Tools > HP Insight Diagnostics. - Via Web Browser: Open the HP System Management Homepage (SMH), click Webapps, and select HP Insight Diagnostics.
For Linux Admins:
- Open your browser and navigate to:
https://localhost:2381 - Log in with root credentials.
- Click Webapps > HP Insight Diagnostics.
Exporting the Online Log:
Once the interface opens, follow the same “Advanced” steps:
- Set Category to ‘All’.
- Set View Level to ‘Advanced’.
- Click Save to download the file directly to your workstation.
How to Install Online Diagnostics (If Missing)
If the tool isn’t installed, you’ll need the HPE Service Pack for ProLiant (SPP):
- Mount the SPP ISO.
- Navigate to
/hp/swpackagesand runhpsum.exe(Windows) or./hpsum(Linux). - Select Localhost as the target and ensure HP Insight Diagnostics Online Edition is checked for installation.
Lazy Admin Tip 💡
For modern Gen9, Gen10, and Gen11 servers, you can bypass these tools entirely by using the iLO (Integrated Lights-Out). Simply log into the iLO web interface and download the Active Health System (AHS) log. It’s the modern replacement for the Survey log and is much faster to collect!
#HPE #ProLiant #ServerAdmin #SysAdmin #ITOps #HardwareTroubleshooting #iLO #DataCenter #LazyAdmin #TechTips
The Permission Panic: How to Backup and Restore Share & NTFS Permissions | Lazy Admin Blog

It only takes one “Inheritance” checkbox error to bring a department to a standstill. If you are migrating a file server or just performing routine maintenance, having a permission backup is your “Undo” button.
1. Share Permissions (The Registry Method)
“Share” permissions (the ones you see in the Sharing tab) are not stored on the files themselves; they are stored in the Windows Registry.
To Backup: Open a Command Prompt (Admin) and run:
DOS
reg export HKLM\SYSTEM\CurrentControlSet\Services\LanmanServer\Shares shareperms.reg
To Restore: Simply import the file back on the new or repaired server:
DOS
reg import shareperms.reg
Note: You must restart the ‘Server’ service or reboot for the shares to reappear.
2. NTFS Permissions (The icacls Method)
NTFS permissions (the “Security” tab) are much more complex. We use the built-in icacls tool to handle these.
The Backup Command:
DOS
icacls d:\data /save ntfsperms.txt /t /c
- /t: Recurses through all subfolders.
- /c: Continues even if it hits a single file error (like a long file path).
The “Tricky” Restore Command: When restoring, icacls treats the paths inside the text file as relative. If your backup file says “Data\Folder1,” and you try to restore to D:\Data, it will look for D:\Data\Data\Folder1.
The Correct Syntax:
DOS
icacls d:\ /restore ntfsperms.txt
Lazy Admin Warning: Always point the restore command one level above the folder you backed up. If you backed up
D:\Data, restore toD:\.
Understanding the “Secret Code” (SDDL)
If you open your ntfsperms.txt file, you’ll see strings like D:AI(A;ID;FA;;;BA). This is Security Descriptor Definition Language (SDDL).
- BA = Built-in Administrators
- SY = Local System
- AU = Authenticated Users
It looks like gibberish, but to the Windows Kernel, it is a perfect map of your security infrastructure.
#WindowsServer #SysAdmin #DisasterRecovery #NTFS #FileServer #TechTips #CyberSecurity #ITAdmin #LazyAdmin
- ← Previous
- 1
- 2
- 3
- …
- 5
- Next →