
VMware Tools
Lost Your VM? How to Find Its ESXi Host from the Guest OS | Lazy Admin Blog
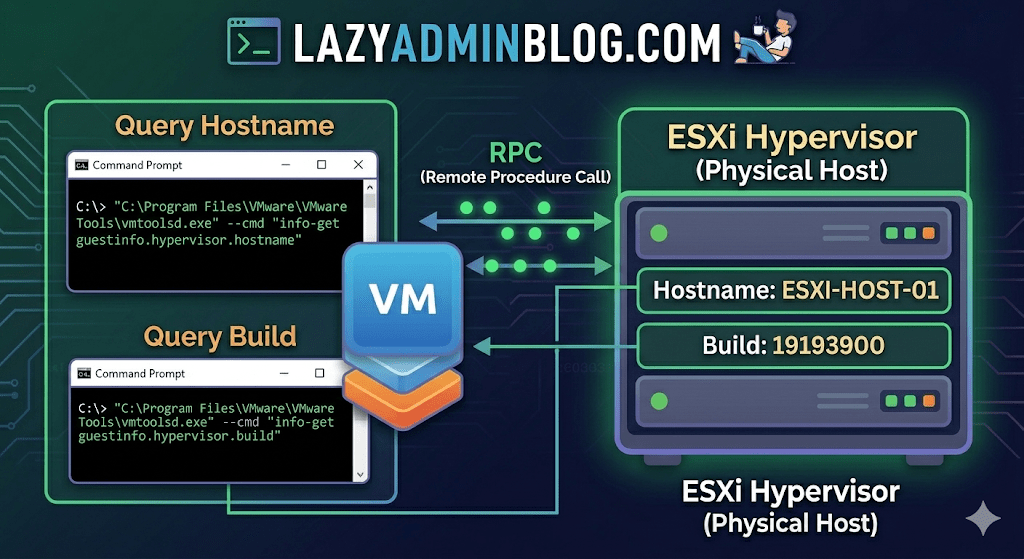
It’s a classic “Ghost in the Machine” scenario: You can RDP or SSH into a virtual machine, but you can’t find it in vCenter. Maybe it’s a massive environment with thousands of VMs, maybe the naming convention doesn’t match, or maybe you’re dealing with a rogue host that isn’t even in your main cluster.
If VMware Tools is installed and running, the VM actually knows exactly where it lives. You just have to ask it nicely through the Command Prompt.
The Magic Tool: vmtoolsd.exe
On Windows VMs, the VMware Tools service includes a CLI utility called vmtoolsd.exe. This tool can query the hypervisor for specific environment variables that are passed down to the guest.
1. Find the ESXi Hostname
If you need to know which physical server is currently crunching the cycles for your VM, run this command:
"C:\Program Files\VMware\VMware Tools\vmtoolsd.exe" --cmd "info-get guestinfo.hypervisor.hostname"
2. Get the ESXi Build Details
Need to know if the underlying host is patched or running an ancient version of ESXi? Query the build number:
"C:\Program Files\VMware\VMware Tools\vmtoolsd.exe" --cmd "info-get guestinfo.hypervisor.build"
Why is this useful?
- vCenter Search is failing: Sometimes the inventory search index gets corrupted, and “Name contains” returns nothing.
- Nested Environments: If you are running VMs inside VMs, this helps you verify which layer of the onion you are currently on.
- Troubleshooting Performance: If a VM is lagging, you can quickly identify the host to check for hardware alerts or CPU contention without leaving the OS.
What if I’m on Linux?
The same logic applies! Most modern Linux distributions use open-vm-tools. You can run the same query via the terminal:
vmtoolsd --cmd "info-get guestinfo.hypervisor.hostname"
Important Requirement: Guest RPC
For these commands to work, the VM must have VMware Tools installed and the guestinfo variables must be accessible. In some hardened environments, admins might disable these RPC (Remote Procedure Call) queries in the .vmx file for security reasons, but in 95% of standard builds, this will work out of the box.
Troubleshooting VMware Tools Upgrade Failures on Windows Server 2003 | Lazy Admin Blog

In the world of legacy infrastructure, Windows Server 2003 virtual machines (VMs) occasionally hit a “brick wall” during VMware Tools upgrades. While VMware continues to investigate the root cause, the community has identified a manual “scrubbing” process to bypass the installer errors and force a clean installation.
🛑 Pre-Requisites & Data Collection
Before performing a manual registry cleanup, VMware Support recommends gathering the following data to help identify the underlying issue:
- Version Mapping: Note the current “from” version and the target “to” version.
- Upgrade Method: Are you using the “Interactive” installer, “Silent” switches, or vCenter’s “Automatic” update?
- Historical Data: Open the Windows Event Viewer, search for Event Source: MsiInstaller, and look for Event ID: 1034 to find traces of previous installation attempts.
🛠️ The Fix: Manual Registry & System Scrubbing
[!CAUTION] Warning: This procedure involves modifying the Windows Registry. Incorrect changes can destabilize your OS. Always take a full VM Snapshot and a Registry Backup before proceeding.
1. Registry Cleanup (Installer Keys)
Log in as an Administrator, open regedit, and navigate to/delete the following keys if they exist:
HKEY_CLASSES_ROOT\Installer\Features\05014B32081E884E91FB41199E24004HKEY_CLASSES_ROOT\Installer\Products\05014B32081E884E91FB41199E24004HKEY_LOCAL_MACHINE\SOFTWARE\Classes\Installer\Features\05014B32081E884E91FB41199E24004HKEY_LOCAL_MACHINE\SOFTWARE\Classes\Installer\Products\05014B32081E884E91FB41199E24004HKEY_LOCAL_MACHINE\SOFTWARE\Microsoft\Windows\CurrentVersion\Installer\UserData\S-1-5-18\Components\B150AC107B12D11A9DD0006794C4E25HKEY_LOCAL_MACHINE\SOFTWARE\Microsoft\Windows\CurrentVersion\Uninstall\{3B410500-1802-488E-9EF1-4B11992E0440}HKEY_LOCAL_MACHINE\SOFTWARE\VMware, Inc.
2. Service Removal
Deep-seated services can block the new installer. Delete these keys under CurrentControlSet\Services:
VMToolsVMUpgradeHelperVMware Physical Disk Helper Servicevmvss
3. File System Cleanup
Once the registry is clear, you must remove the physical binary remnants:
- Open Windows Explorer.
- Delete the folder:
%ProgramFiles%\VMware\VMware Tools. - Restart the Virtual Machine. This step is non-negotiable as it clears the memory and releases hooks on drivers.
🚀 Final Step: Fresh Installation
After the reboot, the system will be “clean” of previous VMware Tools traces. You can now mount the VMware Tools ISO through your vSphere client and run a fresh installation.
Pro-Tip: If the VM has other VMware products installed (like vCenter Server), do not do a blanket search-and-destroy for the term “VMware” in the registry. Stick strictly to the keys listed above to avoid breaking other applications.
How to Fix: Keyboard or Mouse Not Working in a VMware Virtual Machine

It’s a frustrating classic: you click into your VM, and… nothing. The cursor doesn’t move, or the keyboard acts like it’s unplugged. Usually, this is a “focus” or driver issue rather than a hardware failure.
Here is the “Lazy Admin” checklist to get your inputs back online.
1. The “Focus” Check (The Most Common Culprit)
Virtualization software intercepts your hardware inputs. If the VM window doesn’t have “Focus,” your typing is still going to your host OS.
- Action: Click anywhere inside the VM console window.
- Pro Tip: Look at the bottom status bar of your VMware window. If the mouse icon isn’t lit up, the VM isn’t “grabbing” the input.
2. The Wireless Device “Passthrough” Trap
If you are using a wireless USB mouse/keyboard, the VM might have accidentally “claimed” the USB receiver for itself, cutting it off from the host.
- Action: Go to VM > Removable Devices and ensure your HID (Human Interface Device) is Disconnected from the VM so the host can manage it and pass the input through the software layer instead.
- Alternative: Remove the USB Controller from the VM settings and re-add it to reset the bus.
3. Driver Conflicts & Optimization
Sometimes, fancy “Gaming” drivers (Logitech G-Hub, Razer Synapse) inside the guest OS conflict with the VMware virtual driver.
- Action: Uninstall any non-standard mouse/keyboard software inside the VM.
- Optimization: In VMware Workstation settings, go to Preferences > Input and set “Optimize mouse for games” to Always or Automatic.
4. The Nuclear Option: Reinstall VMware Tools
The VMware Tools package includes the specialized vmmouse driver that handles smooth cursor movement and keyboard mapping. If this is corrupted, your input will fail.
- Action: 1. Press
Ctrl + Altto release your mouse to the host. 2. Go to VM > Install (or Reinstall) VMware Tools. 3. Use the keyboard (Tab and Spacebar) if the mouse isn’t working to navigate the installer.
5. Troubleshooting the Host (OS-Specific)
If the issue persists, the problem might be a service on your physical computer blocking the input stream.
- Windows Hosts: Run
msconfigto perform a “Clean Boot,” disabling non-Microsoft services to see if a background app is interfering. - Linux Hosts: Drop to Run Level 2 to disable start daemons and test the raw input.
#VMware #Virtualization #SysAdmin #ITSupport #TechTips #LazyAdmin #VMwareWorkstation #vSphere #WindowsTips #LinuxTips