
ESXi
EVC Mode & CPU Compatibility FAQ | Lazy Admin Blog

You’ve just unboxed a shiny new host with the latest Intel or AMD processor, but your current cluster is running hardware from three years ago. You try to vMotion a VM, and vSphere gives you the dreaded “CPU Incompatibility” error.
Enter Enhanced vMotion Compatibility (EVC). Here’s everything you need to know to get your mixed-hardware cluster working without the headache.
What exactly is EVC?
Think of EVC as a “lowest common denominator” filter for your CPUs. It masks the advanced features of newer processors so that every host in the cluster appears to have the exact same instruction set. This allows VMs to live-migrate between old and new hardware because the “view” of the CPU never changes.
Quick FAQ
Q: Can I mix Intel and AMD in the same EVC cluster? A: No. EVC only works within a single vendor family. You can mix different generations of Intel, or different generations of AMD, but you cannot vMotion between the two brands.
Q: Will EVC slow down my new servers? A: Technically, yes—but rarely in a way you’ll notice. It hides new instructions (like specialized encryption or AI math sets), but the raw clock speed and core count of your new CPUs are still fully utilized. Most general-purpose VMs don’t use the high-end instructions being masked.
Q: Do I need to power off VMs to enable EVC? A: It depends:
- Enabling on an empty cluster: No downtime.
- Enabling on a cluster where VMs are already running on the oldest host: Usually no downtime.
- Enabling on a cluster where VMs are running on newer hosts: You must power off those VMs so they can “re-boot” with the masked CPU instructions.
Q: What is “Per-VM EVC”? A: Introduced in vSphere 6.7, this allows you to set the EVC mode on the VM itself rather than the whole cluster. This is a lifesaver for migrating VMs across different vCenters or into the Cloud (like AWS/Azure).
How to Find Your Correct EVC Mode
Don’t guess. Use the official tool:
- Go to the VMware Compatibility Guide (CPU/EVC Matrix).
- Select your ESXi version.
- Select the CPU models of your oldest and newest hosts.
- The tool will tell you the highest supported “Baseline” you can use.
Step-by-Step: Enabling EVC on an Existing Cluster
- Select your Cluster in vCenter.
- Go to Configure > VMware EVC.
- Click Edit.
- Select Enable EVC for Intel/AMD hosts.
- Choose the Baseline that matches your oldest host.
- Validation: vCenter will check if any running VMs are currently using features above that baseline. If they are, you’ll need to shut them down before you can save the settings.
Summary Table: EVC Baselines
| If your oldest host is… | Use this EVC Mode |
| Intel Ice Lake | Intel “Ice Lake” Generation |
| Intel Cascade Lake | Intel “Cascade Lake” Generation |
| AMD EPYC Rome | AMD EPYC “Rome” Generation |
Lost Your VM? How to Find Its ESXi Host from the Guest OS | Lazy Admin Blog
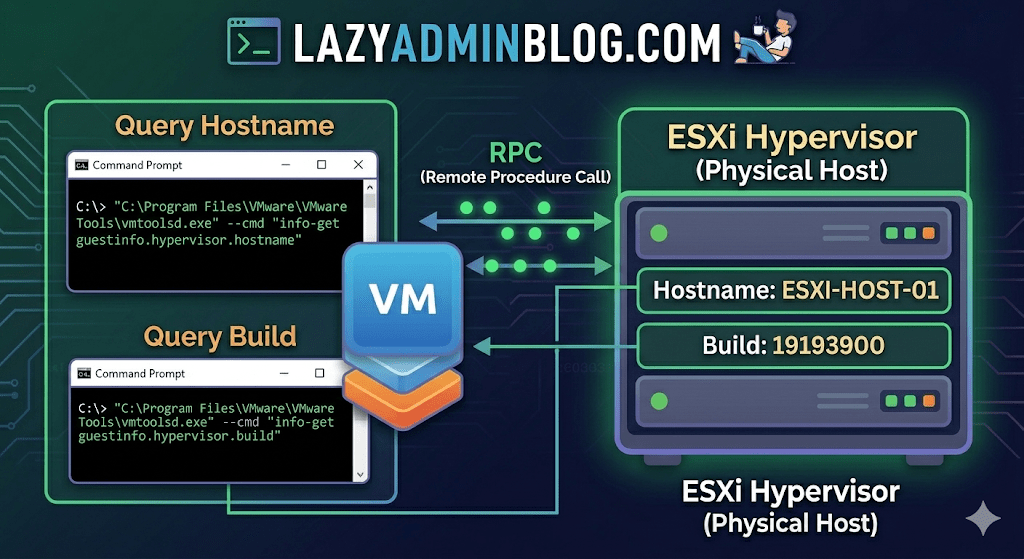
It’s a classic “Ghost in the Machine” scenario: You can RDP or SSH into a virtual machine, but you can’t find it in vCenter. Maybe it’s a massive environment with thousands of VMs, maybe the naming convention doesn’t match, or maybe you’re dealing with a rogue host that isn’t even in your main cluster.
If VMware Tools is installed and running, the VM actually knows exactly where it lives. You just have to ask it nicely through the Command Prompt.
The Magic Tool: vmtoolsd.exe
On Windows VMs, the VMware Tools service includes a CLI utility called vmtoolsd.exe. This tool can query the hypervisor for specific environment variables that are passed down to the guest.
1. Find the ESXi Hostname
If you need to know which physical server is currently crunching the cycles for your VM, run this command:
"C:\Program Files\VMware\VMware Tools\vmtoolsd.exe" --cmd "info-get guestinfo.hypervisor.hostname"
2. Get the ESXi Build Details
Need to know if the underlying host is patched or running an ancient version of ESXi? Query the build number:
"C:\Program Files\VMware\VMware Tools\vmtoolsd.exe" --cmd "info-get guestinfo.hypervisor.build"
Why is this useful?
- vCenter Search is failing: Sometimes the inventory search index gets corrupted, and “Name contains” returns nothing.
- Nested Environments: If you are running VMs inside VMs, this helps you verify which layer of the onion you are currently on.
- Troubleshooting Performance: If a VM is lagging, you can quickly identify the host to check for hardware alerts or CPU contention without leaving the OS.
What if I’m on Linux?
The same logic applies! Most modern Linux distributions use open-vm-tools. You can run the same query via the terminal:
vmtoolsd --cmd "info-get guestinfo.hypervisor.hostname"
Important Requirement: Guest RPC
For these commands to work, the VM must have VMware Tools installed and the guestinfo variables must be accessible. In some hardened environments, admins might disable these RPC (Remote Procedure Call) queries in the .vmx file for security reasons, but in 95% of standard builds, this will work out of the box.
How to Force Cancel a Hung Task in vCenter or ESXi | Lazy Admin Blog
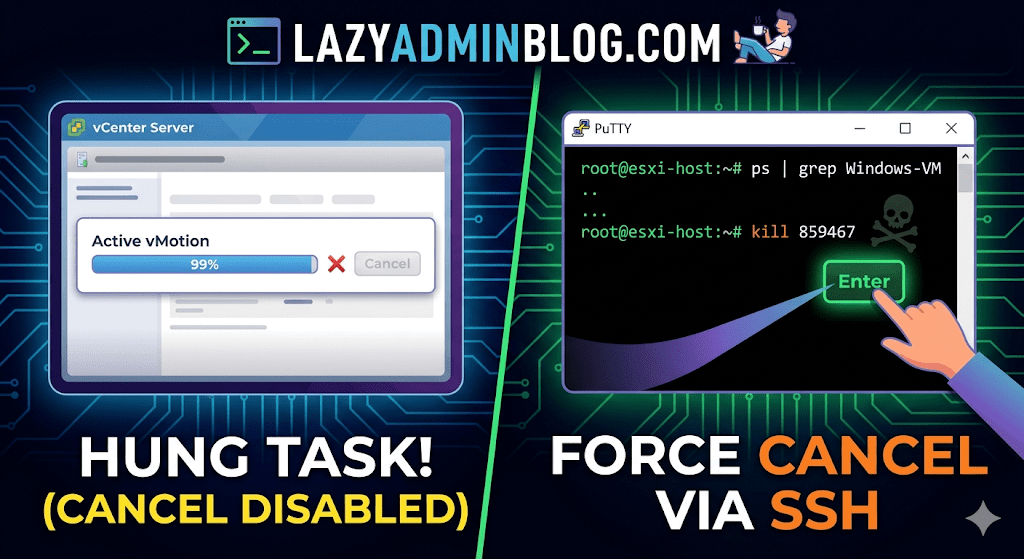
We’ve all been there: a vMotion hits 99% and just… stays there. Or a backup job finishes on the proxy side, but vCenter still thinks the VM is “busy.” Usually, the Cancel button is grayed out, leaving you stuck in management limbo.
When the GUI fails you, it’s time to hop into the CLI. Here is how to manually kill a hung task by targeting the VM’s parent process.
Step 1: Verify the Task
Before pulling the trigger, confirm the task is actually stuck and not just slow. Check the Monitor > Tasks and Events tab for the specific VM. If the progress bar hasn’t budged in an hour and the “Cancel” option is disabled, proceed to the host.
Step 2: Enable and Connect via SSH
To kill a process, you need to be on the specific ESXi host where the VM is currently registered.
- Enable SSH: Go to the ESXi host in vSphere > Configure > System > Services > Start SSH.
- Connect: Open your terminal (Putty, CMD, or Terminal) and log in as
root.
Step 3: Locate the Parent Process ID (PID)
We need to find the specific process tied to your VM. Use the ps command combined with grep to filter for your VM’s name.
Run the following command:
ps -v | grep "Your_VM_Name"
(Note: Using the -v flag in ESXi provides a more detailed view of the world ID and parent processes.)
Look for the line representing the VM’s main process. You are looking for the Leader ID or the first ID listed in the row.
Step 4: Kill the Process
Once you have identified the ID (e.g., 859467), send the kill signal. Start with a standard terminate signal, which allows the process to clean up after itself.
Run the command:
kill 859467
Lazy Admin Tip: If the process is extremely stubborn and won’t die, you can use
kill -9 859467to force an immediate termination. Use this as a last resort!
Step 5: Verify in vSphere
Give vCenter a minute to catch up. The hung task should now disappear or show as “Canceled” in the Tasks and Events console. Your VM should return to an “Idle” state, allowing you to power it on, move it, or restart your backup.
vSphere IDs: The Ultimate Quick Reference Guide | Lazy Admin Blog

Ever feel like you’re drowning in a sea of GUIDs and MoRefs? When you’re scripting or troubleshooting, using the wrong ID is the fastest way to break a backup job or target the wrong server.
Here is the “Lazy Admin” breakdown of the most common vSphere identifiers and how to grab them with PowerCLI.
1. vCenter Instance UUID (serverGuid)
This is the “SSN” of your vCenter server. It’s generated at install time and stays durable for that instance.
- Why it matters: In Linked Mode or cross-vCenter environments, this identifies which vCenter owns an object.
- PowerCLI:PowerShell
$vcenter = Connect-viserver vcsa-01a.corp.local $vcenter.InstanceUuid
2. ESXi Host UUID
Unlike other IDs, this isn’t generated by VMware. It’s pulled from the hardware’s SMBIOS.
- Why it matters: It’s unique to the physical motherboard/vendor.
- PowerCLI:PowerShell
(Get-VMHost | Select -First 1).ExtensionData.hardware.systeminfo.uuid
3. VC-VM Instance UUID (The “Management” ID)
Found in the .vmx file as vc.uuid. This is what vCenter uses to track VMs.
- The “Magic”: vCenter actively scans for duplicates of this ID and will “patch” (change) it automatically if it finds a conflict within its own inventory.
- PowerCLI:PowerShell
(Get-VM | Select -First 1).extensiondata.config.InstanceUUID
4. VM SMBIOS UUID (The “Guest” ID)
Found as uuid.bios in the .vmx. This is what the Guest OS (Windows/Linux) sees as the hardware serial number.
- The “Magic”: vCenter tries not to change this because many applications use it for licensing. If you move/copy a VM, vCenter will ask you what to do to prevent duplicates.
- PowerCLI:PowerShell
(Get-VM | Select -First 1).extensiondata.Config.UUID
5. VM Location ID
Stored as uuid.location. This is a hash of the VM’s configuration file path and the ESXi host UUID.
- The “I Moved It” Prompt: When this hash doesn’t match the current environment, vSphere triggers that famous “Did you move it or copy it?” popup.
- PowerCLI:PowerShell
(Get-VM | Select -First 1).extensiondata.config.LocationId
6. VM MoRef (Managed Object Reference)
The MoRef is the “Short ID” (like vm-43) used by the API and the vCenter database.
- Why it matters: This is the most important ID for database associations (stats, events, tasks). It is not unique across different vCenters.
- PowerCLI:PowerShell
(Get-VM | Select -First 1).ExtensionData.Moref.Value
Quick ID Reference Table
| ID Name | Scope | Persistence | Best Use Case |
| MoRef | Single vCenter | Changes if re-inventoried | API calls & DB tracking |
| Instance UUID | Single vCenter | High (Patched by VC) | Unique VM tracking |
| SMBIOS UUID | Global/Guest OS | Very High | Guest Software Licensing |
| Host UUID | Physical Hardware | Permanent | Hardware Asset Tracking |
Fixing Corrupt Image Profiles on ESXi | Lazy Admin Blog

We’ve all been there—a patch remediation task in vSphere Update Manager (VUM) or vSphere Lifecycle Manager (vLCM) gets interrupted (shoutout to that one colleague!), and suddenly your ESXi host is in a “zombie” state.
If you see the dreaded “Unknown – no profile defined” error, your host has lost its identity. It no longer knows which VIBs (VMware Installation Bundles) should be installed. This is usually caused by a corrupt imgdb.tgz file.
We’ve all been there—a patch remediation task in vSphere Update Manager (VUM) or vSphere Lifecycle Manager (vLCM) gets interrupted (shoutout to that one colleague!), and suddenly your ESXi host is in a “zombie” state.
If you see the dreaded “Unknown – no profile defined” error, your host has lost its identity. It no longer knows which VIBs (VMware Installation Bundles) should be installed. This is usually caused by a corrupt imgdb.tgz file.

The Symptom: Missing Image Profile
When an image profile is empty or corrupt, you cannot install patches, remove drivers, or perform upgrades. ESXi relies on the image database to maintain consistency.
How to Diagnose a Corrupt imgdb.tgz
Before you resort to a full host rebuild, verify the file size of the database. A healthy imgdb.tgz is typically around 26 KB. If yours is only a few bytes, it’s corrupted.
SSH into the host.
Locate the files:
cd /vmfs/volumesfind * | grep imgdb.tgz
Note: You will usually see two results (one for each bootbank).
Check the size:
ls -l <path_to_result>/imgdb.tgzIf the size is tiny (e.g., 0-100 bytes), the database is toast.
The Fix: Borrowing a “Known Good” Profile
Instead of a time-consuming reinstall, you can manually restore the database from a healthy host running the exact same version and patch level.
Step 1: Export from a Healthy Host
On a working ESXi host, copy the healthy database to a shared datastore:
cp /bootbank/imgdb.tgz /vmfs/volumes//
Step 2: Restore on the Corrupt Host
On the host with the issue, move the good file to /tmp and extract it to access the internal VIB and Profile metadata:
cp /vmfs/volumes//imgdb.tgz /tmpcd /tmptar -xzf imgdb.tgz
Step 3: Rebuild the Database Directories
Now, manually place the healthy metadata into the system directories:
Copy Profiles:
cp /tmp/var/db/esximg/profiles/* /var/db/esximg/profiles/Copy VIBs:
cp /tmp/var/db/esximg/vibs/* /var/db/esximg/vibs/Replace Bootbank File:
rm /bootbank/imgdb.tgzcp /tmp/imgdb.tgz /bootbank/
Step 4: Finalize and Persist
To ensure these changes survive a reboot, run the backup script:
/sbin/auto-backup.sh
Summary Table: Resolution Options
| Option | Effort | Risk | When to use |
| Rebuild Host | High | Low | If you don’t have a matching “known good” host. |
| Manual File Copy | Low | Medium | When you need a fast fix and have a twin host available. |
Forgot Your ESXi Root Password? Reset It Without Reinstalling (vCenter Hack) | Lazy Admin Blog

We’ve all been there. You go to log into the DCUI or SSH into a host only to find the root password doesn’t work, and nobody documented the change.
According to VMware’s official stance, the only “supported” way to recover is a complete wipe and reinstall. But if your host is still managed by vCenter and you have Enterprise Plus licensing, there is a “lazy” (and highly effective) way out using Host Profiles.
How it works
When a host is added to vCenter, a special user called vpxa is created with full root privileges. We can use this existing “backdoor” to push a new configuration to the host, effectively overwriting the lost root password.
Step-by-Step Recovery
1. Extract the Profile
Right-click the “locked” host in the vSphere Web Client. Navigate to All vCenter Actions > Host Profiles > Extract Host Profile. Follow the wizard to create a template of that specific host’s configuration.
2. Edit the Security Settings
Go to Home > Host Profiles (under Management). Right-click your new profile and select Edit.
- Expand Security and Services.
- Expand Security Settings.
- Click on Security Configuration.
- In the dropdown, select: “Configure a fixed administrator password”.
- Enter and confirm your new root password.
3. Attach and Remediate
- Go back to Hosts and Clusters, right-click the host, and select Host Profiles > Attach Host Profile. Select the one you just edited.
- Maintenance Mode: You must put the host into Maintenance Mode.
- Remediate: Right-click the host again, select Host Profiles > Remediate. If you skip Maintenance Mode, vSphere will block the operation.
4. Finish
Once the remediation task completes, the host will reboot. Your new root password is now active!
Important Limitations
- Licensing: This requires Enterprise Plus. Standard or Essentials kits do not include Host Profiles.
- Connectivity: The host must be currently “Connected” in vCenter. If the management agent has crashed or the host is “Not Responding,” this method will not work.
The “Lazy Admin” Verdict
Reinstalling an ESXi host means reconfiguring networking, storage, and scratch partitions. Using a Host Profile takes about 10 minutes and keeps your uptime (and sanity) intact.
The Clean Exit: How to Safely Remove Storage Devices from ESXi | Lazy Admin Blog

In the world of storage, “unpresenting” a LUN is more than just a right-click. If you don’t follow the proper decommissioning workflow, ESXi will keep trying to talk to a ghost device, leading to host instability and long boot times.
Follow this definitive checklist and procedure to ensure your environment stays clean and APD-free.
The “Safe-to-Remove” Checklist
Before you even touch the unmount button, verify these 7 critical points:
- Evacuate Data: Move or unregister all VMs, snapshots, templates, and ISO images from the datastore.
- HA Heartbeats: Ensure the datastore is NOT being used for vSphere HA heartbeats.
- No Clusters: Remove the datastore from any Datastore Clusters or Storage DRS management.
- Coredump: Confirm the LUN isn’t configured as a diagnostic coredump partition.
- SIOC: Disable Storage I/O Control (SIOC) for the datastore.
- RDMs: If the LUN is an Raw Device Mapping, remove the RDM from the VM settings (select “Delete from disk” to kill the mapping file).
- Scratch Location: Ensure the host isn’t using this LUN for its persistent scratch partition.
Pro Tip: Check Scratch Location via PowerCLI
Use this script to verify your scratch config across a cluster:
$cluster = "YourClusterName"foreach ($esx in Get-Cluster $cluster | Get-VMHost) { Get-VMHostAdvancedConfiguration -VMHost $esx -Name "ScratchConfig.ConfiguredScratchLocation"}
Step 1: Identify your NAA ID
You need the unique Network Address Authority (NAA) ID to ensure you are pulling the right plug.
- Via GUI: Check the Properties window of the datastore.
- Via CLI: Run
esxcli storage vmfs extent list
Step 2: The Unmount & Detach Workflow
1. Unmount the File System
In the Configuration tab > Storage, right-click the datastore and select Unmount. If you are doing this for multiple hosts, use the Datastores view (Ctrl+Shift+D) to unmount from the entire cluster at once.
2. Detach the Device (The Most Important Step)
Unmounting removes the “logical” access, but Detaching tells the kernel to stop looking for the “physical” device.
- Switch to the Devices view.
- Right-click the NAA ID and select Detach.
- The state should now show as Unmounted.
Note: Detaching is a per-host operation. You must perform this on every host that has visibility to the LUN to avoid APD states.
Step 3: Cleanup the SAN & Host
Once the state is “Unmounted” across all hosts, you can safely unmap/unpresent the LUN from your SAN array.
Permanent Decommissioning
To prevent “ghost” entries from appearing in your detached list, run these commands on the host:
- List detached devices:
esxcli storage core device detached list - Remove the configuration permanently:
esxcli storage core device detached remove -d <NAA_ID>
vSphere Ports & Connections: The Infrastructure Roadmap | Lazy Admin Blog

In a locked-down enterprise environment, the “Any-to-Any” firewall rule is a myth. To manage ESXi effectively, you need to poke specific holes in your hardware and software firewalls.
The Core Management Ports
These are the “must-haves” for basic connectivity between vCenter, the vSphere Client, and the Host.
| Port | Protocol | Source | Destination | Purpose |
| 443 | TCP | Management Workstation | vCenter / ESXi | vSphere Client / SDK: The primary port for the Web Client and API access. |
| 902 | TCP/UDP | vCenter Server | ESXi Host | vCenter Agent (vpxa): vCenter uses this to send data to the host and receive heartbeats. |
| 902 | TCP | Management Workstation | ESXi Host | VM Console: Required to open the “Remote Console” (MKS) to a virtual machine. |
| 80 | TCP | vCenter / Workstation | ESXi Host | HTTP: Used for redirecting to 443 and for some legacy file downloads. |
Advanced Feature Ports
If you are using specific vSphere features like vMotion, HA, or specialized storage, you need these additional ports open:
1. vMotion (Live Migration)
- 8000 (TCP): Required for vMotion traffic.
- 2049 (TCP/UDP): If using NFS storage for the virtual disks.
2. vSphere High Availability (HA)
- 8182 (TCP/UDP): Used by the Fault Domain Manager (FDM) agent for inter-host communication and election of the master host.
3. Provisioning & Deployment
- 69 (UDP): TFTP, used for PXE booting ESXi for Auto Deploy.
- 4012 (TCP): Used by the Auto Deploy service.
4. Troubleshooting & Monitoring
- 22 (TCP): SSH access to the ESXi Shell.
- 161 / 162 (UDP): SNMP polling and traps for hardware monitoring.
Troubleshooting “Host Disconnected”
If your host shows as “Not Responding” in vCenter, check these three things in order:
- Ping: Can the vCenter server ping the ESXi management IP?
- Port 902: From the vCenter server, try to telnet to the host on port 902 (
telnet <host-ip> 902). If it fails, the heartbeat can’t get through. - DNS: VMware is extremely sensitive to DNS. Ensure forward and reverse lookups work for both the vCenter and the Host.
Lazy Admin Tip 💡
Don’t memorize every port! Use the VMware Ports and Protocols Tool (the official online matrix). It allows you to select your source and destination products and generates a custom firewall rule list for you.
A high resolution pdf can be downloaded here Connections and Ports in ESX and ESXi
#VMware #vSphere #Networking #SysAdmin #Firewall #DataCenter #ESXi #ITOps #LazyAdmin #Connectivity
The Master List: VMware ESXi Release and Build Number History (Updated 2026) | Lazy Admin Blog

Is your host up to date? Checking the “About” section in your vSphere Client is step one, but cross-referencing that number against this list is how you confirm if you’re on a General Availability (GA) release, an Update, or an Express Patch.
vSphere ESXi 9.0 (Latest)
The new generation of the hypervisor, optimized for AI workloads and DPUs.
| Name | Version | Release Date | Build Number |
| VMware ESXi 9.0.2 | 9.0.2 | 2026-01-20 | 25148080 |
| VMware ESXi 9.0.1 | 9.0.1 | 2025-09-29 | 24957450 |
| VMware ESXi 9.0 GA | 9.0 GA | 2025-06-17 | 24755225 |
vSphere ESXi 8.0
The enterprise workhorse for 2024-2026.
| Name | Version | Release Date | Build Number |
| VMware ESXi 8.0 Update 3 | 8.0 U3 | 2024-06-25 | 24022510 |
| VMware ESXi 8.0 Update 2 | 8.0 U2 | 2023-09-21 | 22380479 |
| VMware ESXi 8.0 Update 1 | 8.0 U1 | 2023-04-18 | 21495797 |
| VMware ESXi 8.0 GA | 8.0 GA | 2022-10-11 | 20513097 |
vSphere ESXi 7.0
Note: This version introduced the new Lifecycle Manager (vLCM).
| Name | Version | Release Date | Build Number |
| VMware ESXi 7.0 Update 3w | 7.0 U3w | 2025-09-29 | 24927030 |
| VMware ESXi 7.0 Update 3 | 7.0 U3 | 2021-10-05 | 18644231 |
| VMware ESXi 7.0 GA | 7.0 GA | 2020-04-02 | 15843807 |
vSphere ESXi 6.x Legacy (Archive)
| Name | Version | Release Date | Build Number |
| VMware ESXi 6.7 Update 3 | 6.7 U3 | 2019-08-20 | 14320388 |
| VMware ESXi 6.5 Update 3 | 6.5 U3 | 2019-07-02 | 13932383 |
| VMware ESXi 6.0 Update 1a | 6.0 U1a | 2015-10-06 | 3073146 |
| VMware ESXi 6.0 GA | 6.0 GA | 2015-03-12 | 2494585 |
How to Verify Your Build Number
If you aren’t at your desk and only have SSH access to the host, you can find your build number instantly with this command:
vmware -v
Example Output:
VMware ESXi 8.0.0 build-20513097
Lazy Admin Tip 💡
Always remember the vCenter Interoperability Rule: Your vCenter Server must always be at a build version equal to or higher than your ESXi hosts. If you patch your hosts to vSphere 9.0 while vCenter is still on 8.0, your hosts will show as “Not Responding” or “Disconnected.”
#VMware #vSphere9 #ESXi #SysAdmin #Virtualization #PatchManagement #DataCenter #LazyAdmin #BuildNumbers #ITOperations
Emergency Log Collection: Generating and Uploading ESXi Support Bundles | Lazy Admin Blog
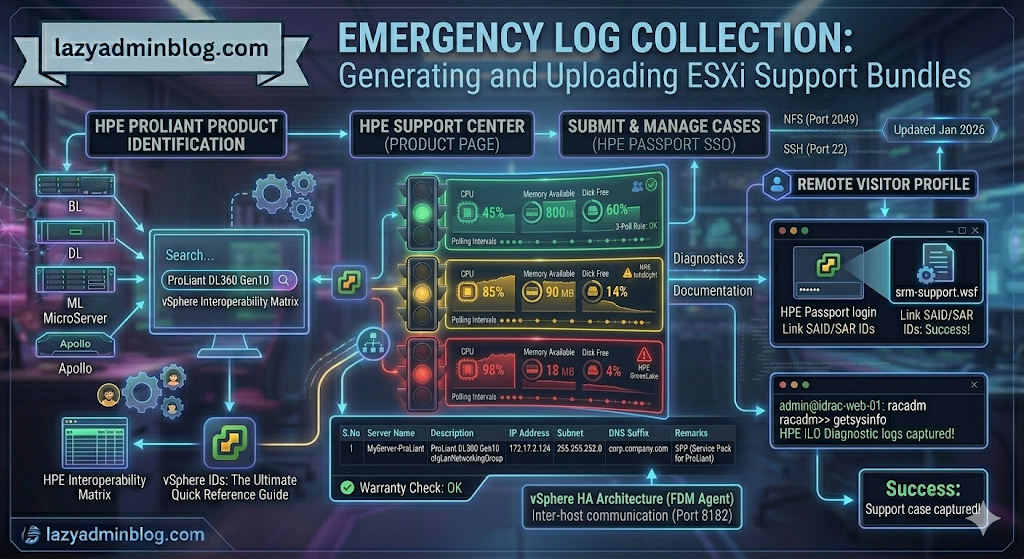
If you can’t generate a support bundle through vCenter, your best bet is the ESXi Shell. By running vm-support directly on the host, you bypass the management overhead and get your diagnostics faster.
Step 1: Generate Logs via SSH (CLI)
Before running the command, identify a datastore with at least 5-10GB of free space to store the compressed bundle.
- SSH into your ESXi host using Putty.
- Navigate to your chosen datastore:
cd /vmfs/volumes/YOUR_DATASTORE_NAME/ - Run the support command and redirect the output to a specific file name:Bash
vm-support -s > vm-support-HostName-$(date +%Y%m%d).tgz-sstands for “stream,” directing the output to the file you specified.- Tip: Using
$(date +%Y%m%d)automatically adds the current date to the filename.
- Once finished, use the vSphere Datastore Browser to download the
.tgzfile to your local workstation.
Step 2: Uploading to VMware via FileZilla
VMware provides a public FTP/SFTP landing zone for Support Requests (SR). While many admins use the browser, a dedicated client like FileZilla is much more reliable for large multi-gigabyte bundles.
Configure FileZilla for VMware
- Set Transfer Mode: Go to Transfer > Transfer type > Binary. This prevents file corruption during the upload.
- Open Site Manager: (File > Site Manager) and create a new site:
- Host:
ftpsite.vmware.com - Protocol: FTP (or SFTP if requested by support)
- Logon Type: Normal
- User:
inbound - Password:
inbound
- Host:
Navigating the Remote Site
- Connect to the server.
- Create your SR Folder: In the “Remote Site” pane, right-click and select Create Directory. Name it exactly after your 10-digit Support Request number (e.g.,
2612345678). - Upload: Locate your
.tgzbundle in the left pane (Local Site), right-click it, and select Upload.
Important Note: For security, the VMware FTP is “blind.” You will not see your files or folders once they are created/uploaded. Don’t panic if the directory looks empty after the transfer completes; as long as the transfer queue shows 100%, VMware has it.
#VMware #ESXi #Troubleshooting #SysAdmin #DataCenter #Virtualization #ITOps #FileZilla #LazyAdmin #TechTips