
SysAdmin
PowerShell: Mapping GPOs to their Linked Organizational Units

As an Active Directory environment grows, keeping track of where specific Group Policy Objects (GPOs) are linked becomes a significant challenge. The “Group Policy Management Console” (GPMC) is great for looking at one GPO at a time, but if you need a bird’s-eye view of your entire inheritance structure, you need automation.
This PowerShell script sweeps through all Organizational Units (OUs), identifies the unique GUIDs of linked policies, resolves those GUIDs into human-readable GPO names, and exports the mapping to a CSV file.
The PowerShell Script
Before running, create a folder at C:\temp\GroupPolicyandLinkedOU\. This script requires the Active Directory and Group Policy modules (included with RSAT).
# Initialize the output file with headers$Header = "GPO_Name;OU_Name;OU_DistinguishedName"$Path = "C:\temp\GroupPolicyandLinkedOU\out.csv"if (!(Test-Path "C:\temp\GroupPolicyandLinkedOU\")) { New-Item -ItemType Directory -Path "C:\temp\GroupPolicyandLinkedOU\" }$Header | Out-File $Path# Get all OUs with their linked GPO attributes$policies = Get-ADOrganizationalUnit -Filter * -Properties LinkedGroupPolicyObjects$policies | ForEach-Object { $OUName = $_.Name $OUDN = $_.DistinguishedName $LinkedGPOs = $_.LinkedGroupPolicyObjects foreach($LinkedGPO in $LinkedGPOs) { # Extract the GUID from the DistinguishedName string # String format is usually: cn={GUID},cn=policies,cn=system,DC=domain... $GUID = $LinkedGPO.Split(",")[0].Replace("cn={","").Replace("}","").Replace("CN={","") try { # Resolve the GUID to a friendly Display Name $GPO = Get-GPO -Guid $GUID $msg = "$($GPO.DisplayName);$OUName;$OUDN" # Output to console and file Write-Host "Mapped: $($GPO.DisplayName) -> $OUName" -ForegroundColor Cyan $msg | Out-File $Path -Append } catch { Write-Warning "Could not resolve GPO GUID: $GUID linked at $OUName" } }}
How it Works
- LinkedGroupPolicyObjects Property: The script looks at the raw attribute on the OU object. In Active Directory, links aren’t stored as names; they are stored as the DistinguishedName of the GPO container, which includes the GUID.
- String Manipulation: The script uses
.Splitand.Replaceto strip away the LDAP syntax, leaving only the raw GUID string. - Get-GPO -Guid: This cmdlet takes that raw ID and queries the domain for the actual GPO metadata, allowing us to retrieve the DisplayName.
- Semicolon Delimited: The output uses
;as a delimiter. When opening the file in Excel, you can easily use “Text to Columns” to separate the data into clean fields.
Why Use This Script?
- Inheritance Audits: Quickly see if a legacy GPO is linked to an OU it shouldn’t be.
- Troubleshooting: If a user is getting a strange setting, you can search the CSV for their OU and see every policy applied.
- Clean-up: Identify “ghost” links—SIDs/GUIDs that remain linked to an OU even though the GPO itself has been deleted.
#PowerShell #ActiveDirectory #GroupPolicy #SysAdmin #WindowsServer #ITAutomation #LazyAdmin #TechTips #ITPro #Infrastructure
PowerShell: Resolve Bulk IP Addresses to Hostnames

When you’re dealing with a large list of IP addresses from a firewall log or a network scan, manually running nslookup is not an option. You need a fast, automated way to perform a reverse DNS lookup to identify the devices on your network.
This script leverages the .NET [System.Net.Dns] class to perform high-speed lookups, converting a simple text file of IPs into a comma-separated list of hostnames.
The PowerShell Script
Save the code below as ResolveIPs.ps1. Create a file named hosts.txt in the same folder and paste your IP addresses (one per line).
PowerShell
# Get list from file, initialize empty array$ListOfIPs = Get-Content ".\hosts.txt"$ResultList = @()# Roll through the list, resolving with the .NET DNS resolverforeach ($IP in $ListOfIPs) { # Suppress errors for IPs that don't resolve $ErrorActionPreference = "silentlycontinue" $Result = $null # Status update for the user Write-Host "Resolving $IP..." -ForegroundColor Cyan # Pass the current IP to .NET for name resolution $Result = [System.Net.Dns]::GetHostEntry($IP) # Add results to the list if ($Result) { $ResultList += "$IP," + [string]$Result.HostName } else { $ResultList += "$IP,unresolved" }}# Export to file and notify completion$ResultList | Out-File .\resolved.txtWrite-Host "Name resolution complete! Check .\resolved.txt" -ForegroundColor Green
How it Works
[System.Net.Dns]::GetHostEntry($IP): This is the heart of the script. It queries your configured DNS servers for a Pointer (PTR) record associated with the IP address.- Error Action Silencing: Since it’s common for some IPs (like guest devices or unmanaged switches) to lack DNS records, we use
silentlycontinueto prevent the red error text from cluttering your console. - Array Building: The script creates a simple “IP,Hostname” format, which can easily be renamed to
.csvand opened in Excel for further analysis.
💡 Lazy Admin Tips
- DNS Suffixes: Ensure your machine has the correct DNS search suffixes configured. If the script only returns short names and you need FQDNs (Fully Qualified Domain Names), check your network adapter settings.
- Speed: The
.NETmethod used here is generally faster than the standardResolve-DnsNamecmdlet when dealing with large batches of legacy records. - Check Your PTRs: If the script returns “unresolved” for IPs you know are active, it’s a sign that your Reverse Lookup Zones in AD DNS might be missing records or need scavenging.
#PowerShell #Networking #DNS #SysAdmin #WindowsServer #Automation #ITPro #LazyAdmin #NetworkSecurity #TechTips
VBScript: Batch Audit Service Status Across Multiple Windows Servers

Keeping track of critical services—like SQL, IIS, or Print Spooler—across a large server farm is a common headache for admins. While PowerShell is the modern go-to, many legacy environments and specific automation workflows still rely on the reliability of VBScript and WMI (Windows Management Instrumentation).
This script allows you to pull a full inventory of every service on a list of servers, including their start mode (Automatic/Manual), current state (Running/Stopped), and the Service Account being used.
Prerequisites & Setup
- Create the workspace: Create a folder named
C:\Temp\ServiceDetails. - The Server List: Create a file named
Servers.txtin that folder. List your server names or IP addresses, one per line. - Permissions: You must run this script from an account that has Local Administrator rights on all target servers to query WMI.
The VBScript Solution
Save the code below as ServiceDetails.vbs in your C:\Temp\ServiceDetails folder.
' --- START OF SCRIPT ---ServerList = "C:\Temp\ServiceDetails\Servers.txt"arrServices = Array("") ' Leave empty to get all servicesDim objFSO : Set objFSO = CreateObject("Scripting.FileSystemObject")Dim objOut : Set objOut = objFSO.CreateTextFile("C:\Temp\ServiceDetails\ServiceQuery.csv")arrComputers = Split(objFSO.OpenTextFile(ServerList).ReadAll, vbNewLine) ' Write CSV HeadersObjOut.WriteLine "SERVER, SERVICE DISPLAY NAME, SERVICE STARTMODE, SERVICE STATUS, SERVICE ACCOUNT"For Each strComputer In arrComputers If Trim(strComputer) <> "" Then strAlive = IsAlive(strComputer) objFound = 0 If strAlive = "Alive" Then On Error Resume Next Set objWMIService = GetObject("winmgmts:\\" & strComputer & "\root\CIMV2") If Err.Number <> 0 Then ObjOut.WriteLine strComputer & ", WMI ERROR, N/A, N/A, N/A" Err.Clear Else Set colItems = objWMIService.ExecQuery("SELECT * FROM Win32_Service") For Each objItem In colItems ObjOut.WriteLine strComputer & "," & objItem.DisplayName & "," & objItem.StartMode & "," & objItem.State & "," & objItem.StartName objFound = 1 Next End If Else ObjOut.WriteLine strComputer & "- UnResolved, N/A, N/A, N/A, N/A" End If End IfNextobjOut.CloseMsgBox "Service Export Complete!", 64, "LazyAdmin Notification"' Function to Ping the server before attempting WMI connectionFunction IsAlive(strComputer) Set WshShell = WScript.CreateObject("WScript.Shell") Set objExecObject = WshShell.Exec("%comspec% /c ping -n 1 -w 500 " & strComputer) strText = objExecObject.StdOut.ReadAll() If Instr(strText, "Reply from") > 0 Then IsAlive = "Alive" Else IsAlive = "Dead" End If End Function
How it Works
- WMI (Win32_Service): The script connects to the
root\CIMV2namespace on the remote machine to query theWin32_Serviceclass. This is the same data you see inservices.msc. - The Ping Check: Before trying to connect (which can be slow if a server is down), the
IsAlivefunction pings the host. This significantly speeds up the script if you have offline servers in your list. - CSV Output: All data is appended to a
.csvfile, making it ready for a pivot table in Excel to find services running under old service accounts or identifying disabled critical services.
#SysAdmin #WindowsServer #VBScript #WMI #ITAutomation #ServerManagement #TechTips #LazyAdmin #Infrastructure #ITAudit
PowerShell Script: Quickly Convert SIDs to Usernames

Have you ever looked at a security log or a orphaned folder permission and seen a string like S-1-5-21-3623811015-3361044348-30300820-1013? Those are SIDs (Security Identifiers). While they are great for the Windows OS, they are nearly impossible for humans to read.
If you have a list of these SIDs from an audit or a log file, you don’t have to look them up one by one. This PowerShell script will take a bulk list of SIDs and “translate” them into readable Usernames (UIDs).
The PowerShell Script
Save this script as SIDtoUID.ps1. It uses the .NET SecurityIdentifier class to perform the translation locally or against your Active Directory domain.
# Create or clear the output fileOut-File UID.txt# Loop through each SID in the source text fileforeach ($SID in (Get-Content SID.txt)){ # Create a SID object $objSID = New-Object System.Security.Principal.SecurityIdentifier ($SID) Try { # Attempt to translate the SID to an NT Account name $objUser = $objSID.Translate( [System.Security.Principal.NTAccount]) # Append the Username to the output file $objUser.Value >> UID.txt Write-Host "Translated: $SID -> $($objUser.Value)" -ForegroundColor Green } Catch { # If translation fails (e.g., deleted account), keep the original SID $SID >> UID.txt Write-Warning "Failed to translate: $SID" }}
How to Use It
- Create your input: Create a file named
SID.txtin the same folder as the script. Paste your SIDs there, one per line. - Run the script: Open PowerShell and execute
.\SIDtoUID.ps1. - Check your results: A new file named
UID.txtwill appear, containing the translated usernames in the same order as your original list.
Why do SIDs sometimes fail to translate?
In the Catch block of the script, we tell PowerShell to just output the original SID if it can’t find a match. This usually happens for two reasons:
- Deleted Accounts: The user or group no longer exists in Active Directory, leaving behind an “orphaned” SID.
- Connectivity: Your machine cannot reach the Domain Controller to perform the lookup.
#PowerShell #ActiveDirectory #SysAdmin #ITPro #CyberSecurity #WindowsServer #Automation #LazyAdmin #TechTips #ITAudit
Automating Active Directory: Export All AD Groups and Members to CSV

Auditing Active Directory groups is a fundamental part of identity management. Whether you are performing a quarterly security review or preparing for a domain migration, knowing exactly who is in which group—and what the scope of those groups is—is essential.
This PowerShell script does more than just list group names; it iterates through every group in your domain, identifies the members (skipping disabled users to keep your data clean), and exports everything into a dated CSV file.
The PowerShell Script
Save this script as ADGroupsExport.ps1 in C:\Temp\ExportADgroups. Ensure you are running this from a machine with the RSAT (Remote Server Administration Tools) installed and logged in with a domain account that has read permissions.
# Get year and month for the filename$DateTime = Get-Date -f "yyyy-MM"# Set CSV file destination$CSVFile = "C:\Temp\ExportADgroups\AD_Groups_"+$DateTime+".csv"if (!(Test-Path "C:\Temp\ExportADgroups")) { New-Item -ItemType Directory -Path "C:\Temp\ExportADgroups" }$CSVOutput = @()# Fetch all AD groups$ADGroups = Get-ADGroup -Filter *$i = 0$tot = $ADGroups.countforeach ($ADGroup in $ADGroups) { $i++ $status = "{0:N0}" -f ($i / $tot * 100) Write-Progress -Activity "Exporting AD Groups" -status "Processing Group $i of $tot : $status% Completed" -PercentComplete ($i / $tot * 100) $Members = "" # Fetch members and filter for enabled objects $MembersArr = Get-ADGroup $ADGroup.DistinguishedName -Properties Member | Select-Object -ExpandProperty Member if ($MembersArr) { foreach ($Member in $MembersArr) { $ADObj = Get-ADObject -Filter "DistinguishedName -eq '$Member'" -Properties Enabled # Skip disabled users to keep the report relevant if ($ADObj.ObjectClass -eq "user" -and $ADObj.Enabled -eq $false) { continue } $Members = $Members + "," + $ADObj.Name } if ($Members) { $Members = $Members.Substring(1) } } # Create ordered hash table for clean CSV columns $HashTab = [ordered]@{ "Name" = $ADGroup.Name "Category" = $ADGroup.GroupCategory "Scope" = $ADGroup.GroupScope "Members" = $Members } $CSVOutput += New-Object PSObject -Property $HashTab}# Sort by name and export$CSVOutput | Sort-Object Name | Export-Csv $CSVFile -NoTypeInformationWrite-Host "Export Complete: $CSVFile" -ForegroundColor Green
Key Features of this Script
- Progress Bar: Since large domains can take a long time to process, the
Write-Progressbar gives you a real-time percentage of the completion. - Clean Membership Lists: The script concatenates all members into a single “Members” column, separated by commas, making it easy to read in Excel.
- Disabled User Filtering: It intelligently checks the
Enabledstatus of user objects. If a user is disabled, they are omitted from the report to focus on active security risks. - Scope & Category: Clearly identifies if a group is Security vs. Distribution and Global vs. Universal.
#ActiveDirectory #PowerShell #SysAdmin #ITAutomation #WindowsServer #IdentityManagement #LazyAdmin #TechTips #Reporting #CyberSecurity
Mapping Your AD: VBScript to List OUs in Parent-Child Order | Lazy Admin Blog

When you’re managing a complex Active Directory environment, getting a clear “birds-eye view” of your structure is essential. While the Active Directory Users & Computers (dsa.msc) snap-in is great for manual navigation, sometimes you need a flat text output that preserves the visual hierarchy of your Organizational Units (OUs).
The following VBScript crawls your LDAP directory and mirrors the parent-child nesting you see in your GUI tools.
📜 The Script: ListAllOUs_ParentChild.vbs
Copy the code below and save it as ListAllOUs_ParentChild.vbs.
Option ExplicitConst ADS_SCOPE_SUBTREE = 2Dim ObjConn, ObjRS, ObjRootDSEDim StrSQL, StrDomName, ObjOU' Get the local domain nameSet ObjRootDSE = GetObject("LDAP://RootDSE")StrDomName = Trim(ObjRootDSE.Get("DefaultNamingContext"))Set ObjRootDSE = Nothing' SQL Query to find OUs (Excluding Domain Controllers)StrSQL = "Select Name, ADsPath From 'LDAP://" & StrDomName & "' Where ObjectCategory = 'OrganizationalUnit' And Name <> 'Domain Controllers'"Set ObjConn = CreateObject("ADODB.Connection")ObjConn.Provider = "ADsDSOObject"ObjConn.Open "Active Directory Provider"Set ObjRS = CreateObject("ADODB.Recordset")ObjRS.Open StrSQL, ObjConnIf Not ObjRS.EOF Then ObjRS.MoveLast: ObjRS.MoveFirst WScript.Echo vbNullString WScript.Echo "Total OU: " & Trim(ObjRS.RecordCount) WScript.Echo "===================" WScript.Echo vbNullString While Not ObjRS.EOF Set ObjOU = GetObject(Trim(ObjRS.Fields("ADsPath").Value)) ' Check if it's a top-level Parent OU If StrComp(Right(Trim(ObjOU.Parent), Len(Trim(ObjOU.Parent)) - 7), StrDomName, VbTextCompare) = 0 Then WScript.Echo "Parent OU: " & Trim(ObjRS.Fields("Name").Value) GetChild(ObjOU) End If ObjRS.MoveNext Set ObjOU = Nothing WendEnd IfObjRS.Close: Set ObjRS = NothingObjConn.Close: Set ObjConn = Nothing' Subroutine to find first-level childrenPrivate Sub GetChild(ThisObject) Dim ObjChild For Each ObjChild In ThisObject If StrComp(Trim(ObjChild.Class), "OrganizationalUnit", VbTextCompare) = 0 Then WScript.Echo vbTab & ">> Child OU: " & Right(Trim(ObjChild.Name), Len(Trim(ObjChild.Name)) - 3) GetGrandChild (ObjChild.ADsPath) End If NextEnd Sub' Recursive subroutine to find all nested childrenPrivate Sub GetGrandChild (ThisADsPath) Dim ObjGrand, ObjItem Set ObjGrand = GetObject(ThisADsPath) For Each ObjItem In ObjGrand If StrComp(Trim(ObjItem.Class), "OrganizationalUnit", VbTextCompare) = 0 Then WScript.Echo vbTab & vbTab & ">> Child OU: " & Right(Trim(ObjItem.Name), Len(Trim(ObjItem.Name)) - 3) GetGrandChild Trim(ObjItem.ADsPath) End If Next Set ObjGrand = NothingEnd Sub
🚀 How to Execute
To run this script correctly and avoid “Windows Script Host” popup boxes for every line, you must use the command-line engine (CScript).
Example Command: CScript /NoLogo ListAllOUs_ParentChild.vbs
Output Preview:
Parent OU: Sales
Child OU: North_Region
Child OU: South_Region
>> Child OU: Retail_Stores
#ActiveDirectory #SysAdmin #WindowsServer #Automation #VBScript #ITAdmin #LazyAdmin #LDAP #DirectoryServices #InfrastructureAsCode #Scripting #ADUC
Automation: Bulk Create and Delete VM Snapshots Across Linked vCenters | Lazy Admin Blog

In a large environment, taking snapshots before a major patch or application update is a standard safety net. But if you have servers spread across multiple vCenters in Linked Mode (e.g., Datacenter1 and Datacenter2), clicking through the vSphere Client is a waste of time.
Today, I’m sharing a “Lazy Admin” script that allows you to bulk create, check, and remove snapshots using a simple CSV list.
Prerequisites
- VMware PowerCLI: Ensure the PowerCLI module is installed on the machine running the script.
- CSV Setup: Create a file named
snapshot_servers.csvinC:\Temp\VMSnapshots\.
The CSV should look like this: | Host | Location | | :— | :— | | Server01 | Datacenter1 | | Server02 | Datacenter2 |
Part 1: Creating Snapshots
- Open PowerShell ISE with vCenter Administrator credentials.
- Load the functions by running the full script (provided below).
- Run the following command:
Create-VMSnapshots -SS_CSV "C:\Temp\VMSnapshots\snapshot_servers.csv" -SS_Name "Pre-Patching" -SS_Description "Requested by App Team"
The script will iterate through your CSV and create snapshots sequentially. You can monitor the progress in the vSphere Tasks console.
Part 2: Deleting Snapshots
Once your changes are verified, don’t let those snapshots linger and bloat your datastores! To remove them:
- Use the same
snapshot_servers.csvlist. - Run the following command:
Remove-VMSnapshots -SS_CSV "C:\Temp\VMSnapshots\snapshot_servers.csv"
Note: This is a sequential script; it will wait for one snapshot removal to finish before moving to the next to avoid pinning your storage I/O.
The Script: VMSnapshots.ps1
Save this code to C:\Temp\VMSnapshots\VMSnapshots.ps1.
function Create-VMSnapshots { param ( [string]$SS_CSV = $(Read-Host "Enter path to CSV"), [string]$SS_Name = $(Read-Host "Enter name for snapshots"), [string]$SS_Description = $(Read-Host "Enter description for snapshots") ) # Import VMware PowerCLI Module If ( !(Get-Module -Name VMware.VimAutomation.Core -ErrorAction SilentlyContinue) ) { import-module VMware.VimAutomation.Core } $Servers = Import-CSV $SS_CSV $WLM_vCenter = Connect-VIServer vCenter1 -WarningAction SilentlyContinue $EDN_vCenter = Connect-VIServer vCenter2 -WarningAction SilentlyContinue ForEach($Server in $Servers){ If($Server.Location -eq 'Datacenter1'){ New-Snapshot -VM $Server.Host -Name $SS_Name -Description $SS_Description -Quiesce -Server $WLM_vCenter -WarningAction SilentlyContinue } ElseIf($Server.Location -eq 'Datacenter2'){ New-Snapshot -VM $Server.Host -Name $SS_Name -Description $SS_Description -Quiesce -Server $EDN_vCenter -WarningAction SilentlyContinue } } }function Check-VMSnapshots { param ( [string]$SS_CSV = $(Read-Host "Enter path to CSV"), [string]$SS_Name = $(Read-Host "Enter snapshot name") ) # Import VMware PowerCLI Module If ( !(Get-Module -Name VMware.VimAutomation.Core -ErrorAction SilentlyContinue) ) { import-module VMware.VimAutomation.Core } $Servers = Import-CSV $SS_CSV $WLM_vCenter = Connect-VIServer vCenter1 -WarningAction SilentlyContinue $EDN_vCenter = Connect-VIServer vCenter2 -WarningAction SilentlyContinue ForEach($Server in $Servers){ If($Server.Location -eq 'Datacenter1'){ Get-Snapshot -VM $Server.Host -Name $SS_Name -Server $WLM_vCenter | Select VM, Name, @{ n="SpaceUsedGB"; e={[math]::round( $_.SizeGB )}} -WarningAction SilentlyContinue } ElseIf($Server.Location -eq 'Datacenter2'){ Get-Snapshot -VM $Server.Host -Name $SS_Name -Server $EDN_vCenter | Select VM, Name, @{ n="SpaceUsedGB"; e={[math]::round( $_.SizeGB )}} -WarningAction SilentlyContinue } } } function Remove-VMSnapshots { param ( [string]$SS_CSV = $(Read-Host "Enter path to CSV") ) # Import VMware PowerCLI Module If ( !(Get-Module -Name VMware.VimAutomation.Core -ErrorAction SilentlyContinue) ) { import-module VMware.VimAutomation.Core } $Servers = Import-CSV $SS_CSV $WLM_vCenter = Connect-VIServer vCenter1 -WarningAction SilentlyContinue $EDN_vCenter = Connect-VIServer vCenter2 -WarningAction SilentlyContinue ForEach($Server in $Servers){ If($Server.Location -eq 'Datacenter1'){ Get-Snapshot $Server.Host -Server $WLM_vCenter | Remove-Snapshot -Confirm:$false -WarningAction SilentlyContinue } ElseIf($Server.Location -eq 'Datacenter2'){ Get-Snapshot $Server.Host -Server $EDN_vCenter | Remove-Snapshot -Confirm:$false -WarningAction SilentlyContinue } } }
Guide to the Entra ID Passkey Rollout (March 2026) | Lazy Admin Blog

How to avoid 500 helpdesk tickets by spending 10 minutes in the Admin Center today.
If you woke up this morning to find a new “Default Passkey Profile” in your Entra tenant, don’t panic. Microsoft is officially “encouraging” (read: forcing) the world toward phishing-resistant auth. As a Lazy Admin, your goal isn’t to fight the change—it’s to control it so it doesn’t control your weekend.
1. The Big Change: Passkey Profiles
Previously, FIDO2 was a simple “On/Off” switch. Now, we have Passkey Profiles.
- The Default Behavior: If you didn’t opt-in, Microsoft has created a “Default Profile” for you.
- The Trap: If you had “Enforce Attestation” set to No, Microsoft is now allowing Synced Passkeys (iCloud Keychain, Google Password Manager). This means users can put corporate credentials on their personal iPhones.
2. The “Lazy” Strategy: Tiered Security
Don’t treat your CEO and your Summer Intern the same way. Use the new Group-Based Profiles to save yourself the headache of “One Size Fits None.”
| User Group | Recommended Profile | Why? |
| IT Admins | Device-Bound Only | Requires a physical YubiKey or Windows Hello. No syncing to the cloud. |
| Standard Users | Synced & Device-Bound | Maximum convenience. If they lose their phone, iCloud/Google restores the key. Zero helpdesk calls. |
| Contractors | AAGUID Restricted | Only allow specific hardware models you’ve issued to them. |
3. Avoid the “Registration Deadlock”
Many admins are seeing “Helpdesk Hell” because their Conditional Access (CA) policies are too strict.
The Problem: You have a policy requiring “Phishing-Resistant MFA” to access “All Apps.” A user tries to register a passkey, but they can’t log in to the registration page because… they don’t have a passkey yet.
The Lazy Fix: Exclude the “Register security information” user action from your strictest CA policies, or better yet, issue a Temporary Access Pass (TAP) for 24 hours. A TAP satisfies the MFA requirement and lets them onboard themselves without calling you.
🛠️ The 5-Minute “Lazy Admin” Checklist
- [ ] Check your Attestation: Go to Security > Authentication Methods > Passkey (FIDO2). If you want to block personal iPhones, set Enforce Attestation to Yes.
- [ ] Kill the Nudges: If you aren’t ready for the rollout, disable the “Microsoft-managed” registration campaigns before they start bugging your users on Monday.
- [ ] Review AAGUIDs: If you only use YubiKeys, make sure their AAGUIDs are explicitly whitelisted in your Admin profile.
Bottom Line: Spend 10 minutes setting up your profiles today, or spend 10 hours resetting MFA sessions next week. Choose wisely.
EVC Mode & CPU Compatibility FAQ | Lazy Admin Blog

You’ve just unboxed a shiny new host with the latest Intel or AMD processor, but your current cluster is running hardware from three years ago. You try to vMotion a VM, and vSphere gives you the dreaded “CPU Incompatibility” error.
Enter Enhanced vMotion Compatibility (EVC). Here’s everything you need to know to get your mixed-hardware cluster working without the headache.
What exactly is EVC?
Think of EVC as a “lowest common denominator” filter for your CPUs. It masks the advanced features of newer processors so that every host in the cluster appears to have the exact same instruction set. This allows VMs to live-migrate between old and new hardware because the “view” of the CPU never changes.
Quick FAQ
Q: Can I mix Intel and AMD in the same EVC cluster? A: No. EVC only works within a single vendor family. You can mix different generations of Intel, or different generations of AMD, but you cannot vMotion between the two brands.
Q: Will EVC slow down my new servers? A: Technically, yes—but rarely in a way you’ll notice. It hides new instructions (like specialized encryption or AI math sets), but the raw clock speed and core count of your new CPUs are still fully utilized. Most general-purpose VMs don’t use the high-end instructions being masked.
Q: Do I need to power off VMs to enable EVC? A: It depends:
- Enabling on an empty cluster: No downtime.
- Enabling on a cluster where VMs are already running on the oldest host: Usually no downtime.
- Enabling on a cluster where VMs are running on newer hosts: You must power off those VMs so they can “re-boot” with the masked CPU instructions.
Q: What is “Per-VM EVC”? A: Introduced in vSphere 6.7, this allows you to set the EVC mode on the VM itself rather than the whole cluster. This is a lifesaver for migrating VMs across different vCenters or into the Cloud (like AWS/Azure).
How to Find Your Correct EVC Mode
Don’t guess. Use the official tool:
- Go to the VMware Compatibility Guide (CPU/EVC Matrix).
- Select your ESXi version.
- Select the CPU models of your oldest and newest hosts.
- The tool will tell you the highest supported “Baseline” you can use.
Step-by-Step: Enabling EVC on an Existing Cluster
- Select your Cluster in vCenter.
- Go to Configure > VMware EVC.
- Click Edit.
- Select Enable EVC for Intel/AMD hosts.
- Choose the Baseline that matches your oldest host.
- Validation: vCenter will check if any running VMs are currently using features above that baseline. If they are, you’ll need to shut them down before you can save the settings.
Summary Table: EVC Baselines
| If your oldest host is… | Use this EVC Mode |
| Intel Ice Lake | Intel “Ice Lake” Generation |
| Intel Cascade Lake | Intel “Cascade Lake” Generation |
| AMD EPYC Rome | AMD EPYC “Rome” Generation |
Lost Your VM? How to Find Its ESXi Host from the Guest OS | Lazy Admin Blog
It’s a classic “Ghost in the Machine” scenario: You can RDP or SSH into a virtual machine, but you can’t find it in vCenter. Maybe it’s a massive environment with thousands of VMs, maybe the naming convention doesn’t match, or maybe you’re dealing with a rogue host that isn’t even in your main cluster.
If VMware Tools is installed and running, the VM actually knows exactly where it lives. You just have to ask it nicely through the Command Prompt.
The Magic Tool: vmtoolsd.exe
On Windows VMs, the VMware Tools service includes a CLI utility called vmtoolsd.exe. This tool can query the hypervisor for specific environment variables that are passed down to the guest.
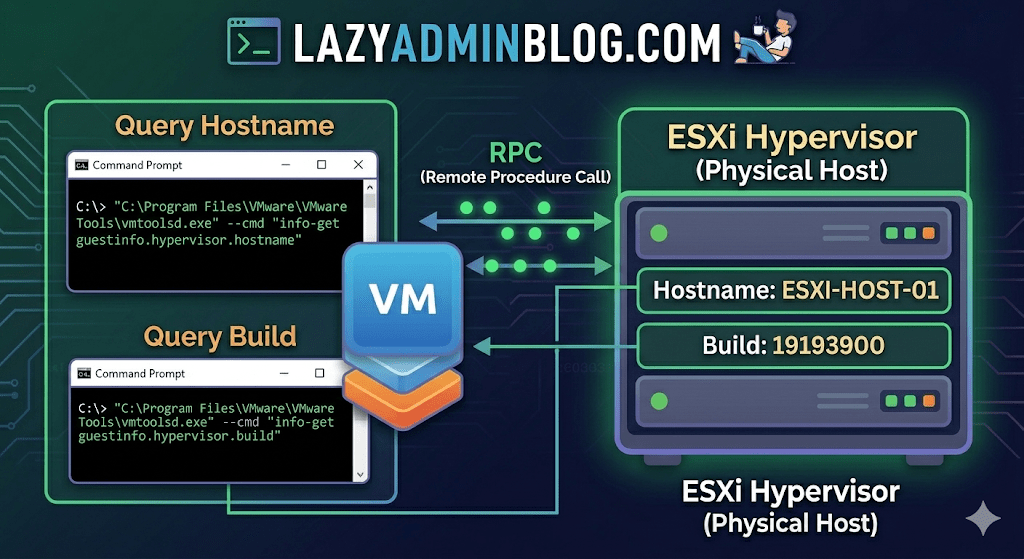
1. Find the ESXi Hostname
If you need to know which physical server is currently crunching the cycles for your VM, run this command:
"C:\Program Files\VMware\VMware Tools\vmtoolsd.exe" --cmd "info-get guestinfo.hypervisor.hostname"
2. Get the ESXi Build Details
Need to know if the underlying host is patched or running an ancient version of ESXi? Query the build number:
"C:\Program Files\VMware\VMware Tools\vmtoolsd.exe" --cmd "info-get guestinfo.hypervisor.build"
Why is this useful?
- vCenter Search is failing: Sometimes the inventory search index gets corrupted, and “Name contains” returns nothing.
- Nested Environments: If you are running VMs inside VMs, this helps you verify which layer of the onion you are currently on.
- Troubleshooting Performance: If a VM is lagging, you can quickly identify the host to check for hardware alerts or CPU contention without leaving the OS.
What if I’m on Linux?
The same logic applies! Most modern Linux distributions use open-vm-tools. You can run the same query via the terminal:
vmtoolsd --cmd "info-get guestinfo.hypervisor.hostname"
Important Requirement: Guest RPC
For these commands to work, the VM must have VMware Tools installed and the guestinfo variables must be accessible. In some hardened environments, admins might disable these RPC (Remote Procedure Call) queries in the .vmx file for security reasons, but in 95% of standard builds, this will work out of the box.