
Troubleshooting
PowerShell: Resolve Bulk IP Addresses to Hostnames

When you’re dealing with a large list of IP addresses from a firewall log or a network scan, manually running nslookup is not an option. You need a fast, automated way to perform a reverse DNS lookup to identify the devices on your network.
This script leverages the .NET [System.Net.Dns] class to perform high-speed lookups, converting a simple text file of IPs into a comma-separated list of hostnames.
The PowerShell Script
Save the code below as ResolveIPs.ps1. Create a file named hosts.txt in the same folder and paste your IP addresses (one per line).
PowerShell
# Get list from file, initialize empty array$ListOfIPs = Get-Content ".\hosts.txt"$ResultList = @()# Roll through the list, resolving with the .NET DNS resolverforeach ($IP in $ListOfIPs) { # Suppress errors for IPs that don't resolve $ErrorActionPreference = "silentlycontinue" $Result = $null # Status update for the user Write-Host "Resolving $IP..." -ForegroundColor Cyan # Pass the current IP to .NET for name resolution $Result = [System.Net.Dns]::GetHostEntry($IP) # Add results to the list if ($Result) { $ResultList += "$IP," + [string]$Result.HostName } else { $ResultList += "$IP,unresolved" }}# Export to file and notify completion$ResultList | Out-File .\resolved.txtWrite-Host "Name resolution complete! Check .\resolved.txt" -ForegroundColor Green
How it Works
[System.Net.Dns]::GetHostEntry($IP): This is the heart of the script. It queries your configured DNS servers for a Pointer (PTR) record associated with the IP address.- Error Action Silencing: Since it’s common for some IPs (like guest devices or unmanaged switches) to lack DNS records, we use
silentlycontinueto prevent the red error text from cluttering your console. - Array Building: The script creates a simple “IP,Hostname” format, which can easily be renamed to
.csvand opened in Excel for further analysis.
💡 Lazy Admin Tips
- DNS Suffixes: Ensure your machine has the correct DNS search suffixes configured. If the script only returns short names and you need FQDNs (Fully Qualified Domain Names), check your network adapter settings.
- Speed: The
.NETmethod used here is generally faster than the standardResolve-DnsNamecmdlet when dealing with large batches of legacy records. - Check Your PTRs: If the script returns “unresolved” for IPs you know are active, it’s a sign that your Reverse Lookup Zones in AD DNS might be missing records or need scavenging.
#PowerShell #Networking #DNS #SysAdmin #WindowsServer #Automation #ITPro #LazyAdmin #NetworkSecurity #TechTips
VBScript: Batch Audit Service Status Across Multiple Windows Servers

Keeping track of critical services—like SQL, IIS, or Print Spooler—across a large server farm is a common headache for admins. While PowerShell is the modern go-to, many legacy environments and specific automation workflows still rely on the reliability of VBScript and WMI (Windows Management Instrumentation).
This script allows you to pull a full inventory of every service on a list of servers, including their start mode (Automatic/Manual), current state (Running/Stopped), and the Service Account being used.
Prerequisites & Setup
- Create the workspace: Create a folder named
C:\Temp\ServiceDetails. - The Server List: Create a file named
Servers.txtin that folder. List your server names or IP addresses, one per line. - Permissions: You must run this script from an account that has Local Administrator rights on all target servers to query WMI.
The VBScript Solution
Save the code below as ServiceDetails.vbs in your C:\Temp\ServiceDetails folder.
' --- START OF SCRIPT ---ServerList = "C:\Temp\ServiceDetails\Servers.txt"arrServices = Array("") ' Leave empty to get all servicesDim objFSO : Set objFSO = CreateObject("Scripting.FileSystemObject")Dim objOut : Set objOut = objFSO.CreateTextFile("C:\Temp\ServiceDetails\ServiceQuery.csv")arrComputers = Split(objFSO.OpenTextFile(ServerList).ReadAll, vbNewLine) ' Write CSV HeadersObjOut.WriteLine "SERVER, SERVICE DISPLAY NAME, SERVICE STARTMODE, SERVICE STATUS, SERVICE ACCOUNT"For Each strComputer In arrComputers If Trim(strComputer) <> "" Then strAlive = IsAlive(strComputer) objFound = 0 If strAlive = "Alive" Then On Error Resume Next Set objWMIService = GetObject("winmgmts:\\" & strComputer & "\root\CIMV2") If Err.Number <> 0 Then ObjOut.WriteLine strComputer & ", WMI ERROR, N/A, N/A, N/A" Err.Clear Else Set colItems = objWMIService.ExecQuery("SELECT * FROM Win32_Service") For Each objItem In colItems ObjOut.WriteLine strComputer & "," & objItem.DisplayName & "," & objItem.StartMode & "," & objItem.State & "," & objItem.StartName objFound = 1 Next End If Else ObjOut.WriteLine strComputer & "- UnResolved, N/A, N/A, N/A, N/A" End If End IfNextobjOut.CloseMsgBox "Service Export Complete!", 64, "LazyAdmin Notification"' Function to Ping the server before attempting WMI connectionFunction IsAlive(strComputer) Set WshShell = WScript.CreateObject("WScript.Shell") Set objExecObject = WshShell.Exec("%comspec% /c ping -n 1 -w 500 " & strComputer) strText = objExecObject.StdOut.ReadAll() If Instr(strText, "Reply from") > 0 Then IsAlive = "Alive" Else IsAlive = "Dead" End If End Function
How it Works
- WMI (Win32_Service): The script connects to the
root\CIMV2namespace on the remote machine to query theWin32_Serviceclass. This is the same data you see inservices.msc. - The Ping Check: Before trying to connect (which can be slow if a server is down), the
IsAlivefunction pings the host. This significantly speeds up the script if you have offline servers in your list. - CSV Output: All data is appended to a
.csvfile, making it ready for a pivot table in Excel to find services running under old service accounts or identifying disabled critical services.
#SysAdmin #WindowsServer #VBScript #WMI #ITAutomation #ServerManagement #TechTips #LazyAdmin #Infrastructure #ITAudit
PowerShell Script: Quickly Convert SIDs to Usernames

Have you ever looked at a security log or a orphaned folder permission and seen a string like S-1-5-21-3623811015-3361044348-30300820-1013? Those are SIDs (Security Identifiers). While they are great for the Windows OS, they are nearly impossible for humans to read.
If you have a list of these SIDs from an audit or a log file, you don’t have to look them up one by one. This PowerShell script will take a bulk list of SIDs and “translate” them into readable Usernames (UIDs).
The PowerShell Script
Save this script as SIDtoUID.ps1. It uses the .NET SecurityIdentifier class to perform the translation locally or against your Active Directory domain.
# Create or clear the output fileOut-File UID.txt# Loop through each SID in the source text fileforeach ($SID in (Get-Content SID.txt)){ # Create a SID object $objSID = New-Object System.Security.Principal.SecurityIdentifier ($SID) Try { # Attempt to translate the SID to an NT Account name $objUser = $objSID.Translate( [System.Security.Principal.NTAccount]) # Append the Username to the output file $objUser.Value >> UID.txt Write-Host "Translated: $SID -> $($objUser.Value)" -ForegroundColor Green } Catch { # If translation fails (e.g., deleted account), keep the original SID $SID >> UID.txt Write-Warning "Failed to translate: $SID" }}
How to Use It
- Create your input: Create a file named
SID.txtin the same folder as the script. Paste your SIDs there, one per line. - Run the script: Open PowerShell and execute
.\SIDtoUID.ps1. - Check your results: A new file named
UID.txtwill appear, containing the translated usernames in the same order as your original list.
Why do SIDs sometimes fail to translate?
In the Catch block of the script, we tell PowerShell to just output the original SID if it can’t find a match. This usually happens for two reasons:
- Deleted Accounts: The user or group no longer exists in Active Directory, leaving behind an “orphaned” SID.
- Connectivity: Your machine cannot reach the Domain Controller to perform the lookup.
#PowerShell #ActiveDirectory #SysAdmin #ITPro #CyberSecurity #WindowsServer #Automation #LazyAdmin #TechTips #ITAudit
EVC Mode & CPU Compatibility FAQ | Lazy Admin Blog

You’ve just unboxed a shiny new host with the latest Intel or AMD processor, but your current cluster is running hardware from three years ago. You try to vMotion a VM, and vSphere gives you the dreaded “CPU Incompatibility” error.
Enter Enhanced vMotion Compatibility (EVC). Here’s everything you need to know to get your mixed-hardware cluster working without the headache.
What exactly is EVC?
Think of EVC as a “lowest common denominator” filter for your CPUs. It masks the advanced features of newer processors so that every host in the cluster appears to have the exact same instruction set. This allows VMs to live-migrate between old and new hardware because the “view” of the CPU never changes.
Quick FAQ
Q: Can I mix Intel and AMD in the same EVC cluster? A: No. EVC only works within a single vendor family. You can mix different generations of Intel, or different generations of AMD, but you cannot vMotion between the two brands.
Q: Will EVC slow down my new servers? A: Technically, yes—but rarely in a way you’ll notice. It hides new instructions (like specialized encryption or AI math sets), but the raw clock speed and core count of your new CPUs are still fully utilized. Most general-purpose VMs don’t use the high-end instructions being masked.
Q: Do I need to power off VMs to enable EVC? A: It depends:
- Enabling on an empty cluster: No downtime.
- Enabling on a cluster where VMs are already running on the oldest host: Usually no downtime.
- Enabling on a cluster where VMs are running on newer hosts: You must power off those VMs so they can “re-boot” with the masked CPU instructions.
Q: What is “Per-VM EVC”? A: Introduced in vSphere 6.7, this allows you to set the EVC mode on the VM itself rather than the whole cluster. This is a lifesaver for migrating VMs across different vCenters or into the Cloud (like AWS/Azure).
How to Find Your Correct EVC Mode
Don’t guess. Use the official tool:
- Go to the VMware Compatibility Guide (CPU/EVC Matrix).
- Select your ESXi version.
- Select the CPU models of your oldest and newest hosts.
- The tool will tell you the highest supported “Baseline” you can use.
Step-by-Step: Enabling EVC on an Existing Cluster
- Select your Cluster in vCenter.
- Go to Configure > VMware EVC.
- Click Edit.
- Select Enable EVC for Intel/AMD hosts.
- Choose the Baseline that matches your oldest host.
- Validation: vCenter will check if any running VMs are currently using features above that baseline. If they are, you’ll need to shut them down before you can save the settings.
Summary Table: EVC Baselines
| If your oldest host is… | Use this EVC Mode |
| Intel Ice Lake | Intel “Ice Lake” Generation |
| Intel Cascade Lake | Intel “Cascade Lake” Generation |
| AMD EPYC Rome | AMD EPYC “Rome” Generation |
Lost Your VM? How to Find Its ESXi Host from the Guest OS | Lazy Admin Blog
It’s a classic “Ghost in the Machine” scenario: You can RDP or SSH into a virtual machine, but you can’t find it in vCenter. Maybe it’s a massive environment with thousands of VMs, maybe the naming convention doesn’t match, or maybe you’re dealing with a rogue host that isn’t even in your main cluster.
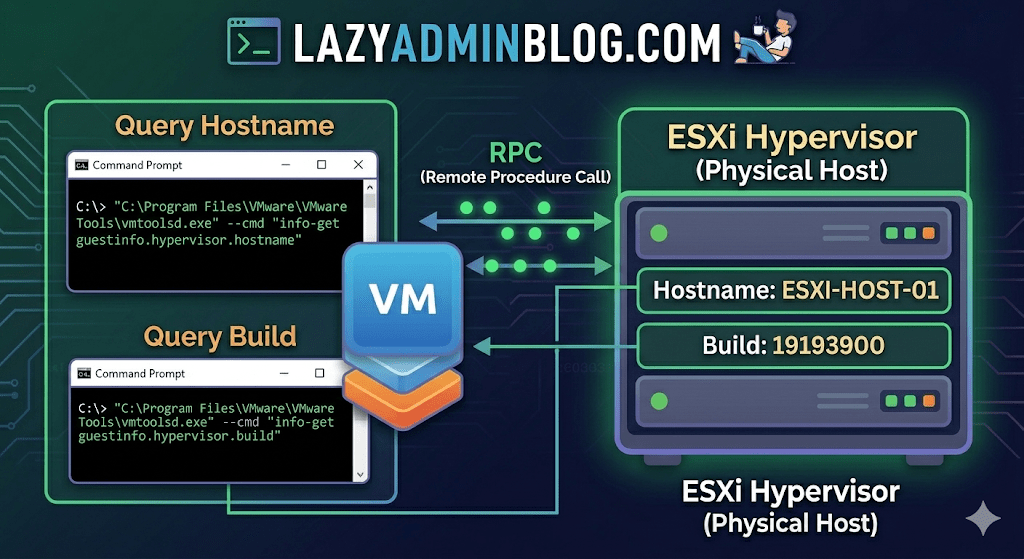
If VMware Tools is installed and running, the VM actually knows exactly where it lives. You just have to ask it nicely through the Command Prompt.
The Magic Tool: vmtoolsd.exe
On Windows VMs, the VMware Tools service includes a CLI utility called vmtoolsd.exe. This tool can query the hypervisor for specific environment variables that are passed down to the guest.
1. Find the ESXi Hostname
If you need to know which physical server is currently crunching the cycles for your VM, run this command:
"C:\Program Files\VMware\VMware Tools\vmtoolsd.exe" --cmd "info-get guestinfo.hypervisor.hostname"
2. Get the ESXi Build Details
Need to know if the underlying host is patched or running an ancient version of ESXi? Query the build number:
"C:\Program Files\VMware\VMware Tools\vmtoolsd.exe" --cmd "info-get guestinfo.hypervisor.build"
Why is this useful?
- vCenter Search is failing: Sometimes the inventory search index gets corrupted, and “Name contains” returns nothing.
- Nested Environments: If you are running VMs inside VMs, this helps you verify which layer of the onion you are currently on.
- Troubleshooting Performance: If a VM is lagging, you can quickly identify the host to check for hardware alerts or CPU contention without leaving the OS.
What if I’m on Linux?
The same logic applies! Most modern Linux distributions use open-vm-tools. You can run the same query via the terminal:
vmtoolsd --cmd "info-get guestinfo.hypervisor.hostname"
Important Requirement: Guest RPC
For these commands to work, the VM must have VMware Tools installed and the guestinfo variables must be accessible. In some hardened environments, admins might disable these RPC (Remote Procedure Call) queries in the .vmx file for security reasons, but in 95% of standard builds, this will work out of the box.
How to Force Cancel a Hung Task in vCenter or ESXi | Lazy Admin Blog
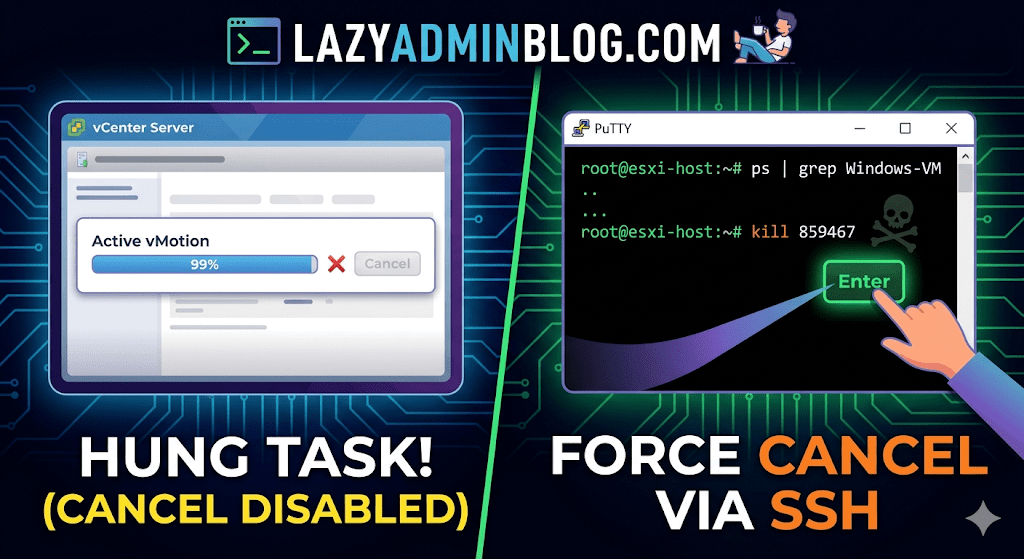
We’ve all been there: a vMotion hits 99% and just… stays there. Or a backup job finishes on the proxy side, but vCenter still thinks the VM is “busy.” Usually, the Cancel button is grayed out, leaving you stuck in management limbo.
When the GUI fails you, it’s time to hop into the CLI. Here is how to manually kill a hung task by targeting the VM’s parent process.
Step 1: Verify the Task
Before pulling the trigger, confirm the task is actually stuck and not just slow. Check the Monitor > Tasks and Events tab for the specific VM. If the progress bar hasn’t budged in an hour and the “Cancel” option is disabled, proceed to the host.
Step 2: Enable and Connect via SSH
To kill a process, you need to be on the specific ESXi host where the VM is currently registered.
- Enable SSH: Go to the ESXi host in vSphere > Configure > System > Services > Start SSH.
- Connect: Open your terminal (Putty, CMD, or Terminal) and log in as
root.
Step 3: Locate the Parent Process ID (PID)
We need to find the specific process tied to your VM. Use the ps command combined with grep to filter for your VM’s name.
Run the following command:
ps -v | grep "Your_VM_Name"
(Note: Using the -v flag in ESXi provides a more detailed view of the world ID and parent processes.)
Look for the line representing the VM’s main process. You are looking for the Leader ID or the first ID listed in the row.
Step 4: Kill the Process
Once you have identified the ID (e.g., 859467), send the kill signal. Start with a standard terminate signal, which allows the process to clean up after itself.
Run the command:
kill 859467
Lazy Admin Tip: If the process is extremely stubborn and won’t die, you can use
kill -9 859467to force an immediate termination. Use this as a last resort!
Step 5: Verify in vSphere
Give vCenter a minute to catch up. The hung task should now disappear or show as “Canceled” in the Tasks and Events console. Your VM should return to an “Idle” state, allowing you to power it on, move it, or restart your backup.
Hyper-V Performance Hack: The Essential Antivirus Exclusions List | Lazy Admin Blog
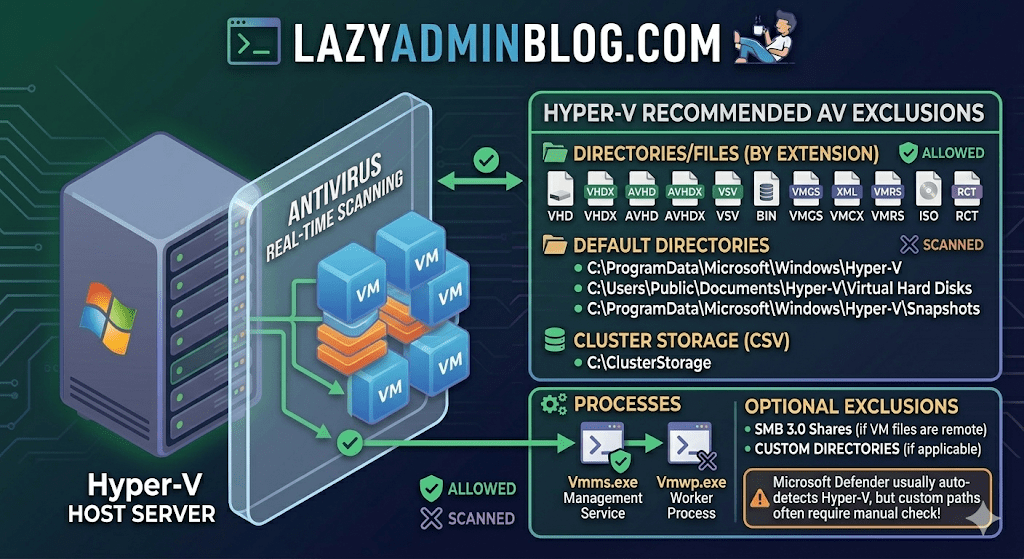
Running antivirus on your Hyper-V host is a security must, but if you don’t configure it correctly, you’re asking for trouble. We’re talking “disappearing” VMs, corrupted virtual disks, and performance so sluggish you’ll think you’re back on physical hardware from 2005.
The culprit is usually the Real-Time Scanning engine trying to “inspect” a 100GB .vhdx file every time the guest OS writes a single bit. Here is the definitive “Lazy Admin” guide to Hyper-V AV exclusions.
1. File Extension Exclusions
Tell your AV to keep its hands off these specific virtual machine file types:
- Virtual Disks:
.vhd,.vhdx - Snapshots/Checkpoints:
.avhd,.avhdx - Saved State:
.vsv,.bin,.vmgs - Configuration:
.xml,.vmcx,.vmrs - ISO Images:
.iso - Tracking:
.rct(Resilient Change Tracking)
2. Directory Exclusions
If you are using the default paths, exclude these. If you have a dedicated D:\VMs drive (which you should!), exclude that entire custom path as well.
- Default Configs:
C:\ProgramData\Microsoft\Windows\Hyper-V - Default VHDs:
C:\Users\Public\Documents\Hyper-V\Virtual Hard Disks - Default Snapshots:
C:\ProgramData\Microsoft\Windows\Hyper-V\Snapshots - Cluster Shared Volumes (CSV):
C:\ClusterStorage - Hyper-V Replica: Any custom replication data folders.
- SMB 3.0 Shares: If your VMs live on a remote file server, apply these same exclusions to that file server!
Lazy Admin Pro-Tip: If you’re using a Cluster, don’t just exclude the
C:\ClusterStoragefolder by path. Use the Volume ID (get it viamountvol) to ensure the exclusion sticks even if drive letters or paths shift.
3. Process Exclusions
Sometimes excluding the file isn’t enough; you need to exclude the “person” opening the file. Exclude these core Hyper-V executables:
- Vmms.exe: The Virtual Machine Management Service.
- Vmwp.exe: The Virtual Machine Worker Process (one runs for every active VM).
- Vmcompute.exe: (For Windows Server 2019+) The Host Compute Service.
Why this matters (The “Error 0x800704C8”)
If you don’t set these, you’ll eventually see the dreaded Error 0x800704C8 (The process cannot access the file because it is being used by another process). This happens when your AV locks the VM’s configuration file exactly when Hyper-V tries to start it.
What about Windows Defender?
Good news for the truly lazy: if you are using built-in Microsoft Defender on Windows Server, it automatically detects the Hyper-V role and applies most of these exclusions for you. However, it does not always catch your custom storage paths (like E:\MyVMs), so always double-check your work!
Windows Server 2008 R2 Stuck in Recovery Loop? Here’s the Fix | Lazy Admin Blog

A sudden power failure is the ultimate “stress test” for a server, and sometimes the OS fails that test, landing you in an endless loop of Startup Repair. If F8 > Last Known Good Configuration didn’t save your skin, it’s time to break out the installation media.
The Prerequisites
Before you start, ensure you have your Windows Server 2008 R2 Installation Disc (or a bootable USB) ready.
- Boot from the media.
- Select your language/input settings and click Next.
- Select Repair your computer.
- Choose the OS you want to fix and click Next.
- Select Command Prompt from the System Recovery Options.
Method 1: The System File Checker (SFC)
If the power cut corrupted a core system file, SFC is your first line of defense. It compares your system files against the “known good” versions on the disc.
- In the Command Prompt, type:
sfc /scannow - Wait: This can take a while. If it finds and fixes errors, reboot and see if the loop is broken.
Method 2: Rebuilding the BCD
Sometimes the boot configuration data gets scrambled. This command scans for Windows installations and lets you add them back to the boot list.
- In the Command Prompt, type:
Bootrec /RebuildBcd - If it finds a Windows installation, press Y to add it to the boot list.
Method 3: The “Nuclear” Boot Repair
If the Master Boot Record (MBR) or the boot sector itself is toast, you need to rewrite them entirely. This is the heavy-duty fix for when the BIOS simply can’t find where Windows starts.
Run these three commands in order:
- Fix the MBR:
BOOTREC /FIXMBR - Fix the Boot Sector:
BOOTREC /FIXBOOT - Force the Update:
D:\boot\Bootsect.exe /NT60 All(Note: Replace D: with the actual drive letter of your installation disc).
Fixing Corrupt Image Profiles on ESXi | Lazy Admin Blog

We’ve all been there—a patch remediation task in vSphere Update Manager (VUM) or vSphere Lifecycle Manager (vLCM) gets interrupted (shoutout to that one colleague!), and suddenly your ESXi host is in a “zombie” state.
If you see the dreaded “Unknown – no profile defined” error, your host has lost its identity. It no longer knows which VIBs (VMware Installation Bundles) should be installed. This is usually caused by a corrupt imgdb.tgz file.

The Symptom: Missing Image Profile
When an image profile is empty or corrupt, you cannot install patches, remove drivers, or perform upgrades. ESXi relies on the image database to maintain consistency.
How to Diagnose a Corrupt imgdb.tgz
Before you resort to a full host rebuild, verify the file size of the database. A healthy imgdb.tgz is typically around 26 KB. If yours is only a few bytes, it’s corrupted.
SSH into the host.
Locate the files:
cd /vmfs/volumesfind * | grep imgdb.tgz
Note: You will usually see two results (one for each bootbank).
Check the size:
ls -l <path_to_result>/imgdb.tgzIf the size is tiny (e.g., 0-100 bytes), the database is toast.
The Fix: Borrowing a “Known Good” Profile
Instead of a time-consuming reinstall, you can manually restore the database from a healthy host running the exact same version and patch level.
Step 1: Export from a Healthy Host
On a working ESXi host, copy the healthy database to a shared datastore:
cp /bootbank/imgdb.tgz /vmfs/volumes//
Step 2: Restore on the Corrupt Host
On the host with the issue, move the good file to /tmp and extract it to access the internal VIB and Profile metadata:
cp /vmfs/volumes//imgdb.tgz /tmpcd /tmptar -xzf imgdb.tgz
Step 3: Rebuild the Database Directories
Now, manually place the healthy metadata into the system directories:
Copy Profiles:
cp /tmp/var/db/esximg/profiles/* /var/db/esximg/profiles/Copy VIBs:
cp /tmp/var/db/esximg/vibs/* /var/db/esximg/vibs/Replace Bootbank File:
rm /bootbank/imgdb.tgzcp /tmp/imgdb.tgz /bootbank/
Step 4: Finalize and Persist
To ensure these changes survive a reboot, run the backup script:
/sbin/auto-backup.sh
Summary Table: Resolution Options
| Option | Effort | Risk | When to use |
| Rebuild Host | High | Low | If you don’t have a matching “known good” host. |
| Manual File Copy | Low | Medium | When you need a fast fix and have a twin host available. |
The Clean Exit: How to Safely Remove Storage Devices from ESXi | Lazy Admin Blog

In the world of storage, “unpresenting” a LUN is more than just a right-click. If you don’t follow the proper decommissioning workflow, ESXi will keep trying to talk to a ghost device, leading to host instability and long boot times.
Follow this definitive checklist and procedure to ensure your environment stays clean and APD-free.
The “Safe-to-Remove” Checklist
Before you even touch the unmount button, verify these 7 critical points:
- Evacuate Data: Move or unregister all VMs, snapshots, templates, and ISO images from the datastore.
- HA Heartbeats: Ensure the datastore is NOT being used for vSphere HA heartbeats.
- No Clusters: Remove the datastore from any Datastore Clusters or Storage DRS management.
- Coredump: Confirm the LUN isn’t configured as a diagnostic coredump partition.
- SIOC: Disable Storage I/O Control (SIOC) for the datastore.
- RDMs: If the LUN is an Raw Device Mapping, remove the RDM from the VM settings (select “Delete from disk” to kill the mapping file).
- Scratch Location: Ensure the host isn’t using this LUN for its persistent scratch partition.
Pro Tip: Check Scratch Location via PowerCLI
Use this script to verify your scratch config across a cluster:
$cluster = "YourClusterName"foreach ($esx in Get-Cluster $cluster | Get-VMHost) { Get-VMHostAdvancedConfiguration -VMHost $esx -Name "ScratchConfig.ConfiguredScratchLocation"}
Step 1: Identify your NAA ID
You need the unique Network Address Authority (NAA) ID to ensure you are pulling the right plug.
- Via GUI: Check the Properties window of the datastore.
- Via CLI: Run
esxcli storage vmfs extent list
Step 2: The Unmount & Detach Workflow
1. Unmount the File System
In the Configuration tab > Storage, right-click the datastore and select Unmount. If you are doing this for multiple hosts, use the Datastores view (Ctrl+Shift+D) to unmount from the entire cluster at once.
2. Detach the Device (The Most Important Step)
Unmounting removes the “logical” access, but Detaching tells the kernel to stop looking for the “physical” device.
- Switch to the Devices view.
- Right-click the NAA ID and select Detach.
- The state should now show as Unmounted.
Note: Detaching is a per-host operation. You must perform this on every host that has visibility to the LUN to avoid APD states.
Step 3: Cleanup the SAN & Host
Once the state is “Unmounted” across all hosts, you can safely unmap/unpresent the LUN from your SAN array.
Permanent Decommissioning
To prevent “ghost” entries from appearing in your detached list, run these commands on the host:
- List detached devices:
esxcli storage core device detached list - Remove the configuration permanently:
esxcli storage core device detached remove -d <NAA_ID>