
Command Line
Lost Your VM? How to Find Its ESXi Host from the Guest OS | Lazy Admin Blog
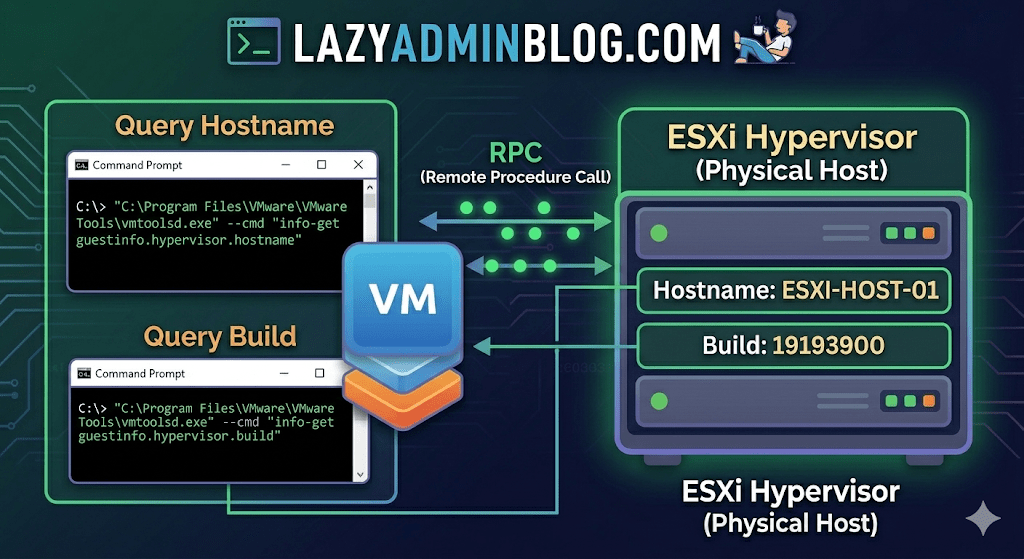
It’s a classic “Ghost in the Machine” scenario: You can RDP or SSH into a virtual machine, but you can’t find it in vCenter. Maybe it’s a massive environment with thousands of VMs, maybe the naming convention doesn’t match, or maybe you’re dealing with a rogue host that isn’t even in your main cluster.
If VMware Tools is installed and running, the VM actually knows exactly where it lives. You just have to ask it nicely through the Command Prompt.
The Magic Tool: vmtoolsd.exe
On Windows VMs, the VMware Tools service includes a CLI utility called vmtoolsd.exe. This tool can query the hypervisor for specific environment variables that are passed down to the guest.
1. Find the ESXi Hostname
If you need to know which physical server is currently crunching the cycles for your VM, run this command:
"C:\Program Files\VMware\VMware Tools\vmtoolsd.exe" --cmd "info-get guestinfo.hypervisor.hostname"
2. Get the ESXi Build Details
Need to know if the underlying host is patched or running an ancient version of ESXi? Query the build number:
"C:\Program Files\VMware\VMware Tools\vmtoolsd.exe" --cmd "info-get guestinfo.hypervisor.build"
Why is this useful?
- vCenter Search is failing: Sometimes the inventory search index gets corrupted, and “Name contains” returns nothing.
- Nested Environments: If you are running VMs inside VMs, this helps you verify which layer of the onion you are currently on.
- Troubleshooting Performance: If a VM is lagging, you can quickly identify the host to check for hardware alerts or CPU contention without leaving the OS.
What if I’m on Linux?
The same logic applies! Most modern Linux distributions use open-vm-tools. You can run the same query via the terminal:
vmtoolsd --cmd "info-get guestinfo.hypervisor.hostname"
Important Requirement: Guest RPC
For these commands to work, the VM must have VMware Tools installed and the guestinfo variables must be accessible. In some hardened environments, admins might disable these RPC (Remote Procedure Call) queries in the .vmx file for security reasons, but in 95% of standard builds, this will work out of the box.
No Reboot Required: Configuring Dell iDRAC via RACADM | Lazy Admin Blog

Configuring the Integrated Dell Remote Access Controller (iDRAC) is usually a “Day 1” task performed in the BIOS. But what if you’ve already deployed the server and realized the NIC isn’t configured, or the IP needs to change?
By using the Dell RACADM (Remote Access Controller Admin) utility, you can modify network settings, reset credentials, and pull system health logs directly from the command line without a single second of downtime.
Getting the Tools
To start, download the Dell EMC OpenManage DRAC Tools. This package includes the RACADM executable. You can install this on the local server or on your management workstation to manage servers over the network.
1. Remote RACADM (From your Workstation)
If you have the current credentials but need to change settings remotely, use the -r (remote), -u (user), and -p (password) flags.
Example: Get System Information
Bash
racadm -r 10.1.1.1 -u root -p calvin getsysinfo
Note: If you get an SSL certificate error, the command will still run. To force the command to stop on certificate errors for security, add the
-Sflag.
2. Local RACADM (From the Server OS)
If you are logged into the Windows or Linux OS on the Dell server itself, you don’t need credentials. The tool communicates directly with the hardware via the IPMI driver.
Example: Quick Network Setup
Bash
# Check current configracadm getniccfg# Set a new Static IP, Subnet, and Gatewayracadm setniccfg -s 192.168.1.50 255.255.255.0 192.168.1.1
3. Deep Configuration (The Config Group Method)
For more granular control (like setting DNS servers or the DRAC name), you can target specific configuration groups.
The “Lazy Admin” DNS Setup Script:
Bash
racadm config -g cfgLanNetworking -o cfgNicIpAddress 172.17.2.124racadm config -g cfgLanNetworking -o cfgNicNetmask 255.255.252.0racadm config -g cfgLanNetworking -o cfgDNSServer1 172.17.0.6racadm config -g cfgLanNetworking -o cfgDNSRacName MyServer-iDRACracadm config -g cfgLanNetworking -o cfgDNSDomainName corp.company.com
4. SSH / Serial RACADM
If you are already connected to the iDRAC via SSH, you don’t need to repeat the racadm command prefix. Simply type racadm and hit enter to enter the RACADM shell:
Bash
admin@idrac-web-01: racadmracadm>> getsysinforacadm>> serveraction powercycle
Why this is a “Lazy Admin” Win
Instead of walking to the cold aisle with a crash cart or waiting for a 20-minute reboot cycle, you can script the iDRAC configuration of an entire rack in seconds.
#DellEMC #PowerEdge #iDRAC #SysAdmin #DataCenter #RACADM #Infrastructure #ITOps #LazyAdmin #ServerManagement
Restore Missing “Help and Support” Service in Windows Server 2003

In Windows Server 2003, you might occasionally encounter a scenario where the Help and Support service is completely missing from the services.msc console or simply refuses to start. This is usually due to a corruption in the registration of the Help Center binaries.
Instead of a full OS repair, you can re-register and re-install the service directly from the command line.
The Fix: Re-registering via Command Prompt
Follow these steps to force the system to rebuild the service entry:
- Open a Command Prompt (Start > Run >
cmd). - Switch to your system drive (usually C:):DOS
%SystemDrive% - Navigate to the Help Center binaries directory:DOS
cd %windir%\PCHealth\HelpCtr\Binaries - Run the registration and installation command:DOS
start /w helpsvc /svchost netsvcs /regserver /installNote: The/wswitch tells the command prompt to wait for the process to finish before returning to the prompt.
Verification
Once the command finishes, the service should start automatically. You can verify it by running:
- Type
services.mscin the Run box. - Look for Help and Support.
- Ensure the Status is Started and the Startup Type is Automatic.
#WindowsServer2003 #SysAdmin #LegacyIT #WindowsFix #TechSupport #ServerAdmin #ITPro #LazyAdmin #Troubleshooting #RetroIT
Mastering DsQuery: Fast Domain Controller Auditing

Using the GUI to find specific servers in a large forest can be time-consuming. DsQuery Server provides a lightning-fast way to extract this data directly from the Command Prompt. Whether you need a list of Global Catalogs or want to find the Schema Master, these commands will save you hours of clicking.
1. Locating Domain Controllers in the Forest
To get a quick list of every DC across all domains in your entire forest, you can use the -Forest switch.
- To get the full Distinguished Name (DN):
DsQuery Server -Forest - To get just the Relative Distinguished Name (RDN):
DsQuery Server -o rdn -Forest
2. Targeting a Specific Domain
If you only want to see the controllers within a specific domain, use the -domain switch: DsQuery Server -domain lazyadminblog.com
3. Finding Global Catalog (GC) Servers
Global Catalogs are vital for forest-wide searches. To find which DCs in a specific domain are configured as GCs: DsQuery Server -domain lazyadminblog.com -isgc
4. Finding FSMO Role Holders
Instead of opening multiple MMC snap-ins, you can find the FSMO role holders directly. For example, to find the server holding the Schema Master role for the forest: DsQuery Server -Forest -hasfsmo schema
Note: You can replace
schemawithnaming,pdc,rid, orinfrastructureto find other role holders.
5. Exporting your Results
The most useful way to use DsQuery is to pipe the results into a text file for documentation or further scripting. Use the > operator to save your output: DsQuery Server -Forest > C:\Logs\AllDCs.txt
#ActiveDirectory #DsQuery #SysAdmin #WindowsServer #ITPro #CodingAdmin #ServerAudit #LazyAdmin #TechTips #DataCenter
LDIFDE vs. CSVDE: How to Export Active Directory Data

Exporting Active Directory objects doesn’t require complex scripts. Windows includes built-in tools to handle this via the command line. Choosing between them depends on what you plan to do with the data.
1. LDIFDE (LDAP Data Interchange Format)
Best for: Migrations and bulk modifications.
LDIFDE exports data in the .ldf format. This format is superior for importing data back into AD because it can handle operations like add, modify, and delete.
Command Syntax:
DOS
ldifde -f Exportuser.ldf -s ADservername -d "CN=username,CN=Users,DC=domain,DC=com"
- -f: The filename for the export.
- -s: The source Active Directory server.
- -d: The Distinguished Name (DN) of the root search point.
2. CSVDE (Comma Separated Value)
Best for: Reporting and Excel analysis.
CSVDE exports data into a standard CSV format. This is perfect if you need to create a spreadsheet of user attributes for a manager or an audit. Note that CSVDE cannot be used to modify existing objects; it only supports “Add” operations during an import.
Advanced Export Command:
This command filters for specific objects with mailboxes and pulls a massive list of attributes (Name, Company, Title, Phone, etc.):
DOS
csvde -m -f Mailboxes.csv -d "OU=Users,DC=domain,DC=com" -r "(&(objectClass=user)(mail=*))" -l "objectClass,displayName,memberOf,proxyAddresses,title,telephoneNumber,company,userPrincipalName,sAMAccountName"
- -m: Omits binary attributes (like objectGUID) that aren’t readable in text.
- -r: The LDAP filter (e.g., only users with an email address).
- -l: The list of specific attributes you want to include in the columns.
Comparison Table: Which should you use?
| Feature | LDIFDE | CSVDE |
| Output Format | Plain Text (.ldf) | Comma Separated (.csv) |
| Best Use | Modifying/Moving Objects | Reporting / Spreadsheet Analysis |
| Readability | Harder for humans | Very easy (Excel) |
| Import Support | Add, Modify, Delete | Add only |
The LazyAdmin Tip: Always use the -m switch with CSVDE. If you don’t, your CSV file will be filled with unreadable binary strings for attributes like user certificates or SID history, making it almost impossible to use in Excel!
#ActiveDirectory #SysAdmin #ITPro #DataExport #WindowsServer #CSVDE #LDIFDE #LazyAdmin #TechTips #ServerManagement
How to get Serial number and System information of ESXi host remotely using putty

🛠️ Method 1: Using esxcfg-info
The esxcfg-info command is a comprehensive tool that dumps a massive amount of data regarding the host’s configuration. Filtering this with grep is the quickest way to find your serial number.
Command:
Bash
esxcfg-info | grep "Serial Number"
- What it does: Searches the entire configuration dump for the specific “Serial Number” string.
- LazyAdmin Tip: If you get too many results, try
esxcfg-info -w | grep "Serial Number"to focus specifically on hardware information.
🛠️ Method 2: Using dmidecode (DMI Table Decoder)
If you need more than just the serial number—such as the Manufacturer, Product Name (Model), and UUID—dmidecode is the standard tool. It retrieves data directly from the system’s Desktop Management Interface (DMI) table.
Command:
Bash
/usr/sbin/dmidecode | grep -A4 "System Information"
- What it does: The
-A4flag tells grep to show the 4 lines after the match. - The Result: You will typically see:
- Manufacturer (e.g., Dell Inc., HP, Cisco)
- Product Name (e.g., PowerEdge R740)
- Version
- Serial Number
- UUID
🛠️ Method 3: The Modern ESXCLI Way
If you are on ESXi 6.x or 7.x/8.x, VMware has standardized most commands under the esxcli framework. This is often faster and cleaner than the legacy scripts.
Command:
Bash
esxcli hardware platform get
- Why use this? It provides a clean, organized output of the Vendor Name, Product Name, and Serial Number without needing to
grep.
⚠️ Troubleshooting Access
- SSH is Disabled: By default, SSH is turned off for security. You must enable it via the DCUI (the yellow and grey monitor screen) under “Troubleshooting Options” or via the Host Client web interface.
- Permission Denied: Ensure you are logging in as
root. Standard users generally do not have permission to query the hardware DMI tables. - Shell Lockdown: If the host is in “Lockdown Mode,” you will be unable to SSH in even with the correct credentials. You’ll need to disable Lockdown Mode via vCenter first.
#VMware #ESXi #SysAdmin #ITPro #CommandLine #ServerHardware #TechTips #LazyAdmin #DataCenter #RemoteManagement #vSphere