
Virtualization
EVC Mode & CPU Compatibility FAQ | Lazy Admin Blog

You’ve just unboxed a shiny new host with the latest Intel or AMD processor, but your current cluster is running hardware from three years ago. You try to vMotion a VM, and vSphere gives you the dreaded “CPU Incompatibility” error.
Enter Enhanced vMotion Compatibility (EVC). Here’s everything you need to know to get your mixed-hardware cluster working without the headache.
What exactly is EVC?
Think of EVC as a “lowest common denominator” filter for your CPUs. It masks the advanced features of newer processors so that every host in the cluster appears to have the exact same instruction set. This allows VMs to live-migrate between old and new hardware because the “view” of the CPU never changes.
Quick FAQ
Q: Can I mix Intel and AMD in the same EVC cluster? A: No. EVC only works within a single vendor family. You can mix different generations of Intel, or different generations of AMD, but you cannot vMotion between the two brands.
Q: Will EVC slow down my new servers? A: Technically, yes—but rarely in a way you’ll notice. It hides new instructions (like specialized encryption or AI math sets), but the raw clock speed and core count of your new CPUs are still fully utilized. Most general-purpose VMs don’t use the high-end instructions being masked.
Q: Do I need to power off VMs to enable EVC? A: It depends:
- Enabling on an empty cluster: No downtime.
- Enabling on a cluster where VMs are already running on the oldest host: Usually no downtime.
- Enabling on a cluster where VMs are running on newer hosts: You must power off those VMs so they can “re-boot” with the masked CPU instructions.
Q: What is “Per-VM EVC”? A: Introduced in vSphere 6.7, this allows you to set the EVC mode on the VM itself rather than the whole cluster. This is a lifesaver for migrating VMs across different vCenters or into the Cloud (like AWS/Azure).
How to Find Your Correct EVC Mode
Don’t guess. Use the official tool:
- Go to the VMware Compatibility Guide (CPU/EVC Matrix).
- Select your ESXi version.
- Select the CPU models of your oldest and newest hosts.
- The tool will tell you the highest supported “Baseline” you can use.
Step-by-Step: Enabling EVC on an Existing Cluster
- Select your Cluster in vCenter.
- Go to Configure > VMware EVC.
- Click Edit.
- Select Enable EVC for Intel/AMD hosts.
- Choose the Baseline that matches your oldest host.
- Validation: vCenter will check if any running VMs are currently using features above that baseline. If they are, you’ll need to shut them down before you can save the settings.
Summary Table: EVC Baselines
| If your oldest host is… | Use this EVC Mode |
| Intel Ice Lake | Intel “Ice Lake” Generation |
| Intel Cascade Lake | Intel “Cascade Lake” Generation |
| AMD EPYC Rome | AMD EPYC “Rome” Generation |
Lost Your VM? How to Find Its ESXi Host from the Guest OS | Lazy Admin Blog
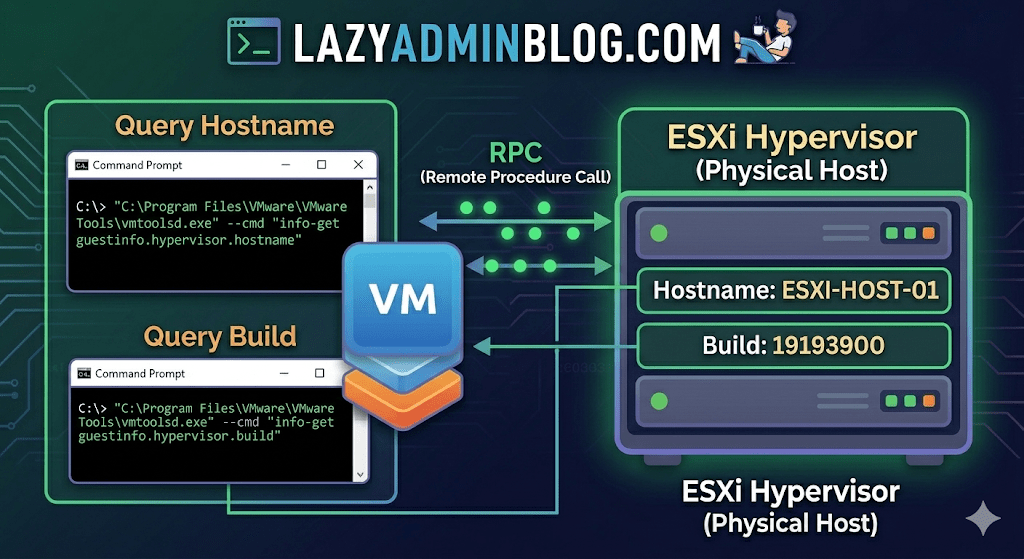
It’s a classic “Ghost in the Machine” scenario: You can RDP or SSH into a virtual machine, but you can’t find it in vCenter. Maybe it’s a massive environment with thousands of VMs, maybe the naming convention doesn’t match, or maybe you’re dealing with a rogue host that isn’t even in your main cluster.
If VMware Tools is installed and running, the VM actually knows exactly where it lives. You just have to ask it nicely through the Command Prompt.
The Magic Tool: vmtoolsd.exe
On Windows VMs, the VMware Tools service includes a CLI utility called vmtoolsd.exe. This tool can query the hypervisor for specific environment variables that are passed down to the guest.
1. Find the ESXi Hostname
If you need to know which physical server is currently crunching the cycles for your VM, run this command:
"C:\Program Files\VMware\VMware Tools\vmtoolsd.exe" --cmd "info-get guestinfo.hypervisor.hostname"
2. Get the ESXi Build Details
Need to know if the underlying host is patched or running an ancient version of ESXi? Query the build number:
"C:\Program Files\VMware\VMware Tools\vmtoolsd.exe" --cmd "info-get guestinfo.hypervisor.build"
Why is this useful?
- vCenter Search is failing: Sometimes the inventory search index gets corrupted, and “Name contains” returns nothing.
- Nested Environments: If you are running VMs inside VMs, this helps you verify which layer of the onion you are currently on.
- Troubleshooting Performance: If a VM is lagging, you can quickly identify the host to check for hardware alerts or CPU contention without leaving the OS.
What if I’m on Linux?
The same logic applies! Most modern Linux distributions use open-vm-tools. You can run the same query via the terminal:
vmtoolsd --cmd "info-get guestinfo.hypervisor.hostname"
Important Requirement: Guest RPC
For these commands to work, the VM must have VMware Tools installed and the guestinfo variables must be accessible. In some hardened environments, admins might disable these RPC (Remote Procedure Call) queries in the .vmx file for security reasons, but in 95% of standard builds, this will work out of the box.
Finding RDM LUN UUIDs in a vSphere Cluster | Lazy Admin Blog
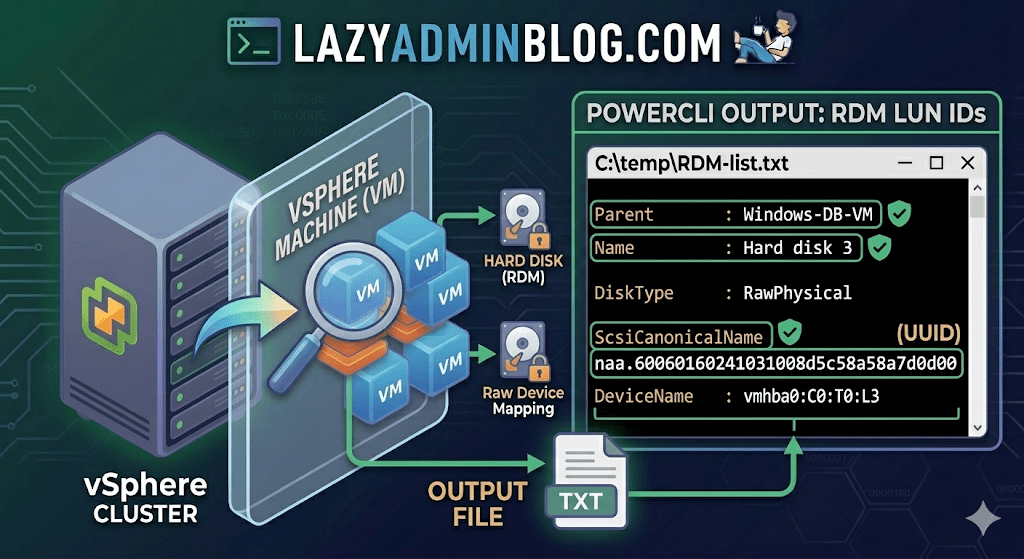
If you’re managing a large virtual environment, keeping track of Raw Device Mappings (RDMs) can be a nightmare. Unlike standard virtual disks (VMDKs) that live neatly inside a datastore, RDMs are directly mapped to a LUN on your SAN.
When your storage team asks, “Which VM is using LUN ID 55?”, you don’t want to check every VM manually. This PowerCLI script will scan your entire cluster and export a list of all RDMs along with their Canonical Name (NAA ID) and Device Name.
The PowerCLI One-Liner
This command connects to your cluster, filters for disks that are either RawPhysical (Pass-through) or RawVirtual, and spits out the details to a text file for easy searching.
Run this in your PowerCLI window:
PowerShell
Get-Cluster 'YourClusterName' | Get-VM | Get-HardDisk -DiskType "RawPhysical","RawVirtual" | Select-Object @{N="VM";E={$_.Parent.Name}},Name,DiskType,ScsiCanonicalName,DeviceName | Format-List | Out-File –FilePath C:\temp\RDM-list.txt
Breaking Down the Output
Once you open C:\temp\RDM-list.txt, here is what you are looking at:
- Parent: The name of the Virtual Machine.
- Name: The label of the hard disk (e.g., “Hard disk 2”).
- DiskType: Confirms if it’s Physical (direct SCSI commands) or Virtual mode.
- ScsiCanonicalName: The NAA ID (e.g.,
naa.600601...). This is the “Universal ID” your storage array uses. - DeviceName: The internal vSphere path to the device.
Why do you need this?
- Storage Migrations: If you are decommissioning a storage array, you must identify every RDM to ensure you don’t leave a “Ghost LUN” behind.
- Troubleshooting Performance: If a specific LUN is showing high latency on the SAN side, this script tells you exactly which VM is the “noisy neighbor.”
- Audit & Compliance: Great for keeping a monthly record of physical hardware mappings.
Lazy Admin Note: This script specifically uses VMware PowerCLI cmdlets (
Get-HardDisk). If you are looking for similar info on a Hyper-V host, you would typically useGet-VMHardDiskDriveand look for theDiskNumberproperty to correlate with physical disks inDisk Management.
Hyper-V Performance Hack: The Essential Antivirus Exclusions List | Lazy Admin Blog
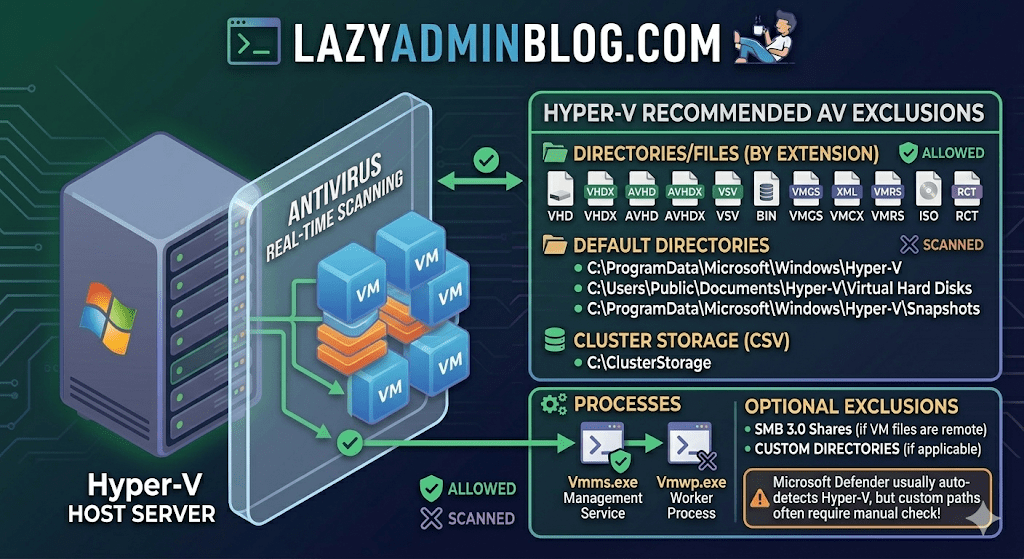
Running antivirus on your Hyper-V host is a security must, but if you don’t configure it correctly, you’re asking for trouble. We’re talking “disappearing” VMs, corrupted virtual disks, and performance so sluggish you’ll think you’re back on physical hardware from 2005.
The culprit is usually the Real-Time Scanning engine trying to “inspect” a 100GB .vhdx file every time the guest OS writes a single bit. Here is the definitive “Lazy Admin” guide to Hyper-V AV exclusions.
1. File Extension Exclusions
Tell your AV to keep its hands off these specific virtual machine file types:
- Virtual Disks:
.vhd,.vhdx - Snapshots/Checkpoints:
.avhd,.avhdx - Saved State:
.vsv,.bin,.vmgs - Configuration:
.xml,.vmcx,.vmrs - ISO Images:
.iso - Tracking:
.rct(Resilient Change Tracking)
2. Directory Exclusions
If you are using the default paths, exclude these. If you have a dedicated D:\VMs drive (which you should!), exclude that entire custom path as well.
- Default Configs:
C:\ProgramData\Microsoft\Windows\Hyper-V - Default VHDs:
C:\Users\Public\Documents\Hyper-V\Virtual Hard Disks - Default Snapshots:
C:\ProgramData\Microsoft\Windows\Hyper-V\Snapshots - Cluster Shared Volumes (CSV):
C:\ClusterStorage - Hyper-V Replica: Any custom replication data folders.
- SMB 3.0 Shares: If your VMs live on a remote file server, apply these same exclusions to that file server!
Lazy Admin Pro-Tip: If you’re using a Cluster, don’t just exclude the
C:\ClusterStoragefolder by path. Use the Volume ID (get it viamountvol) to ensure the exclusion sticks even if drive letters or paths shift.
3. Process Exclusions
Sometimes excluding the file isn’t enough; you need to exclude the “person” opening the file. Exclude these core Hyper-V executables:
- Vmms.exe: The Virtual Machine Management Service.
- Vmwp.exe: The Virtual Machine Worker Process (one runs for every active VM).
- Vmcompute.exe: (For Windows Server 2019+) The Host Compute Service.
Why this matters (The “Error 0x800704C8”)
If you don’t set these, you’ll eventually see the dreaded Error 0x800704C8 (The process cannot access the file because it is being used by another process). This happens when your AV locks the VM’s configuration file exactly when Hyper-V tries to start it.
What about Windows Defender?
Good news for the truly lazy: if you are using built-in Microsoft Defender on Windows Server, it automatically detects the Hyper-V role and applies most of these exclusions for you. However, it does not always catch your custom storage paths (like E:\MyVMs), so always double-check your work!
Forgot Your ESXi Root Password? Reset It Without Reinstalling (vCenter Hack) | Lazy Admin Blog

We’ve all been there. You go to log into the DCUI or SSH into a host only to find the root password doesn’t work, and nobody documented the change.
According to VMware’s official stance, the only “supported” way to recover is a complete wipe and reinstall. But if your host is still managed by vCenter and you have Enterprise Plus licensing, there is a “lazy” (and highly effective) way out using Host Profiles.
How it works
When a host is added to vCenter, a special user called vpxa is created with full root privileges. We can use this existing “backdoor” to push a new configuration to the host, effectively overwriting the lost root password.
Step-by-Step Recovery
1. Extract the Profile
Right-click the “locked” host in the vSphere Web Client. Navigate to All vCenter Actions > Host Profiles > Extract Host Profile. Follow the wizard to create a template of that specific host’s configuration.
2. Edit the Security Settings
Go to Home > Host Profiles (under Management). Right-click your new profile and select Edit.
- Expand Security and Services.
- Expand Security Settings.
- Click on Security Configuration.
- In the dropdown, select: “Configure a fixed administrator password”.
- Enter and confirm your new root password.
3. Attach and Remediate
- Go back to Hosts and Clusters, right-click the host, and select Host Profiles > Attach Host Profile. Select the one you just edited.
- Maintenance Mode: You must put the host into Maintenance Mode.
- Remediate: Right-click the host again, select Host Profiles > Remediate. If you skip Maintenance Mode, vSphere will block the operation.
4. Finish
Once the remediation task completes, the host will reboot. Your new root password is now active!
Important Limitations
- Licensing: This requires Enterprise Plus. Standard or Essentials kits do not include Host Profiles.
- Connectivity: The host must be currently “Connected” in vCenter. If the management agent has crashed or the host is “Not Responding,” this method will not work.
The “Lazy Admin” Verdict
Reinstalling an ESXi host means reconfiguring networking, storage, and scratch partitions. Using a Host Profile takes about 10 minutes and keeps your uptime (and sanity) intact.
The Master List: VMware vCenter Release & Build Number History (Updated 2026) | Lazy Admin Blog

Version tracking is the backbone of lifecycle management. Whether you are patching against the latest security vulnerability or verifying compatibility for a backup agent, you need the exact build number.
Below is the comprehensive history of vCenter Server, from the cutting-edge vSphere 9.0 down to the legacy VirtualCenter 2.5.
vCenter Server 9.0 Build Numbers (Latest)
vSphere 9.0 represents the latest shift toward AI-integrated infrastructure and cloud-native operations.
| Name | Version | Release Date | Build Number |
| vCenter Server 9.0.2.0 | 9.0.2 | 01/20/2026 | 25148086 |
| vCenter Server 9.0.1.0 | 9.0.1 | 09/29/2025 | 24957454 |
| vCenter Server 9.0 GA | 9.0.0 | 06/17/2025 | 24755230 |
vCenter Server 8.0 Build Numbers
The 8.0 Update 3 branch is the current stable “workhorse” for most enterprise environments.
| Name | Version | Release Date | Build Number |
| vCenter Server 8.0 Update 3i | 8.0.3.00800 | 02/24/2026 | 25197330 |
| vCenter Server 8.0 Update 3h | 8.0.3.00700 | 12/15/2025 | 25092719 |
| vCenter Server 8.0 Update 3g | 8.0.3.00600 | 07/29/2025 | 24853646 |
| vCenter Server 8.0 Update 3e | 8.0.3.00500 | 04/11/2025 | 24674346 |
| vCenter Server 8.0 Update 3 | 8.0.3.00000 | 06/25/2024 | 24022515 |
| vCenter Server 8.0 Update 2 | 8.0.2.00000 | 09/21/2023 | 22385739 |
| vCenter Server 8.0 Update 1 | 8.0.1.00000 | 04/18/2023 | 21560480 |
| vCenter Server 8.0 GA | 8.0.0.10000 | 10/11/2022 | 20519528 |
vCenter Server 7.0 Build Numbers
Note: vCenter for Windows was officially removed starting with version 7.0.
| Name | Version | Release Date | Build Number |
| vCenter Server 7.0 Update 3w | 7.0.3.02500 | 09/29/2025 | 24927011 |
| vCenter Server 7.0 Update 3l | 7.0.3.01400 | 03/30/2023 | 21477706 |
| vCenter Server 7.0 Update 2 | 7.0.2.00000 | 03/09/2021 | 17694817 |
| vCenter Server 7.0 GA | 7.0.0.10100 | 04/02/2020 | 15952498 |
Legacy vCenter Server Build Numbers (vSphere 4.0 – 6.7)
| Name | Version | Release Date | Build Number |
| vCenter Server 6.7 Update 3w | 6.7.0.58000 | 10/28/2024 | 24337536 |
| vCenter Server 6.5 Update 3w | 6.5.0.43000 | 07/04/2024 | 24045034 |
| vCenter Server 6.0 Update 1 | 6.0 U1 | 09/10/2015 | 3018524 |
| vCenter Server 5.5 Update 3 | 5.5 U3 | 09/16/2015 | 3000241 |
| vCenter Server 5.1 Update 3 | 5.1 U3 | 12/04/2014 | 2306353 |
| vCenter Server 5.0 GA | 5.0 GA | 08/24/2011 | 456005 |
| vCenter Server 4.1 GA | 4.1 GA | 07/13/2010 | 259021 |
| vCenter Server 4.0 GA | 4.0 GA | 05/21/2009 | 162856 |
| VirtualCenter 2.5.0 GA | 2.5.0 | 12/10/2007 | 64192 |
Quick Tips for the Lazy Admin
- Check via VAMI: For 6.7 and newer, go to
https://<vcenter-ip>:5480. The version and build are right on the login screen. - Compatibility: Before upgrading vCenter, check the VMware Interoperability Matrix. Just because vCenter 9.0 is out doesn’t mean your older ESXi 6.7 hosts can talk to it!
- VCSA Migration: If you are still on version 6.5 or 6.7, your next step is a migration to the Appliance (VCSA). There is no “in-place” upgrade for Windows-based vCenter to 7.0+.
#VMware #vSphere9 #vCenter #SysAdmin #Virtualization #Datacenter #LazyAdmin #BuildNumbers #ITOps #PatchManagement
The Master List: VMware ESXi Release and Build Number History (Updated 2026) | Lazy Admin Blog

Is your host up to date? Checking the “About” section in your vSphere Client is step one, but cross-referencing that number against this list is how you confirm if you’re on a General Availability (GA) release, an Update, or an Express Patch.
vSphere ESXi 9.0 (Latest)
The new generation of the hypervisor, optimized for AI workloads and DPUs.
| Name | Version | Release Date | Build Number |
| VMware ESXi 9.0.2 | 9.0.2 | 2026-01-20 | 25148080 |
| VMware ESXi 9.0.1 | 9.0.1 | 2025-09-29 | 24957450 |
| VMware ESXi 9.0 GA | 9.0 GA | 2025-06-17 | 24755225 |
vSphere ESXi 8.0
The enterprise workhorse for 2024-2026.
| Name | Version | Release Date | Build Number |
| VMware ESXi 8.0 Update 3 | 8.0 U3 | 2024-06-25 | 24022510 |
| VMware ESXi 8.0 Update 2 | 8.0 U2 | 2023-09-21 | 22380479 |
| VMware ESXi 8.0 Update 1 | 8.0 U1 | 2023-04-18 | 21495797 |
| VMware ESXi 8.0 GA | 8.0 GA | 2022-10-11 | 20513097 |
vSphere ESXi 7.0
Note: This version introduced the new Lifecycle Manager (vLCM).
| Name | Version | Release Date | Build Number |
| VMware ESXi 7.0 Update 3w | 7.0 U3w | 2025-09-29 | 24927030 |
| VMware ESXi 7.0 Update 3 | 7.0 U3 | 2021-10-05 | 18644231 |
| VMware ESXi 7.0 GA | 7.0 GA | 2020-04-02 | 15843807 |
vSphere ESXi 6.x Legacy (Archive)
| Name | Version | Release Date | Build Number |
| VMware ESXi 6.7 Update 3 | 6.7 U3 | 2019-08-20 | 14320388 |
| VMware ESXi 6.5 Update 3 | 6.5 U3 | 2019-07-02 | 13932383 |
| VMware ESXi 6.0 Update 1a | 6.0 U1a | 2015-10-06 | 3073146 |
| VMware ESXi 6.0 GA | 6.0 GA | 2015-03-12 | 2494585 |
How to Verify Your Build Number
If you aren’t at your desk and only have SSH access to the host, you can find your build number instantly with this command:
vmware -v
Example Output:
VMware ESXi 8.0.0 build-20513097
Lazy Admin Tip 💡
Always remember the vCenter Interoperability Rule: Your vCenter Server must always be at a build version equal to or higher than your ESXi hosts. If you patch your hosts to vSphere 9.0 while vCenter is still on 8.0, your hosts will show as “Not Responding” or “Disconnected.”
#VMware #vSphere9 #ESXi #SysAdmin #Virtualization #PatchManagement #DataCenter #LazyAdmin #BuildNumbers #ITOperations
Emergency Log Collection: Generating and Uploading ESXi Support Bundles | Lazy Admin Blog
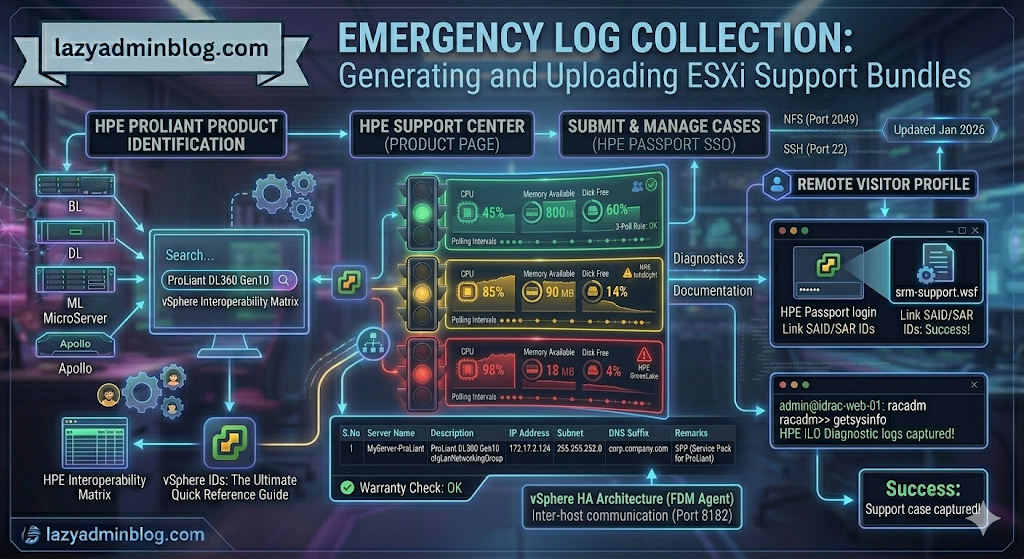
If you can’t generate a support bundle through vCenter, your best bet is the ESXi Shell. By running vm-support directly on the host, you bypass the management overhead and get your diagnostics faster.
Step 1: Generate Logs via SSH (CLI)
Before running the command, identify a datastore with at least 5-10GB of free space to store the compressed bundle.
- SSH into your ESXi host using Putty.
- Navigate to your chosen datastore:
cd /vmfs/volumes/YOUR_DATASTORE_NAME/ - Run the support command and redirect the output to a specific file name:Bash
vm-support -s > vm-support-HostName-$(date +%Y%m%d).tgz-sstands for “stream,” directing the output to the file you specified.- Tip: Using
$(date +%Y%m%d)automatically adds the current date to the filename.
- Once finished, use the vSphere Datastore Browser to download the
.tgzfile to your local workstation.
Step 2: Uploading to VMware via FileZilla
VMware provides a public FTP/SFTP landing zone for Support Requests (SR). While many admins use the browser, a dedicated client like FileZilla is much more reliable for large multi-gigabyte bundles.
Configure FileZilla for VMware
- Set Transfer Mode: Go to Transfer > Transfer type > Binary. This prevents file corruption during the upload.
- Open Site Manager: (File > Site Manager) and create a new site:
- Host:
ftpsite.vmware.com - Protocol: FTP (or SFTP if requested by support)
- Logon Type: Normal
- User:
inbound - Password:
inbound
- Host:
Navigating the Remote Site
- Connect to the server.
- Create your SR Folder: In the “Remote Site” pane, right-click and select Create Directory. Name it exactly after your 10-digit Support Request number (e.g.,
2612345678). - Upload: Locate your
.tgzbundle in the left pane (Local Site), right-click it, and select Upload.
Important Note: For security, the VMware FTP is “blind.” You will not see your files or folders once they are created/uploaded. Don’t panic if the directory looks empty after the transfer completes; as long as the transfer queue shows 100%, VMware has it.
#VMware #ESXi #Troubleshooting #SysAdmin #DataCenter #Virtualization #ITOps #FileZilla #LazyAdmin #TechTips
Troubleshooting VMware Tools Upgrade Failures on Windows Server 2003 | Lazy Admin Blog

In the world of legacy infrastructure, Windows Server 2003 virtual machines (VMs) occasionally hit a “brick wall” during VMware Tools upgrades. While VMware continues to investigate the root cause, the community has identified a manual “scrubbing” process to bypass the installer errors and force a clean installation.
🛑 Pre-Requisites & Data Collection
Before performing a manual registry cleanup, VMware Support recommends gathering the following data to help identify the underlying issue:
- Version Mapping: Note the current “from” version and the target “to” version.
- Upgrade Method: Are you using the “Interactive” installer, “Silent” switches, or vCenter’s “Automatic” update?
- Historical Data: Open the Windows Event Viewer, search for Event Source: MsiInstaller, and look for Event ID: 1034 to find traces of previous installation attempts.
🛠️ The Fix: Manual Registry & System Scrubbing
[!CAUTION] Warning: This procedure involves modifying the Windows Registry. Incorrect changes can destabilize your OS. Always take a full VM Snapshot and a Registry Backup before proceeding.
1. Registry Cleanup (Installer Keys)
Log in as an Administrator, open regedit, and navigate to/delete the following keys if they exist:
HKEY_CLASSES_ROOT\Installer\Features\05014B32081E884E91FB41199E24004HKEY_CLASSES_ROOT\Installer\Products\05014B32081E884E91FB41199E24004HKEY_LOCAL_MACHINE\SOFTWARE\Classes\Installer\Features\05014B32081E884E91FB41199E24004HKEY_LOCAL_MACHINE\SOFTWARE\Classes\Installer\Products\05014B32081E884E91FB41199E24004HKEY_LOCAL_MACHINE\SOFTWARE\Microsoft\Windows\CurrentVersion\Installer\UserData\S-1-5-18\Components\B150AC107B12D11A9DD0006794C4E25HKEY_LOCAL_MACHINE\SOFTWARE\Microsoft\Windows\CurrentVersion\Uninstall\{3B410500-1802-488E-9EF1-4B11992E0440}HKEY_LOCAL_MACHINE\SOFTWARE\VMware, Inc.
2. Service Removal
Deep-seated services can block the new installer. Delete these keys under CurrentControlSet\Services:
VMToolsVMUpgradeHelperVMware Physical Disk Helper Servicevmvss
3. File System Cleanup
Once the registry is clear, you must remove the physical binary remnants:
- Open Windows Explorer.
- Delete the folder:
%ProgramFiles%\VMware\VMware Tools. - Restart the Virtual Machine. This step is non-negotiable as it clears the memory and releases hooks on drivers.
🚀 Final Step: Fresh Installation
After the reboot, the system will be “clean” of previous VMware Tools traces. You can now mount the VMware Tools ISO through your vSphere client and run a fresh installation.
Pro-Tip: If the VM has other VMware products installed (like vCenter Server), do not do a blanket search-and-destroy for the term “VMware” in the registry. Stick strictly to the keys listed above to avoid breaking other applications.
Fix vCenter Performance Overview Error: “Navigation to the webpage was cancelled” (1014454)

If your Performance Overview tab is showing a blank screen or a “navigation cancelled” error, it usually means the vSphere Client can’t reach the underlying stats reporting service. This often happens after a DNS change, an upgrade, or when a third-party app steals a required port.
Follow these troubleshooting steps in order to restore your performance charts.
Step 1: Check the vCenter Web Management Service
The performance tab isn’t part of the core vCenter service; it runs on a separate web management service.
- Log into the vCenter Server.
- Open Services.msc.
- Verify that VMware VirtualCenter Management Webservices is started. If it is, try restarting it.
Step 2: Bypass DNS (The .xml Edit)
If vCenter is having trouble resolving its own FQDN, the Performance tab will fail to load.
- Navigate to:
C:\Program Files\VMware\Infrastructure\VirtualCenter Server\extensions\com.vmware.vim.stats.report\ - Open extension.xml in a text editor (as Administrator).
- Locate the line:
<url>https://vcenter-hostname:8443/statsreport/vicr.do</url> - Change the hostname to the Static IP address of your vCenter server.
- Restart the vCenter Web Management Service.
Step 3: Check for Port Conflicts (Port 8443)
Performance Overview uses port 8443. Sometimes other web services (like IIS or Apache) grab this port first.
- The Test: Stop the “VMware VirtualCenter Management Webservices.”
- Open Command Prompt and run:
telnet <vCenter-IP> 8443 - The Result: If the port responds while the VMware service is stopped, another application is interfering. You will need to identify that app or change the vCenter web port.
Step 4: Browser & Proxy Settings
The vSphere client uses the local Internet Explorer engine to render the performance tab.
- Open Internet Options on your workstation.
- Go to the Connections tab > LAN Settings.
- Uncheck Use automatic configuration script and Proxy server.
- If the issue is only happening on external workstations, ensure the Windows Firewall on the vCenter server is allowing traffic on port 8443.
#VMware #vSphere #vCenter #SysAdmin #Virtualization #Troubleshooting #DataCenter #TechTips #LazyAdmin #CloudAdmin #ITPro