
Windows Server
VBScript: Batch Audit Service Status Across Multiple Windows Servers

Keeping track of critical services—like SQL, IIS, or Print Spooler—across a large server farm is a common headache for admins. While PowerShell is the modern go-to, many legacy environments and specific automation workflows still rely on the reliability of VBScript and WMI (Windows Management Instrumentation).
This script allows you to pull a full inventory of every service on a list of servers, including their start mode (Automatic/Manual), current state (Running/Stopped), and the Service Account being used.
Prerequisites & Setup
- Create the workspace: Create a folder named
C:\Temp\ServiceDetails. - The Server List: Create a file named
Servers.txtin that folder. List your server names or IP addresses, one per line. - Permissions: You must run this script from an account that has Local Administrator rights on all target servers to query WMI.
The VBScript Solution
Save the code below as ServiceDetails.vbs in your C:\Temp\ServiceDetails folder.
' --- START OF SCRIPT ---ServerList = "C:\Temp\ServiceDetails\Servers.txt"arrServices = Array("") ' Leave empty to get all servicesDim objFSO : Set objFSO = CreateObject("Scripting.FileSystemObject")Dim objOut : Set objOut = objFSO.CreateTextFile("C:\Temp\ServiceDetails\ServiceQuery.csv")arrComputers = Split(objFSO.OpenTextFile(ServerList).ReadAll, vbNewLine) ' Write CSV HeadersObjOut.WriteLine "SERVER, SERVICE DISPLAY NAME, SERVICE STARTMODE, SERVICE STATUS, SERVICE ACCOUNT"For Each strComputer In arrComputers If Trim(strComputer) <> "" Then strAlive = IsAlive(strComputer) objFound = 0 If strAlive = "Alive" Then On Error Resume Next Set objWMIService = GetObject("winmgmts:\\" & strComputer & "\root\CIMV2") If Err.Number <> 0 Then ObjOut.WriteLine strComputer & ", WMI ERROR, N/A, N/A, N/A" Err.Clear Else Set colItems = objWMIService.ExecQuery("SELECT * FROM Win32_Service") For Each objItem In colItems ObjOut.WriteLine strComputer & "," & objItem.DisplayName & "," & objItem.StartMode & "," & objItem.State & "," & objItem.StartName objFound = 1 Next End If Else ObjOut.WriteLine strComputer & "- UnResolved, N/A, N/A, N/A, N/A" End If End IfNextobjOut.CloseMsgBox "Service Export Complete!", 64, "LazyAdmin Notification"' Function to Ping the server before attempting WMI connectionFunction IsAlive(strComputer) Set WshShell = WScript.CreateObject("WScript.Shell") Set objExecObject = WshShell.Exec("%comspec% /c ping -n 1 -w 500 " & strComputer) strText = objExecObject.StdOut.ReadAll() If Instr(strText, "Reply from") > 0 Then IsAlive = "Alive" Else IsAlive = "Dead" End If End Function
How it Works
- WMI (Win32_Service): The script connects to the
root\CIMV2namespace on the remote machine to query theWin32_Serviceclass. This is the same data you see inservices.msc. - The Ping Check: Before trying to connect (which can be slow if a server is down), the
IsAlivefunction pings the host. This significantly speeds up the script if you have offline servers in your list. - CSV Output: All data is appended to a
.csvfile, making it ready for a pivot table in Excel to find services running under old service accounts or identifying disabled critical services.
#SysAdmin #WindowsServer #VBScript #WMI #ITAutomation #ServerManagement #TechTips #LazyAdmin #Infrastructure #ITAudit
Batch Script: Query Disk Space Across Multiple Servers using PsInfo

Managing disk space across a sprawling server environment is a constant challenge. While modern monitoring tools exist, sometimes you just need a quick, lightweight way to pull drive statistics from a specific list of servers without setting up complex infrastructure.
This “Lazy Admin” solution uses the classic PsInfo utility from the Microsoft Sysinternals suite to sweep your network and compile disk data into a single CSV.
Prerequisites
Before running the script, ensure you have the following in a single folder:
- PsInfo.exe: Download this as part of the PSTools suite from Microsoft.
- Servers.txt: A simple text file containing the names or IP addresses of your target servers (one per line).
- Admin Rights: You must execute the script with a domain account that has local administrative privileges on the remote servers.
The DiskSpace.cmd Script
Copy the code below and save it as DiskSpace.cmd in your PSTools folder.
@Echo OffSetLocal EnableDelayedExpansion:: Delete existing report if it existsIF EXIST Free_Disk_Space_Servers.csv DEL Free_Disk_Space_Servers.csv:: Loop through the Servers.txt fileFOR /F "Tokens=*" %%L IN (Servers.txt) DO ( SET ServerName=%%L Echo Processing !ServerName!... :: Run PsInfo against the remote server and append output to CSV :: The -d switch pulls disk volume information Psinfo -d /accepteula \\!ServerName! >> Free_Disk_Space_Servers.csv)Echo Export Complete: Free_Disk_Space_Servers.csvPause
How it Works
Psinfo -d: The-dflag tells the utility to display volume information, including drive letters, total size, and free space.SetLocal EnableDelayedExpansion: This allows the script to update theServerNamevariable dynamically as it loops through your text file.>> Free_Disk_Space_Servers.csv: This appends the output of every server query into one continuous file./accepteula: Added to the command to ensure the script doesn’t hang waiting for you to click “Accept” on the Sysinternals license agreement for every server.
💡 Lazy Admin Tip
The output from PsInfo is a bit “chatty” for a standard CSV. Once you open it in Excel, use the Data > Text to Columns feature or simple Find/Replace to clean up the headers. If you need a more modern, native approach, consider using a PowerShell one-liner like: Get-WmiObject Win32_LogicalDisk -ComputerName (Get-Content Servers.txt) | Select-Object SystemName, DeviceID, FreeSpace
#SysAdmin #WindowsServer #Sysinternals #PSTools #BatchScript #ITPro #DiskManagement #LazyAdmin #ServerAudit #TechTips
How to Export Folder and Share Permissions to CSV via PowerShell

Auditing file share permissions is a critical task for security and compliance. While the Windows GUI allows you to view permissions one folder at a time, it is impossible to get a “big picture” view without automation.
By using the Get-Acl (Access Control List) cmdlet in PowerShell, you can recursively scan a directory and export every user and group permission to a clean CSV file for review in Excel.
The PowerShell Script
Save the following code as ExportFolderPermissions.ps1. Before running it, ensure you update the $FolderPath and the output path for the CSV file.
# Define the source path (Local folder or UNC Share)$FolderPath = dir -Directory -Path "\\ServerName\SharePath" -Recurse -Force$Report = @()Foreach ($Folder in $FolderPath) { # Fetch the Access Control List for the current folder $Acl = Get-Acl -Path $Folder.FullName foreach ($Access in $acl.Access) { # Create an ordered object for each permission entry $Properties = [ordered]@{ 'FolderName' = $Folder.FullName 'AD Group or User' = $Access.IdentityReference 'Permissions' = $Access.FileSystemRights 'Inherited' = $Access.IsInherited } $Report += New-Object -TypeName PSObject -Property $Properties }}# Export the final report to CSV$Report | Export-Csv -Path "C:\Temp\FolderPermissions.csv" -NoTypeInformation
How the Script Works
dir -Recurse: This command crawls through every subfolder within your target directory. The-Directoryswitch ensures we only look at folders, not individual files (which would make the report massive).Get-Acl: This retrieves the security descriptor for the folder, including who has access and what specific rights they have (Read, Write, Full Control, etc.).PSObject: We bundle the folder name, user identity, and rights into a custom object so thatExport-Csvcan easily format them into columns.IdentityReference: This shows you the exact AD Group or User name assigned to that folder.
💡 Lazy Admin Tips
- Run as Admin: You must run PowerShell as an Administrator and have “Read Permissions” rights on the target folders, or the script will return “Access Denied” errors.
- Performance: Scanning thousands of subfolders over a slow network link can take time. If you have a massive file server, run the script locally on the server itself rather than over a mapped drive.
- Filter Results: Once you open the CSV in Excel, use Filters to quickly find “Everyone” or “Anonymous” permissions, or to see which folders have inheritance disabled.
#PowerShell #SysAdmin #ActiveDirectory #SecurityAudit #WindowsServer #ITPro #Coding #LazyAdmin #CyberSecurity #TechTips
Mapping Your AD: VBScript to List OUs in Parent-Child Order | Lazy Admin Blog

When you’re managing a complex Active Directory environment, getting a clear “birds-eye view” of your structure is essential. While the Active Directory Users & Computers (dsa.msc) snap-in is great for manual navigation, sometimes you need a flat text output that preserves the visual hierarchy of your Organizational Units (OUs).
The following VBScript crawls your LDAP directory and mirrors the parent-child nesting you see in your GUI tools.
📜 The Script: ListAllOUs_ParentChild.vbs
Copy the code below and save it as ListAllOUs_ParentChild.vbs.
Option ExplicitConst ADS_SCOPE_SUBTREE = 2Dim ObjConn, ObjRS, ObjRootDSEDim StrSQL, StrDomName, ObjOU' Get the local domain nameSet ObjRootDSE = GetObject("LDAP://RootDSE")StrDomName = Trim(ObjRootDSE.Get("DefaultNamingContext"))Set ObjRootDSE = Nothing' SQL Query to find OUs (Excluding Domain Controllers)StrSQL = "Select Name, ADsPath From 'LDAP://" & StrDomName & "' Where ObjectCategory = 'OrganizationalUnit' And Name <> 'Domain Controllers'"Set ObjConn = CreateObject("ADODB.Connection")ObjConn.Provider = "ADsDSOObject"ObjConn.Open "Active Directory Provider"Set ObjRS = CreateObject("ADODB.Recordset")ObjRS.Open StrSQL, ObjConnIf Not ObjRS.EOF Then ObjRS.MoveLast: ObjRS.MoveFirst WScript.Echo vbNullString WScript.Echo "Total OU: " & Trim(ObjRS.RecordCount) WScript.Echo "===================" WScript.Echo vbNullString While Not ObjRS.EOF Set ObjOU = GetObject(Trim(ObjRS.Fields("ADsPath").Value)) ' Check if it's a top-level Parent OU If StrComp(Right(Trim(ObjOU.Parent), Len(Trim(ObjOU.Parent)) - 7), StrDomName, VbTextCompare) = 0 Then WScript.Echo "Parent OU: " & Trim(ObjRS.Fields("Name").Value) GetChild(ObjOU) End If ObjRS.MoveNext Set ObjOU = Nothing WendEnd IfObjRS.Close: Set ObjRS = NothingObjConn.Close: Set ObjConn = Nothing' Subroutine to find first-level childrenPrivate Sub GetChild(ThisObject) Dim ObjChild For Each ObjChild In ThisObject If StrComp(Trim(ObjChild.Class), "OrganizationalUnit", VbTextCompare) = 0 Then WScript.Echo vbTab & ">> Child OU: " & Right(Trim(ObjChild.Name), Len(Trim(ObjChild.Name)) - 3) GetGrandChild (ObjChild.ADsPath) End If NextEnd Sub' Recursive subroutine to find all nested childrenPrivate Sub GetGrandChild (ThisADsPath) Dim ObjGrand, ObjItem Set ObjGrand = GetObject(ThisADsPath) For Each ObjItem In ObjGrand If StrComp(Trim(ObjItem.Class), "OrganizationalUnit", VbTextCompare) = 0 Then WScript.Echo vbTab & vbTab & ">> Child OU: " & Right(Trim(ObjItem.Name), Len(Trim(ObjItem.Name)) - 3) GetGrandChild Trim(ObjItem.ADsPath) End If Next Set ObjGrand = NothingEnd Sub
🚀 How to Execute
To run this script correctly and avoid “Windows Script Host” popup boxes for every line, you must use the command-line engine (CScript).
Example Command: CScript /NoLogo ListAllOUs_ParentChild.vbs
Output Preview:
Parent OU: Sales
Child OU: North_Region
Child OU: South_Region
>> Child OU: Retail_Stores
#ActiveDirectory #SysAdmin #WindowsServer #Automation #VBScript #ITAdmin #LazyAdmin #LDAP #DirectoryServices #InfrastructureAsCode #Scripting #ADUC
Deep Audit: Listing Nested Active Directory Group Members via VBScript | Lazy Admin Blog

Have you ever looked at a “Domain Admins” group and thought it looked suspiciously small? The culprit is usually nesting. Standard AD queries often fail to “recurse,” meaning they show you the subgroup but not the people inside it.
This script, ListGroupMembers_IncludingNested.vbs, uses a recursive function to dive into every sub-group and extract the actual users, ensuring your security audits are 100% accurate.
The Script: How it Works
The script utilizes a Dictionary Object to keep track of groups it has already scanned. This is a critical “Lazy Admin” safety feature—it prevents the script from getting stuck in an infinite loop if two groups are members of each other.
Usage Instructions
- Copy the code below into Notepad.
- Edit the
StrGroupNamevariable to match your target group. - Save the file as
ListGroupMembers.vbs. - Run it from the command prompt using
cscript ListGroupMembers.vbs.
' -- Save as ListGroupMembers_IncludingNested.vbsOption ExplicitDim ObjRootDSE, ObjConn, ObjRS, ObjCustomDim StrDomainName, StrGroupName, StrSQL, StrGroupDN, StrEmptySpaceSet ObjRootDSE = GetObject("LDAP://RootDSE")StrDomainName = Trim(ObjRootDSE.Get("DefaultNamingContext"))' -- Edit the line below with your Group NameStrGroupName = "YourGroupNameHere" StrSQL = "Select ADsPath From 'LDAP://" & StrDomainName & "' Where ObjectCategory = 'Group' AND Name = '" & StrGroupName & "'"Set ObjConn = CreateObject("ADODB.Connection")ObjConn.Provider = "ADsDSOObject": ObjConn.Open "Active Directory Provider"Set ObjRS = ObjConn.Execute(StrSQL)If ObjRS.EOF Then WScript.Echo "Group not found: " & StrGroupNameElse StrGroupDN = Trim(ObjRS.Fields("ADsPath").Value) Set ObjCustom = CreateObject("Scripting.Dictionary") GetAllNestedMembers StrGroupDN, " ", ObjCustomEnd If
Why VBScript in 2026?
While PowerShell is the modern standard, many legacy environments and automated scheduled tasks still rely on VBScript because it requires zero execution policy changes and runs natively on every Windows machine since Server 2000. It is the “Old Reliable” of the AD world.
Key Features of this Script
- Recursive Discovery: It doesn’t just stop at the first layer.
- Class Identification: Clearly marks if a member is a
User,Computer, or anotherGroup. - Loop Protection: Uses the
Scripting.Dictionaryto escape circular nesting traps.
#ActiveDirectory #WindowsServer #CyberSecurity #SysAdmin #ITAudit #VBScript #Automation #LazyAdmin #TechArchive
Stop Hunting for Web Servers: How to Auto-Discover Every IIS Instance in Your Domain | Lazy Admin Blog

Have you ever been asked for a list of every active web server in your environment, only to realize your documentation is six months out of date? You could check your DNS records manually, or you could let PowerShell do the detective work for you.
This script scans your Active Directory for Windows Servers, checks if the World Wide Web Publishing Service (W3SVC) is actually running, and then pulls a deep-profile of the hardware, OS, and network configuration for every active hit.
The Setup
- Create the workspace: Create a folder at
C:\Temp\ServersRunningIIS. - Prepare the list: The script will automatically generate a list of all Windows Servers from AD, but ensure you have the Active Directory PowerShell module installed.
- Run with Privileges: Since the script uses WMI to query remote system info (RAM, OS Version, etc.), run your PowerShell ISE or Console as a Domain Admin.
The PowerShell Script
# Script: IIS Server Discovery & Profiler# Location: lazyadminblog.com# Purpose: Identify active IIS nodes and collect hardware/OS specsImport-Module ActiveDirectory# 1. Harvest all Windows Servers from ADWrite-Host "Gathering server list from Active Directory..." -ForegroundColor Cyan$servers = Get-ADComputer -Filter {operatingsystem -Like "Windows server*"} | Select-Object -ExpandProperty Name$servers | Out-File "C:\Temp\ServersRunningIIS\serverlist.txt"# 2. Load the list for processing$serversall = Get-Content "C:\Temp\ServersRunningIIS\serverlist.txt" Start-Transcript -Path "C:\Temp\ServersRunningIIS\log_output.txt" -Appendforeach($vm in $serversall) { try { # Check if IIS Service (W3SVC) exists and is running $iis = Get-WmiObject Win32_Service -ComputerName $vm -Filter "name='W3SVC'" -ErrorAction SilentlyContinue if($iis.State -eq "Running") { Write-Host "FOUND: IIS is active on $vm" -BackgroundColor DarkBlue -ForegroundColor DarkYellow # Collect Network Info $ipinfo = Get-WmiObject Win32_NetworkAdapterConfiguration -ComputerName $vm | Where-Object {$_.IPEnabled -eq $true -and $_.IPAddress -like "1*"} | Select-Object -First 1 # Collect Hardware Info $hwinfo = Get-WmiObject Win32_Computersystem -ComputerName $vm # Collect OS Info $osinfo = Get-WmiObject Win32_OperatingSystem -ComputerName $vm # Flattening data for CSV-style output $allinfo = "$($hwinfo.Name);$($hwinfo.Domain);$($ipinfo.IPAddress);$($ipinfo.IPSubnet);$($ipinfo.DefaultIPGateway);$($hwinfo.TotalPhysicalMemory);$($hwinfo.Manufacturer);$($hwinfo.Model);$($osinfo.Caption);$($osinfo.OSArchitecture);$($osinfo.ServicePackMajorVersion);$($osinfo.SystemDrive);$($osinfo.Version)" # Save results to our 'Running' list $allinfo | Out-File "C:\Temp\ServersRunningIIS\RunningWebServers.txt" -Append } } catch { Write-Host "Could not connect to $vm" -ForegroundColor Red }}Stop-TranscriptWrite-Host "Audit Complete! Check C:\Temp\ServersRunningIIS\RunningWebServers.txt" -ForegroundColor Green
What’s inside the report?
The output file (RunningWebServers.txt) uses a semicolon (;) delimiter, making it easy to import into Excel. It captures:
- Network: IP Address, Subnet, and Gateway.
- Hardware: Manufacturer, Model, RAM, and Domain membership.
- Software: OS Version, Architecture (x64/x86), and System Drive.
Lazy Admin Tip
If you want to open the results immediately in Excel, just rename the output file from .txt to .csv and use the “Text to Columns” feature in Excel with the semicolon as the separator!
Hyper-V Performance Hack: The Essential Antivirus Exclusions List | Lazy Admin Blog
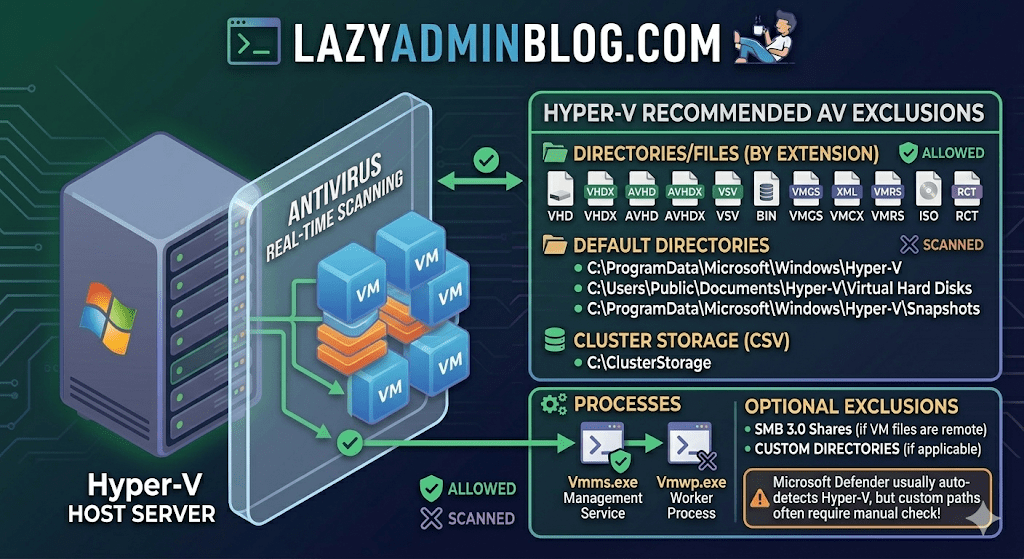
Running antivirus on your Hyper-V host is a security must, but if you don’t configure it correctly, you’re asking for trouble. We’re talking “disappearing” VMs, corrupted virtual disks, and performance so sluggish you’ll think you’re back on physical hardware from 2005.
The culprit is usually the Real-Time Scanning engine trying to “inspect” a 100GB .vhdx file every time the guest OS writes a single bit. Here is the definitive “Lazy Admin” guide to Hyper-V AV exclusions.
1. File Extension Exclusions
Tell your AV to keep its hands off these specific virtual machine file types:
- Virtual Disks:
.vhd,.vhdx - Snapshots/Checkpoints:
.avhd,.avhdx - Saved State:
.vsv,.bin,.vmgs - Configuration:
.xml,.vmcx,.vmrs - ISO Images:
.iso - Tracking:
.rct(Resilient Change Tracking)
2. Directory Exclusions
If you are using the default paths, exclude these. If you have a dedicated D:\VMs drive (which you should!), exclude that entire custom path as well.
- Default Configs:
C:\ProgramData\Microsoft\Windows\Hyper-V - Default VHDs:
C:\Users\Public\Documents\Hyper-V\Virtual Hard Disks - Default Snapshots:
C:\ProgramData\Microsoft\Windows\Hyper-V\Snapshots - Cluster Shared Volumes (CSV):
C:\ClusterStorage - Hyper-V Replica: Any custom replication data folders.
- SMB 3.0 Shares: If your VMs live on a remote file server, apply these same exclusions to that file server!
Lazy Admin Pro-Tip: If you’re using a Cluster, don’t just exclude the
C:\ClusterStoragefolder by path. Use the Volume ID (get it viamountvol) to ensure the exclusion sticks even if drive letters or paths shift.
3. Process Exclusions
Sometimes excluding the file isn’t enough; you need to exclude the “person” opening the file. Exclude these core Hyper-V executables:
- Vmms.exe: The Virtual Machine Management Service.
- Vmwp.exe: The Virtual Machine Worker Process (one runs for every active VM).
- Vmcompute.exe: (For Windows Server 2019+) The Host Compute Service.
Why this matters (The “Error 0x800704C8”)
If you don’t set these, you’ll eventually see the dreaded Error 0x800704C8 (The process cannot access the file because it is being used by another process). This happens when your AV locks the VM’s configuration file exactly when Hyper-V tries to start it.
What about Windows Defender?
Good news for the truly lazy: if you are using built-in Microsoft Defender on Windows Server, it automatically detects the Hyper-V role and applies most of these exclusions for you. However, it does not always catch your custom storage paths (like E:\MyVMs), so always double-check your work!
Stop Brute Force Cold: How to Rename the Local Administrator via GPO | Lazy Admin Blog

The “Administrator” account is a universal target. Because every Windows machine has one by default, hackers already have 50% of the login equation—the username. By renaming this built-in account across your entire Active Directory domain, you significantly lower the risk of automated brute-force attacks.
Best of all? You don’t have to touch a single workstation. We can do this globally using Group Policy Preferences (GPP).
Step 1: Create or Edit your GPO
- Open the Group Policy Management console (
gpmc.msc). - Create a new GPO (e.g., “Security – Rename Local Admin”) or edit an existing one linked to your target Workstations or Servers OU.
- Right-click the GPO and select Edit.
Step 2: Configure the Local User Preference
Navigate to the following path within the editor: Computer Configuration > Preferences > Control Panel Settings > Local Users and Groups
- Right-click Local Users and Groups and select New > Local User.
- Configure the following settings in the dialog box:
- Action: Select Update.
- User name: Select Administrator (built-in) from the dropdown. (Using the built-in identifier ensures the rename works even if the account was previously renamed).
- Rename to: Enter your new, non-obvious username (e.g.,
SrvManager_Admin). - Full name: Enter a descriptive name.
- Password: You can optionally reset the password here, though using LAPS (Local Administrator Password Solution) is recommended for password management.
Step 3: Deployment & Verification
By default, Group Policy refreshes every 90 minutes. If you want to see the change immediately on a specific client, run the following command in an elevated prompt:
DOS
gpupdate /force
Is it working?
If the name hasn’t changed, use the GPResult tool to see if the policy is being applied to the computer object:
DOS
gpresult /r
Troubleshooting Tips:
- OU Check: Ensure the Computer object is actually inside the OU where the GPO is linked.
- Security Filtering: Verify that Authenticated Users or Domain Computers have “Read” and “Apply Group Policy” permissions in the GPO’s Delegation tab.
- Replication: If some sites see the change and others don’t, check your Domain Controller replication status.
Why this is a “Lazy Admin” Win
Instead of using scripts or manual intervention, GPO Preferences handle the logic for you. If you ever need to change the name again, you update one field in the GPO, and the entire domain follows suit.
Fixing Server Manager Error 0x800706BE: The Missing MUM/CAT Mystery | Lazy Admin Blog

If your Server Manager is blank, showing a yellow bang, or refusing to refresh with a “Remote Procedure Call Failed” error, you aren’t looking at a network issue—you’re looking at a corrupted Windows Update store.
When Windows cannot validate the files in the C:\Windows\Servicing\Packages directory, the Server Manager discovery process crashes. Here is how to perform manual surgery on the CBS store to fix it.
The Symptom
- Error Code: 0x800706BE
- Event ID: 1601 (Microsoft-Windows-ServerManager/Operational)
- Message: Could not discover the state of the system.
Step 1: The Diagnostics (CheckSUR)
First, we need to know exactly which files are broken.
- Download and run the System Update Readiness Tool (CheckSUR) (KB947821) or, on newer versions of Windows Server, run:
DISM.exe /Online /Cleanup-image /Scanhealth - Once finished, open the log file:
%Systemroot%\Logs\CBS\Checksur.log - Look for lines starting with
(f) CBS MUM Corruptor(f) CBS MUM Missing. These are your “targets.”
Step 2: Gain Control of the Packages Folder
By default, even an Administrator cannot write to the Servicing folder. You must take ownership:
DOS
takeown /F C:\Windows\Servicing\Packages /D y /Ricacls C:\Windows\Servicing\Packages /save %temp%\AclFile /Ticacls C:\Windows\Servicing\Packages /grant %username%:F /T
Step 3: Extract and Replace the “Grafts”
Now you need to “borrow” healthy files from the original Update files to replace your corrupt ones.
- Download the KB: Download the
.msufile for the KB number listed as corrupt in your log. - Expand the MSU:
expand -F:* Windows6.1-KB978601-x64.msu C:\Repair - Expand the CAB: Inside that folder, find the
.cabfile and expand it too:expand -F:* Windows6.1-KB978601-x64.cab C:\Repair\CAB - The Extraction: Inside the
CABfolder, findupdate.mumandupdate.cat.
Step 4: The Rename and Replace
This is where precision matters. You must rename those generic files to match the exact long string found in your Checksur.log.
- Example Rename:
- From:
update.mum - To:
Package_for_KB978601~31bf3856ad364e35~amd64~~6.0.1.0.mum
- From:
- Move: Copy these renamed files into
C:\Windows\Servicing\Packages.
Step 5: Verify the Fix
Close and reopen Server Manager. It should now trigger a fresh discovery without the RPC error. If it still fails, check the Checksur.log again—you likely have more missing packages to replace!
Lazy Admin Tip 💡
If you have another server running the exact same OS and patch level, you can often just copy the healthy .mum and .cat files from the “Good” server’s C:\Windows\Servicing\Packages folder to the “Bad” one. It’s much faster than manually expanding CAB files!
#WindowsServer #SysAdmin #ServerManager #Troubleshooting #ITOps #Microsoft #TechSupport #LazyAdmin #WindowsUpdate
The Permission Panic: How to Backup and Restore Share & NTFS Permissions | Lazy Admin Blog

It only takes one “Inheritance” checkbox error to bring a department to a standstill. If you are migrating a file server or just performing routine maintenance, having a permission backup is your “Undo” button.
1. Share Permissions (The Registry Method)
“Share” permissions (the ones you see in the Sharing tab) are not stored on the files themselves; they are stored in the Windows Registry.
To Backup: Open a Command Prompt (Admin) and run:
DOS
reg export HKLM\SYSTEM\CurrentControlSet\Services\LanmanServer\Shares shareperms.reg
To Restore: Simply import the file back on the new or repaired server:
DOS
reg import shareperms.reg
Note: You must restart the ‘Server’ service or reboot for the shares to reappear.
2. NTFS Permissions (The icacls Method)
NTFS permissions (the “Security” tab) are much more complex. We use the built-in icacls tool to handle these.
The Backup Command:
DOS
icacls d:\data /save ntfsperms.txt /t /c
- /t: Recurses through all subfolders.
- /c: Continues even if it hits a single file error (like a long file path).
The “Tricky” Restore Command: When restoring, icacls treats the paths inside the text file as relative. If your backup file says “Data\Folder1,” and you try to restore to D:\Data, it will look for D:\Data\Data\Folder1.
The Correct Syntax:
DOS
icacls d:\ /restore ntfsperms.txt
Lazy Admin Warning: Always point the restore command one level above the folder you backed up. If you backed up
D:\Data, restore toD:\.
Understanding the “Secret Code” (SDDL)
If you open your ntfsperms.txt file, you’ll see strings like D:AI(A;ID;FA;;;BA). This is Security Descriptor Definition Language (SDDL).
- BA = Built-in Administrators
- SY = Local System
- AU = Authenticated Users
It looks like gibberish, but to the Windows Kernel, it is a perfect map of your security infrastructure.
#WindowsServer #SysAdmin #DisasterRecovery #NTFS #FileServer #TechTips #CyberSecurity #ITAdmin #LazyAdmin