
vSphere
Automation: Bulk Create and Delete VM Snapshots Across Linked vCenters | Lazy Admin Blog

In a large environment, taking snapshots before a major patch or application update is a standard safety net. But if you have servers spread across multiple vCenters in Linked Mode (e.g., Datacenter1 and Datacenter2), clicking through the vSphere Client is a waste of time.
Today, I’m sharing a “Lazy Admin” script that allows you to bulk create, check, and remove snapshots using a simple CSV list.
Prerequisites
- VMware PowerCLI: Ensure the PowerCLI module is installed on the machine running the script.
- CSV Setup: Create a file named
snapshot_servers.csvinC:\Temp\VMSnapshots\.
The CSV should look like this: | Host | Location | | :— | :— | | Server01 | Datacenter1 | | Server02 | Datacenter2 |
Part 1: Creating Snapshots
- Open PowerShell ISE with vCenter Administrator credentials.
- Load the functions by running the full script (provided below).
- Run the following command:
Create-VMSnapshots -SS_CSV "C:\Temp\VMSnapshots\snapshot_servers.csv" -SS_Name "Pre-Patching" -SS_Description "Requested by App Team"
The script will iterate through your CSV and create snapshots sequentially. You can monitor the progress in the vSphere Tasks console.
Part 2: Deleting Snapshots
Once your changes are verified, don’t let those snapshots linger and bloat your datastores! To remove them:
- Use the same
snapshot_servers.csvlist. - Run the following command:
Remove-VMSnapshots -SS_CSV "C:\Temp\VMSnapshots\snapshot_servers.csv"
Note: This is a sequential script; it will wait for one snapshot removal to finish before moving to the next to avoid pinning your storage I/O.
The Script: VMSnapshots.ps1
Save this code to C:\Temp\VMSnapshots\VMSnapshots.ps1.
function Create-VMSnapshots { param ( [string]$SS_CSV = $(Read-Host "Enter path to CSV"), [string]$SS_Name = $(Read-Host "Enter name for snapshots"), [string]$SS_Description = $(Read-Host "Enter description for snapshots") ) # Import VMware PowerCLI Module If ( !(Get-Module -Name VMware.VimAutomation.Core -ErrorAction SilentlyContinue) ) { import-module VMware.VimAutomation.Core } $Servers = Import-CSV $SS_CSV $WLM_vCenter = Connect-VIServer vCenter1 -WarningAction SilentlyContinue $EDN_vCenter = Connect-VIServer vCenter2 -WarningAction SilentlyContinue ForEach($Server in $Servers){ If($Server.Location -eq 'Datacenter1'){ New-Snapshot -VM $Server.Host -Name $SS_Name -Description $SS_Description -Quiesce -Server $WLM_vCenter -WarningAction SilentlyContinue } ElseIf($Server.Location -eq 'Datacenter2'){ New-Snapshot -VM $Server.Host -Name $SS_Name -Description $SS_Description -Quiesce -Server $EDN_vCenter -WarningAction SilentlyContinue } } }function Check-VMSnapshots { param ( [string]$SS_CSV = $(Read-Host "Enter path to CSV"), [string]$SS_Name = $(Read-Host "Enter snapshot name") ) # Import VMware PowerCLI Module If ( !(Get-Module -Name VMware.VimAutomation.Core -ErrorAction SilentlyContinue) ) { import-module VMware.VimAutomation.Core } $Servers = Import-CSV $SS_CSV $WLM_vCenter = Connect-VIServer vCenter1 -WarningAction SilentlyContinue $EDN_vCenter = Connect-VIServer vCenter2 -WarningAction SilentlyContinue ForEach($Server in $Servers){ If($Server.Location -eq 'Datacenter1'){ Get-Snapshot -VM $Server.Host -Name $SS_Name -Server $WLM_vCenter | Select VM, Name, @{ n="SpaceUsedGB"; e={[math]::round( $_.SizeGB )}} -WarningAction SilentlyContinue } ElseIf($Server.Location -eq 'Datacenter2'){ Get-Snapshot -VM $Server.Host -Name $SS_Name -Server $EDN_vCenter | Select VM, Name, @{ n="SpaceUsedGB"; e={[math]::round( $_.SizeGB )}} -WarningAction SilentlyContinue } } } function Remove-VMSnapshots { param ( [string]$SS_CSV = $(Read-Host "Enter path to CSV") ) # Import VMware PowerCLI Module If ( !(Get-Module -Name VMware.VimAutomation.Core -ErrorAction SilentlyContinue) ) { import-module VMware.VimAutomation.Core } $Servers = Import-CSV $SS_CSV $WLM_vCenter = Connect-VIServer vCenter1 -WarningAction SilentlyContinue $EDN_vCenter = Connect-VIServer vCenter2 -WarningAction SilentlyContinue ForEach($Server in $Servers){ If($Server.Location -eq 'Datacenter1'){ Get-Snapshot $Server.Host -Server $WLM_vCenter | Remove-Snapshot -Confirm:$false -WarningAction SilentlyContinue } ElseIf($Server.Location -eq 'Datacenter2'){ Get-Snapshot $Server.Host -Server $EDN_vCenter | Remove-Snapshot -Confirm:$false -WarningAction SilentlyContinue } } }
EVC Mode & CPU Compatibility FAQ | Lazy Admin Blog

You’ve just unboxed a shiny new host with the latest Intel or AMD processor, but your current cluster is running hardware from three years ago. You try to vMotion a VM, and vSphere gives you the dreaded “CPU Incompatibility” error.
Enter Enhanced vMotion Compatibility (EVC). Here’s everything you need to know to get your mixed-hardware cluster working without the headache.
What exactly is EVC?
Think of EVC as a “lowest common denominator” filter for your CPUs. It masks the advanced features of newer processors so that every host in the cluster appears to have the exact same instruction set. This allows VMs to live-migrate between old and new hardware because the “view” of the CPU never changes.
Quick FAQ
Q: Can I mix Intel and AMD in the same EVC cluster? A: No. EVC only works within a single vendor family. You can mix different generations of Intel, or different generations of AMD, but you cannot vMotion between the two brands.
Q: Will EVC slow down my new servers? A: Technically, yes—but rarely in a way you’ll notice. It hides new instructions (like specialized encryption or AI math sets), but the raw clock speed and core count of your new CPUs are still fully utilized. Most general-purpose VMs don’t use the high-end instructions being masked.
Q: Do I need to power off VMs to enable EVC? A: It depends:
- Enabling on an empty cluster: No downtime.
- Enabling on a cluster where VMs are already running on the oldest host: Usually no downtime.
- Enabling on a cluster where VMs are running on newer hosts: You must power off those VMs so they can “re-boot” with the masked CPU instructions.
Q: What is “Per-VM EVC”? A: Introduced in vSphere 6.7, this allows you to set the EVC mode on the VM itself rather than the whole cluster. This is a lifesaver for migrating VMs across different vCenters or into the Cloud (like AWS/Azure).
How to Find Your Correct EVC Mode
Don’t guess. Use the official tool:
- Go to the VMware Compatibility Guide (CPU/EVC Matrix).
- Select your ESXi version.
- Select the CPU models of your oldest and newest hosts.
- The tool will tell you the highest supported “Baseline” you can use.
Step-by-Step: Enabling EVC on an Existing Cluster
- Select your Cluster in vCenter.
- Go to Configure > VMware EVC.
- Click Edit.
- Select Enable EVC for Intel/AMD hosts.
- Choose the Baseline that matches your oldest host.
- Validation: vCenter will check if any running VMs are currently using features above that baseline. If they are, you’ll need to shut them down before you can save the settings.
Summary Table: EVC Baselines
| If your oldest host is… | Use this EVC Mode |
| Intel Ice Lake | Intel “Ice Lake” Generation |
| Intel Cascade Lake | Intel “Cascade Lake” Generation |
| AMD EPYC Rome | AMD EPYC “Rome” Generation |
Lost Your VM? How to Find Its ESXi Host from the Guest OS | Lazy Admin Blog
It’s a classic “Ghost in the Machine” scenario: You can RDP or SSH into a virtual machine, but you can’t find it in vCenter. Maybe it’s a massive environment with thousands of VMs, maybe the naming convention doesn’t match, or maybe you’re dealing with a rogue host that isn’t even in your main cluster.
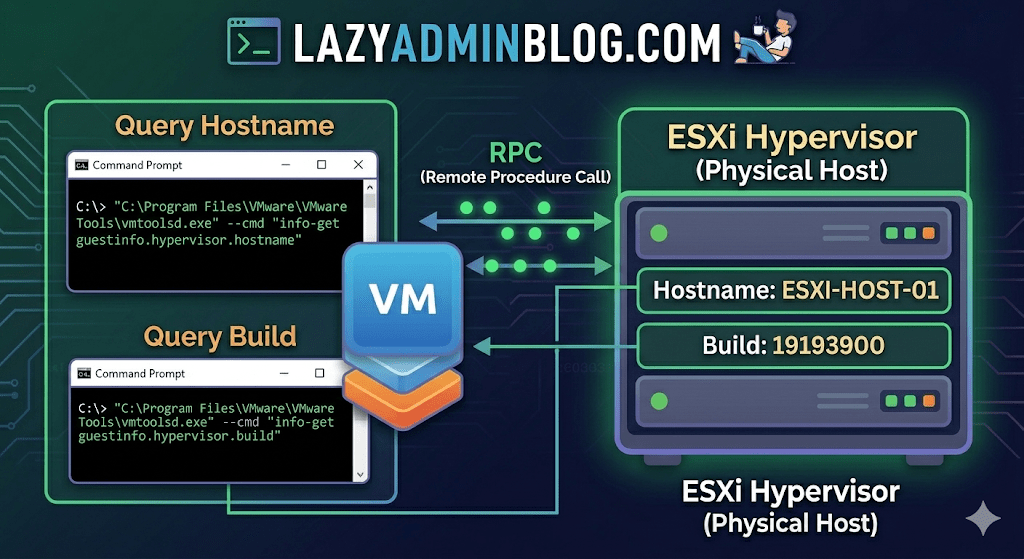
If VMware Tools is installed and running, the VM actually knows exactly where it lives. You just have to ask it nicely through the Command Prompt.
The Magic Tool: vmtoolsd.exe
On Windows VMs, the VMware Tools service includes a CLI utility called vmtoolsd.exe. This tool can query the hypervisor for specific environment variables that are passed down to the guest.
1. Find the ESXi Hostname
If you need to know which physical server is currently crunching the cycles for your VM, run this command:
"C:\Program Files\VMware\VMware Tools\vmtoolsd.exe" --cmd "info-get guestinfo.hypervisor.hostname"
2. Get the ESXi Build Details
Need to know if the underlying host is patched or running an ancient version of ESXi? Query the build number:
"C:\Program Files\VMware\VMware Tools\vmtoolsd.exe" --cmd "info-get guestinfo.hypervisor.build"
Why is this useful?
- vCenter Search is failing: Sometimes the inventory search index gets corrupted, and “Name contains” returns nothing.
- Nested Environments: If you are running VMs inside VMs, this helps you verify which layer of the onion you are currently on.
- Troubleshooting Performance: If a VM is lagging, you can quickly identify the host to check for hardware alerts or CPU contention without leaving the OS.
What if I’m on Linux?
The same logic applies! Most modern Linux distributions use open-vm-tools. You can run the same query via the terminal:
vmtoolsd --cmd "info-get guestinfo.hypervisor.hostname"
Important Requirement: Guest RPC
For these commands to work, the VM must have VMware Tools installed and the guestinfo variables must be accessible. In some hardened environments, admins might disable these RPC (Remote Procedure Call) queries in the .vmx file for security reasons, but in 95% of standard builds, this will work out of the box.
Dealing with ESXi: “Lost connectivity to the device backing the boot filesystem” | Lazy Admin Blog

Meta Description: Seeing the “naa.60xxx backing the boot filesystem” error in ESXi? Learn why your VMs are safe and how to clear this persistent alert without a full reboot.
The Scenario
You open your vCenter console to find a critical alert screaming at you:
Lost connectivity to the device naa.60xxxxxxxxxxxxxxxxxxxxxxxxxxxxxxx backing the boot filesystem /vmfs/devices/disks/naa.60xxxxxxxxxxxxxxxxxxxxxxxxxxxxxxx. As a result, host configuration changes will not be saved to persistent storage.
For any SysAdmin, “Lost Connectivity” and “Boot Filesystem” in the same sentence is usually a reason to start reaching for the coffee and the backup tapes. But before you initiate an emergency failover, let’s look at what is actually happening.
Why did this happen?
If you are booting from a SAN (specifically using iSCSI boot), your ESXi host relies on a connection to a Boot LUN. Unlike your data datastores, iSCSI boot does not support Multipathing.
If a switch reboots, a cable is bumped, or the Storage Processor (SP) on your array (like a VNXe) fails over, the single path to that boot device is severed. Even if the hardware recovers a second later, the ESXi “heartbeat” to the boot device has been interrupted.
The “Lazy” Good News: No Outage
Here is the secret: ESXi is a resident-in-memory OS. Once the host has finished booting, the entire kernel is loaded into RAM. Because the VMs are running on different datastores (which should have multipathing), they will continue to hum along without a hiccup.
The Risk: The only thing you can’t do while this error is active is save configuration changes. If you change a vSwitch setting or a license key, it won’t be written to the “disk” (the LUN), and it will be lost if the host reboots.
The Fix: Clear the Ghost Alert
Often, once connectivity is restored, ESXi doesn’t realize the path is back. You have two ways to fix this:
1. The “Smart” Fix (No Downtime)
Instead of a full reboot, you can simply restart the Management Agents. This force-refreshes the host’s connection to its management services and the underlying boot filesystem.
Via DCUI:
- Connect to the console of your ESXi host.
- Press F2 to customize the system.
- Select Troubleshooting Options.
- Select Restart Management Agents.
Via SSH: Run the following command: services.sh restart
2. The “Maintenance” Fix
If the agents don’t clear the alert, you’ll need a clean slate:
- vMotion your VMs to another host.
- Put the host into Maintenance Mode.
- Reboot the host.
Summary for the Modern SysAdmin
- Is there an outage? No.
- Can I save changes? Not until fixed.
- Why? iSCSI boot has no multipathing.
- Quick Fix: Restart Management Agents.
Finding RDM LUN UUIDs in a vSphere Cluster | Lazy Admin Blog
If you’re managing a large virtual environment, keeping track of Raw Device Mappings (RDMs) can be a nightmare. Unlike standard virtual disks (VMDKs) that live neatly inside a datastore, RDMs are directly mapped to a LUN on your SAN.
When your storage team asks, “Which VM is using LUN ID 55?”, you don’t want to check every VM manually. This PowerCLI script will scan your entire cluster and export a list of all RDMs along with their Canonical Name (NAA ID) and Device Name.
The PowerCLI One-Liner
This command connects to your cluster, filters for disks that are either RawPhysical (Pass-through) or RawVirtual, and spits out the details to a text file for easy searching.
Run this in your PowerCLI window:
PowerShell
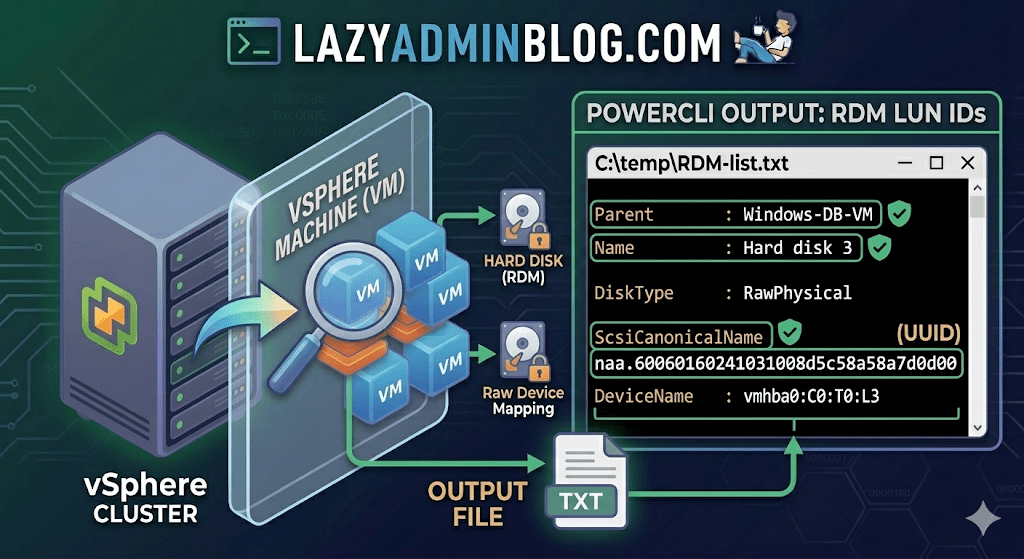
Get-Cluster 'YourClusterName' | Get-VM | Get-HardDisk -DiskType "RawPhysical","RawVirtual" | Select-Object @{N="VM";E={$_.Parent.Name}},Name,DiskType,ScsiCanonicalName,DeviceName | Format-List | Out-File –FilePath C:\temp\RDM-list.txt
Breaking Down the Output
Once you open C:\temp\RDM-list.txt, here is what you are looking at:
- Parent: The name of the Virtual Machine.
- Name: The label of the hard disk (e.g., “Hard disk 2”).
- DiskType: Confirms if it’s Physical (direct SCSI commands) or Virtual mode.
- ScsiCanonicalName: The NAA ID (e.g.,
naa.600601...). This is the “Universal ID” your storage array uses. - DeviceName: The internal vSphere path to the device.
Why do you need this?
- Storage Migrations: If you are decommissioning a storage array, you must identify every RDM to ensure you don’t leave a “Ghost LUN” behind.
- Troubleshooting Performance: If a specific LUN is showing high latency on the SAN side, this script tells you exactly which VM is the “noisy neighbor.”
- Audit & Compliance: Great for keeping a monthly record of physical hardware mappings.
Lazy Admin Note: This script specifically uses VMware PowerCLI cmdlets (
Get-HardDisk). If you are looking for similar info on a Hyper-V host, you would typically useGet-VMHardDiskDriveand look for theDiskNumberproperty to correlate with physical disks inDisk Management.
Fixing Corrupt Image Profiles on ESXi | Lazy Admin Blog

We’ve all been there—a patch remediation task in vSphere Update Manager (VUM) or vSphere Lifecycle Manager (vLCM) gets interrupted (shoutout to that one colleague!), and suddenly your ESXi host is in a “zombie” state.
If you see the dreaded “Unknown – no profile defined” error, your host has lost its identity. It no longer knows which VIBs (VMware Installation Bundles) should be installed. This is usually caused by a corrupt imgdb.tgz file.

The Symptom: Missing Image Profile
When an image profile is empty or corrupt, you cannot install patches, remove drivers, or perform upgrades. ESXi relies on the image database to maintain consistency.
How to Diagnose a Corrupt imgdb.tgz
Before you resort to a full host rebuild, verify the file size of the database. A healthy imgdb.tgz is typically around 26 KB. If yours is only a few bytes, it’s corrupted.
SSH into the host.
Locate the files:
cd /vmfs/volumesfind * | grep imgdb.tgz
Note: You will usually see two results (one for each bootbank).
Check the size:
ls -l <path_to_result>/imgdb.tgzIf the size is tiny (e.g., 0-100 bytes), the database is toast.
The Fix: Borrowing a “Known Good” Profile
Instead of a time-consuming reinstall, you can manually restore the database from a healthy host running the exact same version and patch level.
Step 1: Export from a Healthy Host
On a working ESXi host, copy the healthy database to a shared datastore:
cp /bootbank/imgdb.tgz /vmfs/volumes//
Step 2: Restore on the Corrupt Host
On the host with the issue, move the good file to /tmp and extract it to access the internal VIB and Profile metadata:
cp /vmfs/volumes//imgdb.tgz /tmpcd /tmptar -xzf imgdb.tgz
Step 3: Rebuild the Database Directories
Now, manually place the healthy metadata into the system directories:
Copy Profiles:
cp /tmp/var/db/esximg/profiles/* /var/db/esximg/profiles/Copy VIBs:
cp /tmp/var/db/esximg/vibs/* /var/db/esximg/vibs/Replace Bootbank File:
rm /bootbank/imgdb.tgzcp /tmp/imgdb.tgz /bootbank/
Step 4: Finalize and Persist
To ensure these changes survive a reboot, run the backup script:
/sbin/auto-backup.sh
Summary Table: Resolution Options
| Option | Effort | Risk | When to use |
| Rebuild Host | High | Low | If you don’t have a matching “known good” host. |
| Manual File Copy | Low | Medium | When you need a fast fix and have a twin host available. |
The Clean Exit: How to Safely Remove Storage Devices from ESXi | Lazy Admin Blog

In the world of storage, “unpresenting” a LUN is more than just a right-click. If you don’t follow the proper decommissioning workflow, ESXi will keep trying to talk to a ghost device, leading to host instability and long boot times.
Follow this definitive checklist and procedure to ensure your environment stays clean and APD-free.
The “Safe-to-Remove” Checklist
Before you even touch the unmount button, verify these 7 critical points:
- Evacuate Data: Move or unregister all VMs, snapshots, templates, and ISO images from the datastore.
- HA Heartbeats: Ensure the datastore is NOT being used for vSphere HA heartbeats.
- No Clusters: Remove the datastore from any Datastore Clusters or Storage DRS management.
- Coredump: Confirm the LUN isn’t configured as a diagnostic coredump partition.
- SIOC: Disable Storage I/O Control (SIOC) for the datastore.
- RDMs: If the LUN is an Raw Device Mapping, remove the RDM from the VM settings (select “Delete from disk” to kill the mapping file).
- Scratch Location: Ensure the host isn’t using this LUN for its persistent scratch partition.
Pro Tip: Check Scratch Location via PowerCLI
Use this script to verify your scratch config across a cluster:
$cluster = "YourClusterName"foreach ($esx in Get-Cluster $cluster | Get-VMHost) { Get-VMHostAdvancedConfiguration -VMHost $esx -Name "ScratchConfig.ConfiguredScratchLocation"}
Step 1: Identify your NAA ID
You need the unique Network Address Authority (NAA) ID to ensure you are pulling the right plug.
- Via GUI: Check the Properties window of the datastore.
- Via CLI: Run
esxcli storage vmfs extent list
Step 2: The Unmount & Detach Workflow
1. Unmount the File System
In the Configuration tab > Storage, right-click the datastore and select Unmount. If you are doing this for multiple hosts, use the Datastores view (Ctrl+Shift+D) to unmount from the entire cluster at once.
2. Detach the Device (The Most Important Step)
Unmounting removes the “logical” access, but Detaching tells the kernel to stop looking for the “physical” device.
- Switch to the Devices view.
- Right-click the NAA ID and select Detach.
- The state should now show as Unmounted.
Note: Detaching is a per-host operation. You must perform this on every host that has visibility to the LUN to avoid APD states.
Step 3: Cleanup the SAN & Host
Once the state is “Unmounted” across all hosts, you can safely unmap/unpresent the LUN from your SAN array.
Permanent Decommissioning
To prevent “ghost” entries from appearing in your detached list, run these commands on the host:
- List detached devices:
esxcli storage core device detached list - Remove the configuration permanently:
esxcli storage core device detached remove -d <NAA_ID>
The Master List: VMware ESXi Release and Build Number History (Updated 2026) | Lazy Admin Blog

Is your host up to date? Checking the “About” section in your vSphere Client is step one, but cross-referencing that number against this list is how you confirm if you’re on a General Availability (GA) release, an Update, or an Express Patch.
vSphere ESXi 9.0 (Latest)
The new generation of the hypervisor, optimized for AI workloads and DPUs.
| Name | Version | Release Date | Build Number |
| VMware ESXi 9.0.2 | 9.0.2 | 2026-01-20 | 25148080 |
| VMware ESXi 9.0.1 | 9.0.1 | 2025-09-29 | 24957450 |
| VMware ESXi 9.0 GA | 9.0 GA | 2025-06-17 | 24755225 |
vSphere ESXi 8.0
The enterprise workhorse for 2024-2026.
| Name | Version | Release Date | Build Number |
| VMware ESXi 8.0 Update 3 | 8.0 U3 | 2024-06-25 | 24022510 |
| VMware ESXi 8.0 Update 2 | 8.0 U2 | 2023-09-21 | 22380479 |
| VMware ESXi 8.0 Update 1 | 8.0 U1 | 2023-04-18 | 21495797 |
| VMware ESXi 8.0 GA | 8.0 GA | 2022-10-11 | 20513097 |
vSphere ESXi 7.0
Note: This version introduced the new Lifecycle Manager (vLCM).
| Name | Version | Release Date | Build Number |
| VMware ESXi 7.0 Update 3w | 7.0 U3w | 2025-09-29 | 24927030 |
| VMware ESXi 7.0 Update 3 | 7.0 U3 | 2021-10-05 | 18644231 |
| VMware ESXi 7.0 GA | 7.0 GA | 2020-04-02 | 15843807 |
vSphere ESXi 6.x Legacy (Archive)
| Name | Version | Release Date | Build Number |
| VMware ESXi 6.7 Update 3 | 6.7 U3 | 2019-08-20 | 14320388 |
| VMware ESXi 6.5 Update 3 | 6.5 U3 | 2019-07-02 | 13932383 |
| VMware ESXi 6.0 Update 1a | 6.0 U1a | 2015-10-06 | 3073146 |
| VMware ESXi 6.0 GA | 6.0 GA | 2015-03-12 | 2494585 |
How to Verify Your Build Number
If you aren’t at your desk and only have SSH access to the host, you can find your build number instantly with this command:
vmware -v
Example Output:
VMware ESXi 8.0.0 build-20513097
Lazy Admin Tip 💡
Always remember the vCenter Interoperability Rule: Your vCenter Server must always be at a build version equal to or higher than your ESXi hosts. If you patch your hosts to vSphere 9.0 while vCenter is still on 8.0, your hosts will show as “Not Responding” or “Disconnected.”
#VMware #vSphere9 #ESXi #SysAdmin #Virtualization #PatchManagement #DataCenter #LazyAdmin #BuildNumbers #ITOperations
Troubleshooting VMware Tools Upgrade Failures on Windows Server 2003 | Lazy Admin Blog

In the world of legacy infrastructure, Windows Server 2003 virtual machines (VMs) occasionally hit a “brick wall” during VMware Tools upgrades. While VMware continues to investigate the root cause, the community has identified a manual “scrubbing” process to bypass the installer errors and force a clean installation.
🛑 Pre-Requisites & Data Collection
Before performing a manual registry cleanup, VMware Support recommends gathering the following data to help identify the underlying issue:
- Version Mapping: Note the current “from” version and the target “to” version.
- Upgrade Method: Are you using the “Interactive” installer, “Silent” switches, or vCenter’s “Automatic” update?
- Historical Data: Open the Windows Event Viewer, search for Event Source: MsiInstaller, and look for Event ID: 1034 to find traces of previous installation attempts.
🛠️ The Fix: Manual Registry & System Scrubbing
[!CAUTION] Warning: This procedure involves modifying the Windows Registry. Incorrect changes can destabilize your OS. Always take a full VM Snapshot and a Registry Backup before proceeding.
1. Registry Cleanup (Installer Keys)
Log in as an Administrator, open regedit, and navigate to/delete the following keys if they exist:
HKEY_CLASSES_ROOT\Installer\Features\05014B32081E884E91FB41199E24004HKEY_CLASSES_ROOT\Installer\Products\05014B32081E884E91FB41199E24004HKEY_LOCAL_MACHINE\SOFTWARE\Classes\Installer\Features\05014B32081E884E91FB41199E24004HKEY_LOCAL_MACHINE\SOFTWARE\Classes\Installer\Products\05014B32081E884E91FB41199E24004HKEY_LOCAL_MACHINE\SOFTWARE\Microsoft\Windows\CurrentVersion\Installer\UserData\S-1-5-18\Components\B150AC107B12D11A9DD0006794C4E25HKEY_LOCAL_MACHINE\SOFTWARE\Microsoft\Windows\CurrentVersion\Uninstall\{3B410500-1802-488E-9EF1-4B11992E0440}HKEY_LOCAL_MACHINE\SOFTWARE\VMware, Inc.
2. Service Removal
Deep-seated services can block the new installer. Delete these keys under CurrentControlSet\Services:
VMToolsVMUpgradeHelperVMware Physical Disk Helper Servicevmvss
3. File System Cleanup
Once the registry is clear, you must remove the physical binary remnants:
- Open Windows Explorer.
- Delete the folder:
%ProgramFiles%\VMware\VMware Tools. - Restart the Virtual Machine. This step is non-negotiable as it clears the memory and releases hooks on drivers.
🚀 Final Step: Fresh Installation
After the reboot, the system will be “clean” of previous VMware Tools traces. You can now mount the VMware Tools ISO through your vSphere client and run a fresh installation.
Pro-Tip: If the VM has other VMware products installed (like vCenter Server), do not do a blanket search-and-destroy for the term “VMware” in the registry. Stick strictly to the keys listed above to avoid breaking other applications.
Top VMware ESXi & vSphere Interview Questions

Preparing for a Virtualization role? This guide covers everything from legacy ESX vs. ESXi differences to advanced HA and DRS logic.
🔄 The Evolution: ESX vs. ESXi
- Service Console: ESX had a Service Console (based on RHEL); ESXi is “thin” and has no console, leading to a smaller footprint and faster boots.
- Hardware: ESXi can be purchased as an embedded hypervisor directly on hardware.
- Health Checks: ESXi features built-in server health status monitoring.
🛡️ High Availability (HA) 5.0 Deep Dive
In vSphere 5.0, the HA architecture moved from a Primary/Secondary model to a Master/Slave concept using the FDM (Fault Domain Manager) agent.
| Role | Responsibilities |
| Master | Monitors host/VM availability, manages restarts, communicates with vCenter. |
| Slave | Monitors local VMs, sends status to Master, participates in elections if Master fails. |
Heartbeat Mechanisms:
- Network Heartbeat: Sent between Master and Slaves every second.
- Datastore Heartbeat: Used if the network heartbeat is lost to determine if a host is isolated or has actually failed.
🚀 vMotion & DRS (Distributed Resource Scheduler)
vMotion Prerequisites:
- Shared storage (required prior to 5.1).
- GigaBit Ethernet dedicated vMotion network (VMkernel port).
- Processor compatibility (EVC – Enhanced vMotion Compatibility).
- No active CD-ROM/ISO mounts or CPU affinity.
DRS Automation Levels:
- Manual: vCenter suggests migrations; admin executes.
- Partially Automated: vCenter handles initial VM placement; suggestions for migrations.
- Fully Automated: vCenter moves VMs automatically based on load.
💾 Storage & Networking Quick Hits
- vSAN: Aggregates local storage from ESXi hosts into a single shared datastore.
- iSCSI Port Binding: Used when multiple VMkernel ports are in the same subnet to allow multiple paths to an array.
- Path Selection Policies (PSP): Fixed, MRU (Most Recently Used), and Round Robin.
- Key Command Line Tools:
esxtop: Live performance data.vmkfstools: Virtual disk management.vmware-cmd: VM management and info.
📊 Hardware Version Comparison
| Feature | HW Version 4 (ESX 3.x) | HW Version 7 (vSphere 4.x) | HW Version 8 (vSphere 5.0) |
| Max vRAM | 64 GB | 256 GB | 1 TB |
| Max vCPU | 4 | 8 | 32 |
| USB Support | No | Yes | Yes (incl. 3.0) |
| NICs per VM | 4 | 10 | 10 |
🚀 Key Differences in Modern vSphere (7.0 & 8.0)
1. The Architecture Shift: Project Monterey & DPUs
Modern vSphere now supports DPUs (Data Processing Units). Instead of the CPU handling networking and security, these tasks are offloaded to the SmartNIC.
2. Tanzu (Kubernetes Integration)
The biggest change in vSphere 7/8 is that Kubernetes is built directly into the hypervisor. You no longer just manage VMs; you manage “Namespaces” and containers natively on ESXi.
3. vMotion Enhancements (vSphere 7+)
In version 5.0, vMotion would “stun” a VM briefly. Modern vMotion uses a “Claim” mechanism that makes migrating massive VMs (Monster VMs) almost instantaneous with zero performance impact.
4. Scalability Comparison (vSphere 5.0 vs. 8.0)
| Feature | vSphere 5.0 (Legacy) | vSphere 8.0 (Modern) |
| vCPUs per VM | 32 | 768 |
| RAM per VM | 1 TB | 24 TB |
| Hosts per Cluster | 32 | 96 |
| VMs per Cluster | 3,000 | 10,000 |
🆕 2026 Interview Questions: Modern Edition
Q: What is the “vSphere Distributed Services Engine”?
A: It is the feature that allows vSphere to use DPUs (SmartNICs) to offload infrastructure services like NSX and vSAN, freeing up the host’s CPU for application workloads.
Q: What is a “Lifecycle Manager” (vLCM)?
A: In vSphere 7+, vLCM replaced the old Update Manager (VUM). It uses a declarative model (Desired State) where you define an image for a cluster, and the hosts automatically maintain that version/driver level.
Q: What is “vSAN Express Storage Architecture” (ESA)?
A: Introduced in vSphere 8, ESA is a new way of processing data optimized for high-performance NVMe drives, removing the old “Disk Group” (Cache/Capacity) requirement.
Q: How does vSphere 8 handle AI/ML workloads?
A: Through vGPU and Device Groups, allowing VMs to span multiple physical GPUs and utilizing High-Bandwidth Memory (HBM) for massive AI model training.
#VMware #vSphere #ESXi #Virtualization #SysAdmin #TechInterview #vMotion #CloudComputing #LazyAdmin #DataCenter