
LazyAdmin
Automation: Bulk Create and Delete VM Snapshots Across Linked vCenters | Lazy Admin Blog

In a large environment, taking snapshots before a major patch or application update is a standard safety net. But if you have servers spread across multiple vCenters in Linked Mode (e.g., Datacenter1 and Datacenter2), clicking through the vSphere Client is a waste of time.
Today, I’m sharing a “Lazy Admin” script that allows you to bulk create, check, and remove snapshots using a simple CSV list.
Prerequisites
- VMware PowerCLI: Ensure the PowerCLI module is installed on the machine running the script.
- CSV Setup: Create a file named
snapshot_servers.csvinC:\Temp\VMSnapshots\.
The CSV should look like this: | Host | Location | | :— | :— | | Server01 | Datacenter1 | | Server02 | Datacenter2 |
Part 1: Creating Snapshots
- Open PowerShell ISE with vCenter Administrator credentials.
- Load the functions by running the full script (provided below).
- Run the following command:
Create-VMSnapshots -SS_CSV "C:\Temp\VMSnapshots\snapshot_servers.csv" -SS_Name "Pre-Patching" -SS_Description "Requested by App Team"
The script will iterate through your CSV and create snapshots sequentially. You can monitor the progress in the vSphere Tasks console.
Part 2: Deleting Snapshots
Once your changes are verified, don’t let those snapshots linger and bloat your datastores! To remove them:
- Use the same
snapshot_servers.csvlist. - Run the following command:
Remove-VMSnapshots -SS_CSV "C:\Temp\VMSnapshots\snapshot_servers.csv"
Note: This is a sequential script; it will wait for one snapshot removal to finish before moving to the next to avoid pinning your storage I/O.
The Script: VMSnapshots.ps1
Save this code to C:\Temp\VMSnapshots\VMSnapshots.ps1.
function Create-VMSnapshots { param ( [string]$SS_CSV = $(Read-Host "Enter path to CSV"), [string]$SS_Name = $(Read-Host "Enter name for snapshots"), [string]$SS_Description = $(Read-Host "Enter description for snapshots") ) # Import VMware PowerCLI Module If ( !(Get-Module -Name VMware.VimAutomation.Core -ErrorAction SilentlyContinue) ) { import-module VMware.VimAutomation.Core } $Servers = Import-CSV $SS_CSV $WLM_vCenter = Connect-VIServer vCenter1 -WarningAction SilentlyContinue $EDN_vCenter = Connect-VIServer vCenter2 -WarningAction SilentlyContinue ForEach($Server in $Servers){ If($Server.Location -eq 'Datacenter1'){ New-Snapshot -VM $Server.Host -Name $SS_Name -Description $SS_Description -Quiesce -Server $WLM_vCenter -WarningAction SilentlyContinue } ElseIf($Server.Location -eq 'Datacenter2'){ New-Snapshot -VM $Server.Host -Name $SS_Name -Description $SS_Description -Quiesce -Server $EDN_vCenter -WarningAction SilentlyContinue } } }function Check-VMSnapshots { param ( [string]$SS_CSV = $(Read-Host "Enter path to CSV"), [string]$SS_Name = $(Read-Host "Enter snapshot name") ) # Import VMware PowerCLI Module If ( !(Get-Module -Name VMware.VimAutomation.Core -ErrorAction SilentlyContinue) ) { import-module VMware.VimAutomation.Core } $Servers = Import-CSV $SS_CSV $WLM_vCenter = Connect-VIServer vCenter1 -WarningAction SilentlyContinue $EDN_vCenter = Connect-VIServer vCenter2 -WarningAction SilentlyContinue ForEach($Server in $Servers){ If($Server.Location -eq 'Datacenter1'){ Get-Snapshot -VM $Server.Host -Name $SS_Name -Server $WLM_vCenter | Select VM, Name, @{ n="SpaceUsedGB"; e={[math]::round( $_.SizeGB )}} -WarningAction SilentlyContinue } ElseIf($Server.Location -eq 'Datacenter2'){ Get-Snapshot -VM $Server.Host -Name $SS_Name -Server $EDN_vCenter | Select VM, Name, @{ n="SpaceUsedGB"; e={[math]::round( $_.SizeGB )}} -WarningAction SilentlyContinue } } } function Remove-VMSnapshots { param ( [string]$SS_CSV = $(Read-Host "Enter path to CSV") ) # Import VMware PowerCLI Module If ( !(Get-Module -Name VMware.VimAutomation.Core -ErrorAction SilentlyContinue) ) { import-module VMware.VimAutomation.Core } $Servers = Import-CSV $SS_CSV $WLM_vCenter = Connect-VIServer vCenter1 -WarningAction SilentlyContinue $EDN_vCenter = Connect-VIServer vCenter2 -WarningAction SilentlyContinue ForEach($Server in $Servers){ If($Server.Location -eq 'Datacenter1'){ Get-Snapshot $Server.Host -Server $WLM_vCenter | Remove-Snapshot -Confirm:$false -WarningAction SilentlyContinue } ElseIf($Server.Location -eq 'Datacenter2'){ Get-Snapshot $Server.Host -Server $EDN_vCenter | Remove-Snapshot -Confirm:$false -WarningAction SilentlyContinue } } }
The Architect’s Guide to Windows 12: AI, CorePC, and the Infrastructure Pivot | Lazy Admin Blog
The era of the “monolithic OS” is officially ending. General users will enjoy the “Floating Taskbar” and AI-driven search. Infrastructure architects need to focus on two structural pillars: CorePC and NPU-driven compute.

1. The CorePC Transformation: State-Separated Architecture
For decades, Windows has been a “monolithic” block of code where system files, drivers, and user data were loosely intertwined. Windows 12 introduces CorePC, a modular architecture built on State Separation.
What is State Separation?
CorePC breaks the OS into isolated, specialized partitions. This design philosophy comes from mobile operating systems like iOS and Android. It is adapted for the complexity of the PC.
- The System Partition: A read-only, digitally signed, and immutable image provided by Microsoft. It is isolated from everything else.
- The Application Layer: Apps are containerized. They can interact with system files but cannot modify them, preventing “registry rot” and unauthorized system changes.
- The User State: The only mutable partition where user profiles and local data reside.
💡 Architect’s Insight: The Death of “WinRot”
Practical Application: In a traditional enterprise, a corrupted system file often requires a full re-image. With State Separation, the OS can perform an Atomic Update. It swaps the entire read-only system partition for a fresh one in the background. For a help desk, this means “Reset this PC” takes seconds rather than hours. User data remains completely untouched. It lives on a separate logical “state.”
2. The NPU Requirement: 40+ TOPS or Bust
If your 2026 hardware budget doesn’t prioritize the NPU (Neural Processing Unit), your fleet will be obsolete on delivery.
Understanding TOPS (Trillions of Operations Per Second)
TOPS is the “horsepower” rating for an NPU. Think of it as the RPM for your AI engine. CPUs are great at logic, and GPUs excel at graphics. NPUs are specialized silicon designed to handle the trillions of matrix multiplications required by AI models. They achieve this without draining the battery.
- The Threshold: Microsoft has set a benchmark of 40+ TOPS.
- Why it matters: Windows 12 uses a Neural Index for Recall and Semantic Search. This allows users to find a file by describing it (e.g., “Find the blue sustainability slide from last meeting”) rather than remembering a filename.
- The Hardware Gate: To handle this locally (for privacy and speed), dedicated silicon is required. Current leaders include the Snapdragon X Elite, Intel Core Ultra, and AMD Ryzen AI series.
💡 Architect’s Insight: VDI and the “AI Gap”
The Real-World Scenario: If you are a VDI architect, Windows 12 presents a challenge. Most hypervisors do not yet support NPU passthrough. Running Windows 12 in a VM without NPU offloading means features like Recall will either be disabled. Alternatively, they will tax the server CPUs to the point of instability. Strategy: Shift non-NPU-capable legacy endpoints to Windows 365 (Cloud PC). This offloads the AI compute to Microsoft’s Azure hardware. Older thin clients can “run” Windows 12 features they couldn’t handle locally.
3. Implementation Roadmap: 2026 Action Plan
Phase 1: The “NPU-Ready” Audit
Stop purchasing “standard” laptops. 16GB RAM is now the absolute minimum for AI-native workloads. If you use 8GB, it will lead to significant performance bottlenecks because local models will swap to disk.
Phase 2: AI Data Governance
Windows 12 will “see” and “index” local content via Smart Recall.
- Action: You must define Intune/GPO policies to govern what is indexed. You don’t want the OS indexing sensitive PII or passwords that might appear on-screen during a session. Microsoft has built exclusion logic for credential-related content, but enterprise-grade filtering is still a requirement.
❓ Frequently Asked Questions (FAQ)
- Will my legacy Win32 apps still work? Yes. Windows 12 uses a Win32 Container to run classic apps. However, kernel-mode drivers (like old VPN clients) may need modernization to support the new state-separated driver model.
- Is Windows 12 mandatory? Technically, no. Windows 11 continues to receive updates. Windows 10 is reaching the end of its Extended Security Update (ESU) lifecycle. Therefore, adopting the modular architecture of Windows 12 is the only long-term path for security compliance.
- What about privacy with “Recall”? All Recall indexing and AI processing occur on-device. No screenshots or semantic data are sent to the cloud. Access is protected by Windows Hello (biometrics).
🏁 Summary: Key Takeaways for the Busy Architect
- Modular OS: Windows 12 uses CorePC for faster, safer updates and near-instant recovery.
- Silicon-First: A 40+ TOPS NPU is mandatory for the full “AI PC” experience.
- VDI Pivot: Use Windows 365 to bridge the gap for legacy hardware that lacks local AI silicon.
What’s your strategy for the NPU transition? Are you leaning toward a hardware refresh or a shift to Cloud PCs?
Share your thoughts in the comments. Let us know if you want a follow-up post on Intune policies for Smart Recall governance!
EVC Mode & CPU Compatibility FAQ | Lazy Admin Blog

You’ve just unboxed a shiny new host with the latest Intel or AMD processor, but your current cluster is running hardware from three years ago. You try to vMotion a VM, and vSphere gives you the dreaded “CPU Incompatibility” error.
Enter Enhanced vMotion Compatibility (EVC). Here’s everything you need to know to get your mixed-hardware cluster working without the headache.
What exactly is EVC?
Think of EVC as a “lowest common denominator” filter for your CPUs. It masks the advanced features of newer processors so that every host in the cluster appears to have the exact same instruction set. This allows VMs to live-migrate between old and new hardware because the “view” of the CPU never changes.
Quick FAQ
Q: Can I mix Intel and AMD in the same EVC cluster? A: No. EVC only works within a single vendor family. You can mix different generations of Intel, or different generations of AMD, but you cannot vMotion between the two brands.
Q: Will EVC slow down my new servers? A: Technically, yes—but rarely in a way you’ll notice. It hides new instructions (like specialized encryption or AI math sets), but the raw clock speed and core count of your new CPUs are still fully utilized. Most general-purpose VMs don’t use the high-end instructions being masked.
Q: Do I need to power off VMs to enable EVC? A: It depends:
- Enabling on an empty cluster: No downtime.
- Enabling on a cluster where VMs are already running on the oldest host: Usually no downtime.
- Enabling on a cluster where VMs are running on newer hosts: You must power off those VMs so they can “re-boot” with the masked CPU instructions.
Q: What is “Per-VM EVC”? A: Introduced in vSphere 6.7, this allows you to set the EVC mode on the VM itself rather than the whole cluster. This is a lifesaver for migrating VMs across different vCenters or into the Cloud (like AWS/Azure).
How to Find Your Correct EVC Mode
Don’t guess. Use the official tool:
- Go to the VMware Compatibility Guide (CPU/EVC Matrix).
- Select your ESXi version.
- Select the CPU models of your oldest and newest hosts.
- The tool will tell you the highest supported “Baseline” you can use.
Step-by-Step: Enabling EVC on an Existing Cluster
- Select your Cluster in vCenter.
- Go to Configure > VMware EVC.
- Click Edit.
- Select Enable EVC for Intel/AMD hosts.
- Choose the Baseline that matches your oldest host.
- Validation: vCenter will check if any running VMs are currently using features above that baseline. If they are, you’ll need to shut them down before you can save the settings.
Summary Table: EVC Baselines
| If your oldest host is… | Use this EVC Mode |
| Intel Ice Lake | Intel “Ice Lake” Generation |
| Intel Cascade Lake | Intel “Cascade Lake” Generation |
| AMD EPYC Rome | AMD EPYC “Rome” Generation |
Zerto vs. vSphere Replication: Which DR Strategy is for You? | Lazy Admin Blog

When it comes to Disaster Recovery (DR) in a VMware environment, there are two names that always come up: vSphere Replication (VR) and Zerto.
One is often “free” (included in most licenses), while the other is a premium enterprise powerhouse. But in 2026, with the shifts in Broadcom’s licensing and the rise of ransomware, the choice isn’t just about price—it’s about how much data you can afford to lose.
The Contenders
1. vSphere Replication (The Built-in Basic)
vSphere Replication is a hypervisor-based, asynchronous replication engine. It’s integrated directly into vCenter and captures changed blocks to send to a target site.
- Best For: Small to medium businesses with “relaxed” recovery goals.
- Cost: Included with vSphere Standard and vSphere Foundation subscriptions.
2. Zerto (The Gold Standard for CDP)
Zerto uses Continuous Data Protection (CDP). Instead of taking snapshots, it uses a lightweight agent on each host to intercept every write in real-time and stream it to the DR site.
- Best For: Mission-critical apps where losing 15 minutes of data is a catastrophe.
- Cost: Licensed per VM (Premium pricing).
Key Comparison: RPO and RTO
In the world of “Lazy Adminning,” we care most about RPO (Recovery Point Objective – how much data we lose) and RTO (Recovery Time Objective – how fast we get back up).
| Feature | vSphere Replication | Zerto (HPE) |
| Replication Method | Snapshot-based (Asynchronous) | Journal-based (CDP) |
| Best RPO | 5 to 15 Minutes | 5 to 10 Seconds |
| Point-in-Time Recovery | Limited (up to 24 instances) | Granular (Any second within 30 days) |
| Orchestration | Requires VMware Site Recovery Manager (SRM) | Built-in (One-click failover) |
| Snapshots | Uses VM Snapshots (can impact performance) | No Snapshots (Zero impact on IOPS) |
Why Choose vSphere Replication?
If you have a limited budget and your management is okay with losing 30 minutes of data, VR is the way to go.
- Pros: It’s already there. No extra software to install besides the appliance. It works well for low-change workloads.
- Cons: It relies on snapshots, which can cause “stun” on high-load SQL servers. Without adding SRM (Site Recovery Manager), failover is a manual, painful process of registering VMs and fixing IPs.
Why Choose Zerto?
If you are running a 24/7 shop or protecting against Ransomware, Zerto is king.
- Pros: The Journal is a time machine. If ransomware hits at 10:05:30 AM, you can failover to 10:05:25 AM. It also handles IP re-addressing and boot ordering natively.
- Cons: It’s an expensive add-on. It also requires a “Virtual Replication Appliance” (VRA) on every host in your cluster, which uses a bit of RAM and CPU.
The Verdict: Which one is “Lazy”?
- vSphere Replication is lazy at the start (easy to turn on), but high-effort during an actual disaster (lots of manual work).
- Zerto is a bit more work to set up but is the ultimate “Lazy Admin” tool during a disaster—you literally click one button, walk away, and grab a coffee while the entire data center boots itself at the DR site.
Lost Your VM? How to Find Its ESXi Host from the Guest OS | Lazy Admin Blog
It’s a classic “Ghost in the Machine” scenario: You can RDP or SSH into a virtual machine, but you can’t find it in vCenter. Maybe it’s a massive environment with thousands of VMs, maybe the naming convention doesn’t match, or maybe you’re dealing with a rogue host that isn’t even in your main cluster.
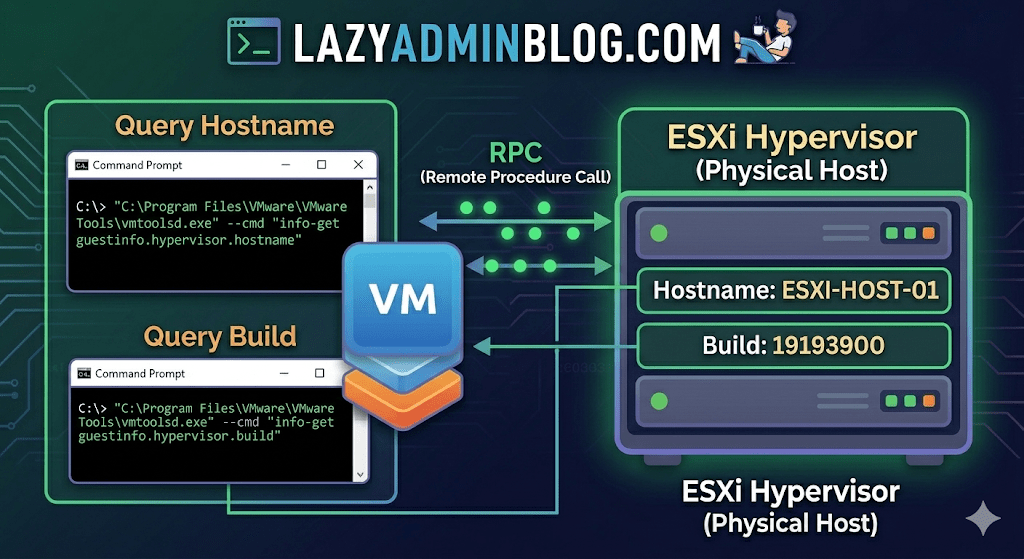
If VMware Tools is installed and running, the VM actually knows exactly where it lives. You just have to ask it nicely through the Command Prompt.
The Magic Tool: vmtoolsd.exe
On Windows VMs, the VMware Tools service includes a CLI utility called vmtoolsd.exe. This tool can query the hypervisor for specific environment variables that are passed down to the guest.
1. Find the ESXi Hostname
If you need to know which physical server is currently crunching the cycles for your VM, run this command:
"C:\Program Files\VMware\VMware Tools\vmtoolsd.exe" --cmd "info-get guestinfo.hypervisor.hostname"
2. Get the ESXi Build Details
Need to know if the underlying host is patched or running an ancient version of ESXi? Query the build number:
"C:\Program Files\VMware\VMware Tools\vmtoolsd.exe" --cmd "info-get guestinfo.hypervisor.build"
Why is this useful?
- vCenter Search is failing: Sometimes the inventory search index gets corrupted, and “Name contains” returns nothing.
- Nested Environments: If you are running VMs inside VMs, this helps you verify which layer of the onion you are currently on.
- Troubleshooting Performance: If a VM is lagging, you can quickly identify the host to check for hardware alerts or CPU contention without leaving the OS.
What if I’m on Linux?
The same logic applies! Most modern Linux distributions use open-vm-tools. You can run the same query via the terminal:
vmtoolsd --cmd "info-get guestinfo.hypervisor.hostname"
Important Requirement: Guest RPC
For these commands to work, the VM must have VMware Tools installed and the guestinfo variables must be accessible. In some hardened environments, admins might disable these RPC (Remote Procedure Call) queries in the .vmx file for security reasons, but in 95% of standard builds, this will work out of the box.
How to Force Cancel a Hung Task in vCenter or ESXi | Lazy Admin Blog
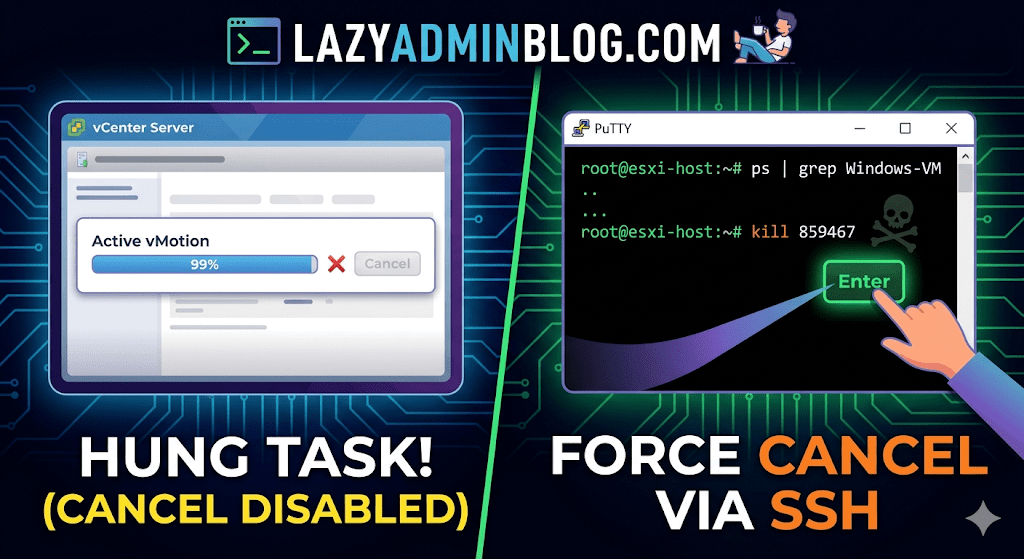
We’ve all been there: a vMotion hits 99% and just… stays there. Or a backup job finishes on the proxy side, but vCenter still thinks the VM is “busy.” Usually, the Cancel button is grayed out, leaving you stuck in management limbo.
When the GUI fails you, it’s time to hop into the CLI. Here is how to manually kill a hung task by targeting the VM’s parent process.
Step 1: Verify the Task
Before pulling the trigger, confirm the task is actually stuck and not just slow. Check the Monitor > Tasks and Events tab for the specific VM. If the progress bar hasn’t budged in an hour and the “Cancel” option is disabled, proceed to the host.
Step 2: Enable and Connect via SSH
To kill a process, you need to be on the specific ESXi host where the VM is currently registered.
- Enable SSH: Go to the ESXi host in vSphere > Configure > System > Services > Start SSH.
- Connect: Open your terminal (Putty, CMD, or Terminal) and log in as
root.
Step 3: Locate the Parent Process ID (PID)
We need to find the specific process tied to your VM. Use the ps command combined with grep to filter for your VM’s name.
Run the following command:
ps -v | grep "Your_VM_Name"
(Note: Using the -v flag in ESXi provides a more detailed view of the world ID and parent processes.)
Look for the line representing the VM’s main process. You are looking for the Leader ID or the first ID listed in the row.
Step 4: Kill the Process
Once you have identified the ID (e.g., 859467), send the kill signal. Start with a standard terminate signal, which allows the process to clean up after itself.
Run the command:
kill 859467
Lazy Admin Tip: If the process is extremely stubborn and won’t die, you can use
kill -9 859467to force an immediate termination. Use this as a last resort!
Step 5: Verify in vSphere
Give vCenter a minute to catch up. The hung task should now disappear or show as “Canceled” in the Tasks and Events console. Your VM should return to an “Idle” state, allowing you to power it on, move it, or restart your backup.
vSphere IDs: The Ultimate Quick Reference Guide | Lazy Admin Blog

Ever feel like you’re drowning in a sea of GUIDs and MoRefs? When you’re scripting or troubleshooting, using the wrong ID is the fastest way to break a backup job or target the wrong server.
Here is the “Lazy Admin” breakdown of the most common vSphere identifiers and how to grab them with PowerCLI.
1. vCenter Instance UUID (serverGuid)
This is the “SSN” of your vCenter server. It’s generated at install time and stays durable for that instance.
- Why it matters: In Linked Mode or cross-vCenter environments, this identifies which vCenter owns an object.
- PowerCLI:PowerShell
$vcenter = Connect-viserver vcsa-01a.corp.local $vcenter.InstanceUuid
2. ESXi Host UUID
Unlike other IDs, this isn’t generated by VMware. It’s pulled from the hardware’s SMBIOS.
- Why it matters: It’s unique to the physical motherboard/vendor.
- PowerCLI:PowerShell
(Get-VMHost | Select -First 1).ExtensionData.hardware.systeminfo.uuid
3. VC-VM Instance UUID (The “Management” ID)
Found in the .vmx file as vc.uuid. This is what vCenter uses to track VMs.
- The “Magic”: vCenter actively scans for duplicates of this ID and will “patch” (change) it automatically if it finds a conflict within its own inventory.
- PowerCLI:PowerShell
(Get-VM | Select -First 1).extensiondata.config.InstanceUUID
4. VM SMBIOS UUID (The “Guest” ID)
Found as uuid.bios in the .vmx. This is what the Guest OS (Windows/Linux) sees as the hardware serial number.
- The “Magic”: vCenter tries not to change this because many applications use it for licensing. If you move/copy a VM, vCenter will ask you what to do to prevent duplicates.
- PowerCLI:PowerShell
(Get-VM | Select -First 1).extensiondata.Config.UUID
5. VM Location ID
Stored as uuid.location. This is a hash of the VM’s configuration file path and the ESXi host UUID.
- The “I Moved It” Prompt: When this hash doesn’t match the current environment, vSphere triggers that famous “Did you move it or copy it?” popup.
- PowerCLI:PowerShell
(Get-VM | Select -First 1).extensiondata.config.LocationId
6. VM MoRef (Managed Object Reference)
The MoRef is the “Short ID” (like vm-43) used by the API and the vCenter database.
- Why it matters: This is the most important ID for database associations (stats, events, tasks). It is not unique across different vCenters.
- PowerCLI:PowerShell
(Get-VM | Select -First 1).ExtensionData.Moref.Value
Quick ID Reference Table
| ID Name | Scope | Persistence | Best Use Case |
| MoRef | Single vCenter | Changes if re-inventoried | API calls & DB tracking |
| Instance UUID | Single vCenter | High (Patched by VC) | Unique VM tracking |
| SMBIOS UUID | Global/Guest OS | Very High | Guest Software Licensing |
| Host UUID | Physical Hardware | Permanent | Hardware Asset Tracking |
Dealing with ESXi: “Lost connectivity to the device backing the boot filesystem” | Lazy Admin Blog

Meta Description: Seeing the “naa.60xxx backing the boot filesystem” error in ESXi? Learn why your VMs are safe and how to clear this persistent alert without a full reboot.
The Scenario
You open your vCenter console to find a critical alert screaming at you:
Lost connectivity to the device naa.60xxxxxxxxxxxxxxxxxxxxxxxxxxxxxxx backing the boot filesystem /vmfs/devices/disks/naa.60xxxxxxxxxxxxxxxxxxxxxxxxxxxxxxx. As a result, host configuration changes will not be saved to persistent storage.
For any SysAdmin, “Lost Connectivity” and “Boot Filesystem” in the same sentence is usually a reason to start reaching for the coffee and the backup tapes. But before you initiate an emergency failover, let’s look at what is actually happening.
Why did this happen?
If you are booting from a SAN (specifically using iSCSI boot), your ESXi host relies on a connection to a Boot LUN. Unlike your data datastores, iSCSI boot does not support Multipathing.
If a switch reboots, a cable is bumped, or the Storage Processor (SP) on your array (like a VNXe) fails over, the single path to that boot device is severed. Even if the hardware recovers a second later, the ESXi “heartbeat” to the boot device has been interrupted.
The “Lazy” Good News: No Outage
Here is the secret: ESXi is a resident-in-memory OS. Once the host has finished booting, the entire kernel is loaded into RAM. Because the VMs are running on different datastores (which should have multipathing), they will continue to hum along without a hiccup.
The Risk: The only thing you can’t do while this error is active is save configuration changes. If you change a vSwitch setting or a license key, it won’t be written to the “disk” (the LUN), and it will be lost if the host reboots.
The Fix: Clear the Ghost Alert
Often, once connectivity is restored, ESXi doesn’t realize the path is back. You have two ways to fix this:
1. The “Smart” Fix (No Downtime)
Instead of a full reboot, you can simply restart the Management Agents. This force-refreshes the host’s connection to its management services and the underlying boot filesystem.
Via DCUI:
- Connect to the console of your ESXi host.
- Press F2 to customize the system.
- Select Troubleshooting Options.
- Select Restart Management Agents.
Via SSH: Run the following command: services.sh restart
2. The “Maintenance” Fix
If the agents don’t clear the alert, you’ll need a clean slate:
- vMotion your VMs to another host.
- Put the host into Maintenance Mode.
- Reboot the host.
Summary for the Modern SysAdmin
- Is there an outage? No.
- Can I save changes? Not until fixed.
- Why? iSCSI boot has no multipathing.
- Quick Fix: Restart Management Agents.
Finding RDM LUN UUIDs in a vSphere Cluster | Lazy Admin Blog
If you’re managing a large virtual environment, keeping track of Raw Device Mappings (RDMs) can be a nightmare. Unlike standard virtual disks (VMDKs) that live neatly inside a datastore, RDMs are directly mapped to a LUN on your SAN.
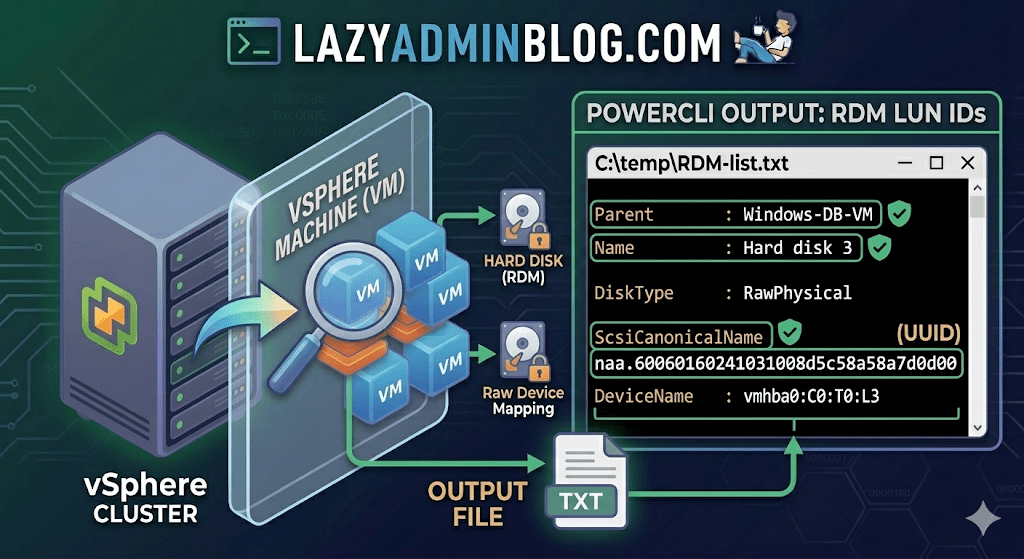
When your storage team asks, “Which VM is using LUN ID 55?”, you don’t want to check every VM manually. This PowerCLI script will scan your entire cluster and export a list of all RDMs along with their Canonical Name (NAA ID) and Device Name.
The PowerCLI One-Liner
This command connects to your cluster, filters for disks that are either RawPhysical (Pass-through) or RawVirtual, and spits out the details to a text file for easy searching.
Run this in your PowerCLI window:
PowerShell
Get-Cluster 'YourClusterName' | Get-VM | Get-HardDisk -DiskType "RawPhysical","RawVirtual" | Select-Object @{N="VM";E={$_.Parent.Name}},Name,DiskType,ScsiCanonicalName,DeviceName | Format-List | Out-File –FilePath C:\temp\RDM-list.txt
Breaking Down the Output
Once you open C:\temp\RDM-list.txt, here is what you are looking at:
- Parent: The name of the Virtual Machine.
- Name: The label of the hard disk (e.g., “Hard disk 2”).
- DiskType: Confirms if it’s Physical (direct SCSI commands) or Virtual mode.
- ScsiCanonicalName: The NAA ID (e.g.,
naa.600601...). This is the “Universal ID” your storage array uses. - DeviceName: The internal vSphere path to the device.
Why do you need this?
- Storage Migrations: If you are decommissioning a storage array, you must identify every RDM to ensure you don’t leave a “Ghost LUN” behind.
- Troubleshooting Performance: If a specific LUN is showing high latency on the SAN side, this script tells you exactly which VM is the “noisy neighbor.”
- Audit & Compliance: Great for keeping a monthly record of physical hardware mappings.
Lazy Admin Note: This script specifically uses VMware PowerCLI cmdlets (
Get-HardDisk). If you are looking for similar info on a Hyper-V host, you would typically useGet-VMHardDiskDriveand look for theDiskNumberproperty to correlate with physical disks inDisk Management.
Hyper-V Performance Hack: The Essential Antivirus Exclusions List | Lazy Admin Blog
Running antivirus on your Hyper-V host is a security must, but if you don’t configure it correctly, you’re asking for trouble. We’re talking “disappearing” VMs, corrupted virtual disks, and performance so sluggish you’ll think you’re back on physical hardware from 2005.
The culprit is usually the Real-Time Scanning engine trying to “inspect” a 100GB .vhdx file every time the guest OS writes a single bit. Here is the definitive “Lazy Admin” guide to Hyper-V AV exclusions.
1. File Extension Exclusions
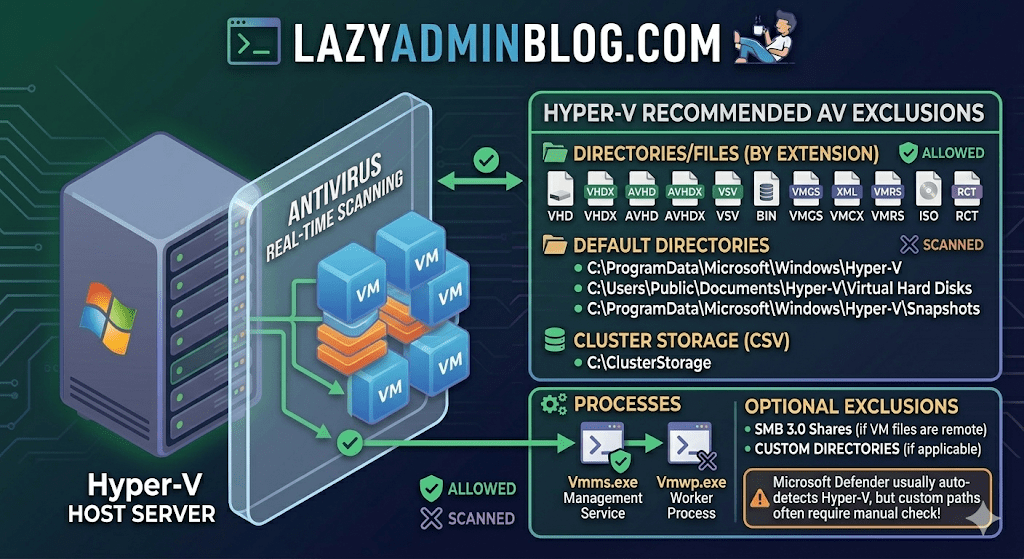
Tell your AV to keep its hands off these specific virtual machine file types:
- Virtual Disks:
.vhd,.vhdx - Snapshots/Checkpoints:
.avhd,.avhdx - Saved State:
.vsv,.bin,.vmgs - Configuration:
.xml,.vmcx,.vmrs - ISO Images:
.iso - Tracking:
.rct(Resilient Change Tracking)
2. Directory Exclusions
If you are using the default paths, exclude these. If you have a dedicated D:\VMs drive (which you should!), exclude that entire custom path as well.
- Default Configs:
C:\ProgramData\Microsoft\Windows\Hyper-V - Default VHDs:
C:\Users\Public\Documents\Hyper-V\Virtual Hard Disks - Default Snapshots:
C:\ProgramData\Microsoft\Windows\Hyper-V\Snapshots - Cluster Shared Volumes (CSV):
C:\ClusterStorage - Hyper-V Replica: Any custom replication data folders.
- SMB 3.0 Shares: If your VMs live on a remote file server, apply these same exclusions to that file server!
Lazy Admin Pro-Tip: If you’re using a Cluster, don’t just exclude the
C:\ClusterStoragefolder by path. Use the Volume ID (get it viamountvol) to ensure the exclusion sticks even if drive letters or paths shift.
3. Process Exclusions
Sometimes excluding the file isn’t enough; you need to exclude the “person” opening the file. Exclude these core Hyper-V executables:
- Vmms.exe: The Virtual Machine Management Service.
- Vmwp.exe: The Virtual Machine Worker Process (one runs for every active VM).
- Vmcompute.exe: (For Windows Server 2019+) The Host Compute Service.
Why this matters (The “Error 0x800704C8”)
If you don’t set these, you’ll eventually see the dreaded Error 0x800704C8 (The process cannot access the file because it is being used by another process). This happens when your AV locks the VM’s configuration file exactly when Hyper-V tries to start it.
What about Windows Defender?
Good news for the truly lazy: if you are using built-in Microsoft Defender on Windows Server, it automatically detects the Hyper-V role and applies most of these exclusions for you. However, it does not always catch your custom storage paths (like E:\MyVMs), so always double-check your work!