
LUN
Finding RDM LUN UUIDs in a vSphere Cluster | Lazy Admin Blog
If you’re managing a large virtual environment, keeping track of Raw Device Mappings (RDMs) can be a nightmare. Unlike standard virtual disks (VMDKs) that live neatly inside a datastore, RDMs are directly mapped to a LUN on your SAN.
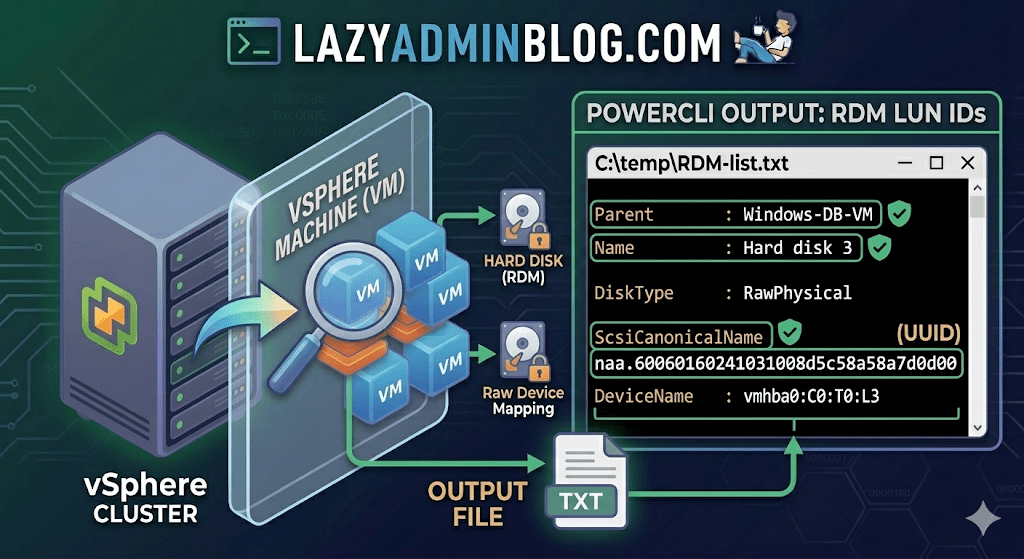
When your storage team asks, “Which VM is using LUN ID 55?”, you don’t want to check every VM manually. This PowerCLI script will scan your entire cluster and export a list of all RDMs along with their Canonical Name (NAA ID) and Device Name.
The PowerCLI One-Liner
This command connects to your cluster, filters for disks that are either RawPhysical (Pass-through) or RawVirtual, and spits out the details to a text file for easy searching.
Run this in your PowerCLI window:
PowerShell
Get-Cluster 'YourClusterName' | Get-VM | Get-HardDisk -DiskType "RawPhysical","RawVirtual" | Select-Object @{N="VM";E={$_.Parent.Name}},Name,DiskType,ScsiCanonicalName,DeviceName | Format-List | Out-File –FilePath C:\temp\RDM-list.txt
Breaking Down the Output
Once you open C:\temp\RDM-list.txt, here is what you are looking at:
- Parent: The name of the Virtual Machine.
- Name: The label of the hard disk (e.g., “Hard disk 2”).
- DiskType: Confirms if it’s Physical (direct SCSI commands) or Virtual mode.
- ScsiCanonicalName: The NAA ID (e.g.,
naa.600601...). This is the “Universal ID” your storage array uses. - DeviceName: The internal vSphere path to the device.
Why do you need this?
- Storage Migrations: If you are decommissioning a storage array, you must identify every RDM to ensure you don’t leave a “Ghost LUN” behind.
- Troubleshooting Performance: If a specific LUN is showing high latency on the SAN side, this script tells you exactly which VM is the “noisy neighbor.”
- Audit & Compliance: Great for keeping a monthly record of physical hardware mappings.
Lazy Admin Note: This script specifically uses VMware PowerCLI cmdlets (
Get-HardDisk). If you are looking for similar info on a Hyper-V host, you would typically useGet-VMHardDiskDriveand look for theDiskNumberproperty to correlate with physical disks inDisk Management.
The Clean Exit: How to Safely Remove Storage Devices from ESXi | Lazy Admin Blog

In the world of storage, “unpresenting” a LUN is more than just a right-click. If you don’t follow the proper decommissioning workflow, ESXi will keep trying to talk to a ghost device, leading to host instability and long boot times.
Follow this definitive checklist and procedure to ensure your environment stays clean and APD-free.
The “Safe-to-Remove” Checklist
Before you even touch the unmount button, verify these 7 critical points:
- Evacuate Data: Move or unregister all VMs, snapshots, templates, and ISO images from the datastore.
- HA Heartbeats: Ensure the datastore is NOT being used for vSphere HA heartbeats.
- No Clusters: Remove the datastore from any Datastore Clusters or Storage DRS management.
- Coredump: Confirm the LUN isn’t configured as a diagnostic coredump partition.
- SIOC: Disable Storage I/O Control (SIOC) for the datastore.
- RDMs: If the LUN is an Raw Device Mapping, remove the RDM from the VM settings (select “Delete from disk” to kill the mapping file).
- Scratch Location: Ensure the host isn’t using this LUN for its persistent scratch partition.
Pro Tip: Check Scratch Location via PowerCLI
Use this script to verify your scratch config across a cluster:
$cluster = "YourClusterName"foreach ($esx in Get-Cluster $cluster | Get-VMHost) { Get-VMHostAdvancedConfiguration -VMHost $esx -Name "ScratchConfig.ConfiguredScratchLocation"}
Step 1: Identify your NAA ID
You need the unique Network Address Authority (NAA) ID to ensure you are pulling the right plug.
- Via GUI: Check the Properties window of the datastore.
- Via CLI: Run
esxcli storage vmfs extent list
Step 2: The Unmount & Detach Workflow
1. Unmount the File System
In the Configuration tab > Storage, right-click the datastore and select Unmount. If you are doing this for multiple hosts, use the Datastores view (Ctrl+Shift+D) to unmount from the entire cluster at once.
2. Detach the Device (The Most Important Step)
Unmounting removes the “logical” access, but Detaching tells the kernel to stop looking for the “physical” device.
- Switch to the Devices view.
- Right-click the NAA ID and select Detach.
- The state should now show as Unmounted.
Note: Detaching is a per-host operation. You must perform this on every host that has visibility to the LUN to avoid APD states.
Step 3: Cleanup the SAN & Host
Once the state is “Unmounted” across all hosts, you can safely unmap/unpresent the LUN from your SAN array.
Permanent Decommissioning
To prevent “ghost” entries from appearing in your detached list, run these commands on the host:
- List detached devices:
esxcli storage core device detached list - Remove the configuration permanently:
esxcli storage core device detached remove -d <NAA_ID>
ESXi Multipathing Decoded: MRU, Fixed, and Round Robin

When you present a LUN to an ESXi host, the Native Multipathing (NMP) engine automatically assigns a policy based on the type of storage array detected. However, as an admin, you need to understand why a policy was chosen—and when you should manually intervene.
1. Most Recently Used (MRU)
Best For: Active/Passive Arrays. MRU selects the first working path it finds at boot. If that path fails, it switches to a standby path.
- Key Behavior: It does not fail back. Even if the original path becomes healthy again, the host stays on the current path. This prevents “path thrashing” on Active/Passive arrays where switching controllers is an expensive operation.
2. Fixed
Best For: Active/Active Arrays. The Fixed policy uses a specific “Preferred Path.” If the preferred path fails, it moves to an alternative.
- Key Behavior: It does fail back. As soon as that designated preferred path is back online, the host immediately switches back to it.
3. Round Robin (RR)
Best For: Load Balancing (Active/Active or ALUA). Round Robin rotates through all available paths to distribute the I/O load.
- Active/Active: Uses every available path.
- Active/Passive: Only uses all paths leading to the active controller.
Note: For Microsoft Failover Clusters (MSCS), Round Robin is only supported on ESXi 5.5 and later.
4. Fixed with Array Preference (FIXED_AP)
Introduced in ESXi 4.1 for ALUA-capable arrays, this policy lets the storage array tell the host which path is the “optimal” one.
- Note: This was removed in ESXi 5.0 in favor of letting the NMP automatically select MRU or Fixed based on the array’s ALUA response.
⚠️ Critical Warnings for Admins
- Don’t Fight the NMP: VMware generally warns against manually changing a LUN from Fixed to MRU. The host chooses the policy based on the hardware it detects; forcing a change can lead to instability.
- Verify Vendor Support: Round Robin is powerful but not supported by every array. Always check the VMware Compatibility Guide before making it your default.
- MSCS Limitations: If you are virtualizing SQL clusters or other failover clusters, double-check your ESXi version before toggling Round Robin, or you risk losing disk heartbeat connectivity.
#VMware #ESXi #StorageAdmin #vSphere #Multipathing #SysAdmin #ITPro #Virtualization #LazyAdmin #DataCenter #StorageTips