
SysAdmin
vSphere IDs: The Ultimate Quick Reference Guide | Lazy Admin Blog

Ever feel like you’re drowning in a sea of GUIDs and MoRefs? When you’re scripting or troubleshooting, using the wrong ID is the fastest way to break a backup job or target the wrong server.
Here is the “Lazy Admin” breakdown of the most common vSphere identifiers and how to grab them with PowerCLI.
1. vCenter Instance UUID (serverGuid)
This is the “SSN” of your vCenter server. It’s generated at install time and stays durable for that instance.
- Why it matters: In Linked Mode or cross-vCenter environments, this identifies which vCenter owns an object.
- PowerCLI:PowerShell
$vcenter = Connect-viserver vcsa-01a.corp.local $vcenter.InstanceUuid
2. ESXi Host UUID
Unlike other IDs, this isn’t generated by VMware. It’s pulled from the hardware’s SMBIOS.
- Why it matters: It’s unique to the physical motherboard/vendor.
- PowerCLI:PowerShell
(Get-VMHost | Select -First 1).ExtensionData.hardware.systeminfo.uuid
3. VC-VM Instance UUID (The “Management” ID)
Found in the .vmx file as vc.uuid. This is what vCenter uses to track VMs.
- The “Magic”: vCenter actively scans for duplicates of this ID and will “patch” (change) it automatically if it finds a conflict within its own inventory.
- PowerCLI:PowerShell
(Get-VM | Select -First 1).extensiondata.config.InstanceUUID
4. VM SMBIOS UUID (The “Guest” ID)
Found as uuid.bios in the .vmx. This is what the Guest OS (Windows/Linux) sees as the hardware serial number.
- The “Magic”: vCenter tries not to change this because many applications use it for licensing. If you move/copy a VM, vCenter will ask you what to do to prevent duplicates.
- PowerCLI:PowerShell
(Get-VM | Select -First 1).extensiondata.Config.UUID
5. VM Location ID
Stored as uuid.location. This is a hash of the VM’s configuration file path and the ESXi host UUID.
- The “I Moved It” Prompt: When this hash doesn’t match the current environment, vSphere triggers that famous “Did you move it or copy it?” popup.
- PowerCLI:PowerShell
(Get-VM | Select -First 1).extensiondata.config.LocationId
6. VM MoRef (Managed Object Reference)
The MoRef is the “Short ID” (like vm-43) used by the API and the vCenter database.
- Why it matters: This is the most important ID for database associations (stats, events, tasks). It is not unique across different vCenters.
- PowerCLI:PowerShell
(Get-VM | Select -First 1).ExtensionData.Moref.Value
Quick ID Reference Table
| ID Name | Scope | Persistence | Best Use Case |
| MoRef | Single vCenter | Changes if re-inventoried | API calls & DB tracking |
| Instance UUID | Single vCenter | High (Patched by VC) | Unique VM tracking |
| SMBIOS UUID | Global/Guest OS | Very High | Guest Software Licensing |
| Host UUID | Physical Hardware | Permanent | Hardware Asset Tracking |
Finding RDM LUN UUIDs in a vSphere Cluster | Lazy Admin Blog
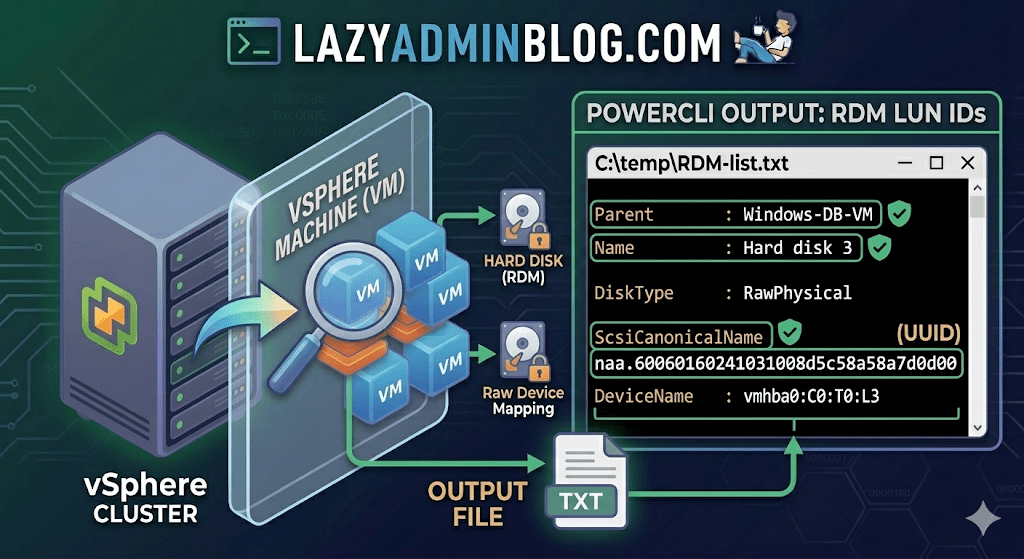
If you’re managing a large virtual environment, keeping track of Raw Device Mappings (RDMs) can be a nightmare. Unlike standard virtual disks (VMDKs) that live neatly inside a datastore, RDMs are directly mapped to a LUN on your SAN.
When your storage team asks, “Which VM is using LUN ID 55?”, you don’t want to check every VM manually. This PowerCLI script will scan your entire cluster and export a list of all RDMs along with their Canonical Name (NAA ID) and Device Name.
The PowerCLI One-Liner
This command connects to your cluster, filters for disks that are either RawPhysical (Pass-through) or RawVirtual, and spits out the details to a text file for easy searching.
Run this in your PowerCLI window:
PowerShell
Get-Cluster 'YourClusterName' | Get-VM | Get-HardDisk -DiskType "RawPhysical","RawVirtual" | Select-Object @{N="VM";E={$_.Parent.Name}},Name,DiskType,ScsiCanonicalName,DeviceName | Format-List | Out-File –FilePath C:\temp\RDM-list.txt
Breaking Down the Output
Once you open C:\temp\RDM-list.txt, here is what you are looking at:
- Parent: The name of the Virtual Machine.
- Name: The label of the hard disk (e.g., “Hard disk 2”).
- DiskType: Confirms if it’s Physical (direct SCSI commands) or Virtual mode.
- ScsiCanonicalName: The NAA ID (e.g.,
naa.600601...). This is the “Universal ID” your storage array uses. - DeviceName: The internal vSphere path to the device.
Why do you need this?
- Storage Migrations: If you are decommissioning a storage array, you must identify every RDM to ensure you don’t leave a “Ghost LUN” behind.
- Troubleshooting Performance: If a specific LUN is showing high latency on the SAN side, this script tells you exactly which VM is the “noisy neighbor.”
- Audit & Compliance: Great for keeping a monthly record of physical hardware mappings.
Lazy Admin Note: This script specifically uses VMware PowerCLI cmdlets (
Get-HardDisk). If you are looking for similar info on a Hyper-V host, you would typically useGet-VMHardDiskDriveand look for theDiskNumberproperty to correlate with physical disks inDisk Management.
Fixing Corrupt Image Profiles on ESXi | Lazy Admin Blog

We’ve all been there—a patch remediation task in vSphere Update Manager (VUM) or vSphere Lifecycle Manager (vLCM) gets interrupted (shoutout to that one colleague!), and suddenly your ESXi host is in a “zombie” state.
If you see the dreaded “Unknown – no profile defined” error, your host has lost its identity. It no longer knows which VIBs (VMware Installation Bundles) should be installed. This is usually caused by a corrupt imgdb.tgz file.
We’ve all been there—a patch remediation task in vSphere Update Manager (VUM) or vSphere Lifecycle Manager (vLCM) gets interrupted (shoutout to that one colleague!), and suddenly your ESXi host is in a “zombie” state.
If you see the dreaded “Unknown – no profile defined” error, your host has lost its identity. It no longer knows which VIBs (VMware Installation Bundles) should be installed. This is usually caused by a corrupt imgdb.tgz file.

The Symptom: Missing Image Profile
When an image profile is empty or corrupt, you cannot install patches, remove drivers, or perform upgrades. ESXi relies on the image database to maintain consistency.
How to Diagnose a Corrupt imgdb.tgz
Before you resort to a full host rebuild, verify the file size of the database. A healthy imgdb.tgz is typically around 26 KB. If yours is only a few bytes, it’s corrupted.
SSH into the host.
Locate the files:
cd /vmfs/volumesfind * | grep imgdb.tgz
Note: You will usually see two results (one for each bootbank).
Check the size:
ls -l <path_to_result>/imgdb.tgzIf the size is tiny (e.g., 0-100 bytes), the database is toast.
The Fix: Borrowing a “Known Good” Profile
Instead of a time-consuming reinstall, you can manually restore the database from a healthy host running the exact same version and patch level.
Step 1: Export from a Healthy Host
On a working ESXi host, copy the healthy database to a shared datastore:
cp /bootbank/imgdb.tgz /vmfs/volumes//
Step 2: Restore on the Corrupt Host
On the host with the issue, move the good file to /tmp and extract it to access the internal VIB and Profile metadata:
cp /vmfs/volumes//imgdb.tgz /tmpcd /tmptar -xzf imgdb.tgz
Step 3: Rebuild the Database Directories
Now, manually place the healthy metadata into the system directories:
Copy Profiles:
cp /tmp/var/db/esximg/profiles/* /var/db/esximg/profiles/Copy VIBs:
cp /tmp/var/db/esximg/vibs/* /var/db/esximg/vibs/Replace Bootbank File:
rm /bootbank/imgdb.tgzcp /tmp/imgdb.tgz /bootbank/
Step 4: Finalize and Persist
To ensure these changes survive a reboot, run the backup script:
/sbin/auto-backup.sh
Summary Table: Resolution Options
| Option | Effort | Risk | When to use |
| Rebuild Host | High | Low | If you don’t have a matching “known good” host. |
| Manual File Copy | Low | Medium | When you need a fast fix and have a twin host available. |
The Clean Exit: How to Safely Remove Storage Devices from ESXi | Lazy Admin Blog

In the world of storage, “unpresenting” a LUN is more than just a right-click. If you don’t follow the proper decommissioning workflow, ESXi will keep trying to talk to a ghost device, leading to host instability and long boot times.
Follow this definitive checklist and procedure to ensure your environment stays clean and APD-free.
The “Safe-to-Remove” Checklist
Before you even touch the unmount button, verify these 7 critical points:
- Evacuate Data: Move or unregister all VMs, snapshots, templates, and ISO images from the datastore.
- HA Heartbeats: Ensure the datastore is NOT being used for vSphere HA heartbeats.
- No Clusters: Remove the datastore from any Datastore Clusters or Storage DRS management.
- Coredump: Confirm the LUN isn’t configured as a diagnostic coredump partition.
- SIOC: Disable Storage I/O Control (SIOC) for the datastore.
- RDMs: If the LUN is an Raw Device Mapping, remove the RDM from the VM settings (select “Delete from disk” to kill the mapping file).
- Scratch Location: Ensure the host isn’t using this LUN for its persistent scratch partition.
Pro Tip: Check Scratch Location via PowerCLI
Use this script to verify your scratch config across a cluster:
$cluster = "YourClusterName"foreach ($esx in Get-Cluster $cluster | Get-VMHost) { Get-VMHostAdvancedConfiguration -VMHost $esx -Name "ScratchConfig.ConfiguredScratchLocation"}
Step 1: Identify your NAA ID
You need the unique Network Address Authority (NAA) ID to ensure you are pulling the right plug.
- Via GUI: Check the Properties window of the datastore.
- Via CLI: Run
esxcli storage vmfs extent list
Step 2: The Unmount & Detach Workflow
1. Unmount the File System
In the Configuration tab > Storage, right-click the datastore and select Unmount. If you are doing this for multiple hosts, use the Datastores view (Ctrl+Shift+D) to unmount from the entire cluster at once.
2. Detach the Device (The Most Important Step)
Unmounting removes the “logical” access, but Detaching tells the kernel to stop looking for the “physical” device.
- Switch to the Devices view.
- Right-click the NAA ID and select Detach.
- The state should now show as Unmounted.
Note: Detaching is a per-host operation. You must perform this on every host that has visibility to the LUN to avoid APD states.
Step 3: Cleanup the SAN & Host
Once the state is “Unmounted” across all hosts, you can safely unmap/unpresent the LUN from your SAN array.
Permanent Decommissioning
To prevent “ghost” entries from appearing in your detached list, run these commands on the host:
- List detached devices:
esxcli storage core device detached list - Remove the configuration permanently:
esxcli storage core device detached remove -d <NAA_ID>
vSphere Ports & Connections: The Infrastructure Roadmap | Lazy Admin Blog

In a locked-down enterprise environment, the “Any-to-Any” firewall rule is a myth. To manage ESXi effectively, you need to poke specific holes in your hardware and software firewalls.
The Core Management Ports
These are the “must-haves” for basic connectivity between vCenter, the vSphere Client, and the Host.
| Port | Protocol | Source | Destination | Purpose |
| 443 | TCP | Management Workstation | vCenter / ESXi | vSphere Client / SDK: The primary port for the Web Client and API access. |
| 902 | TCP/UDP | vCenter Server | ESXi Host | vCenter Agent (vpxa): vCenter uses this to send data to the host and receive heartbeats. |
| 902 | TCP | Management Workstation | ESXi Host | VM Console: Required to open the “Remote Console” (MKS) to a virtual machine. |
| 80 | TCP | vCenter / Workstation | ESXi Host | HTTP: Used for redirecting to 443 and for some legacy file downloads. |
Advanced Feature Ports
If you are using specific vSphere features like vMotion, HA, or specialized storage, you need these additional ports open:
1. vMotion (Live Migration)
- 8000 (TCP): Required for vMotion traffic.
- 2049 (TCP/UDP): If using NFS storage for the virtual disks.
2. vSphere High Availability (HA)
- 8182 (TCP/UDP): Used by the Fault Domain Manager (FDM) agent for inter-host communication and election of the master host.
3. Provisioning & Deployment
- 69 (UDP): TFTP, used for PXE booting ESXi for Auto Deploy.
- 4012 (TCP): Used by the Auto Deploy service.
4. Troubleshooting & Monitoring
- 22 (TCP): SSH access to the ESXi Shell.
- 161 / 162 (UDP): SNMP polling and traps for hardware monitoring.
Troubleshooting “Host Disconnected”
If your host shows as “Not Responding” in vCenter, check these three things in order:
- Ping: Can the vCenter server ping the ESXi management IP?
- Port 902: From the vCenter server, try to telnet to the host on port 902 (
telnet <host-ip> 902). If it fails, the heartbeat can’t get through. - DNS: VMware is extremely sensitive to DNS. Ensure forward and reverse lookups work for both the vCenter and the Host.
Lazy Admin Tip 💡
Don’t memorize every port! Use the VMware Ports and Protocols Tool (the official online matrix). It allows you to select your source and destination products and generates a custom firewall rule list for you.
A high resolution pdf can be downloaded here Connections and Ports in ESX and ESXi
#VMware #vSphere #Networking #SysAdmin #Firewall #DataCenter #ESXi #ITOps #LazyAdmin #Connectivity
HPE ProLiant Diagnostics: How to Generate a Survey Log (Online & Offline) | Lazy Admin Blog

An HPE Survey Log provides a deep-dive look at your server’s hardware configuration, firmware levels, and error counts. Depending on whether your OS is healthy or the server is “down,” you have two ways to get this data.
Method 1: The Offline Approach (Non-Booting Servers)
Use this method if the OS is corrupted or you need to test the hardware in a “clean” state using the SmartStart CD (Gen8 and older) or Service Pack for ProLiant (SPP).
- Boot the server using the SmartStart CD or SPP ISO.
- Navigate: From the homepage, click Maintenance > HP Insight Diagnostics.
- Default View: The Survey tab will open by default.
- The “Pro” Settings: * Change Category from ‘Overview’ to ‘All’.
- Change View Level from ‘Summary’ to ‘Advanced’.
- Save: Click Save. Note that you will need a USB flash drive plugged in to export the
.htmlor.txtlog file.
Method 2: The Online Approach (Live Production)
If the server is running Windows or Linux, you can pull the logs without a reboot by using the HP Insight Diagnostics Online Edition.
For Windows Admins:
- Via Start Menu: Go to
Start > All Programs > HP System Tools > HP Insight Diagnostics. - Via Web Browser: Open the HP System Management Homepage (SMH), click Webapps, and select HP Insight Diagnostics.
For Linux Admins:
- Open your browser and navigate to:
https://localhost:2381 - Log in with root credentials.
- Click Webapps > HP Insight Diagnostics.
Exporting the Online Log:
Once the interface opens, follow the same “Advanced” steps:
- Set Category to ‘All’.
- Set View Level to ‘Advanced’.
- Click Save to download the file directly to your workstation.
How to Install Online Diagnostics (If Missing)
If the tool isn’t installed, you’ll need the HPE Service Pack for ProLiant (SPP):
- Mount the SPP ISO.
- Navigate to
/hp/swpackagesand runhpsum.exe(Windows) or./hpsum(Linux). - Select Localhost as the target and ensure HP Insight Diagnostics Online Edition is checked for installation.
Lazy Admin Tip 💡
For modern Gen9, Gen10, and Gen11 servers, you can bypass these tools entirely by using the iLO (Integrated Lights-Out). Simply log into the iLO web interface and download the Active Health System (AHS) log. It’s the modern replacement for the Survey log and is much faster to collect!
#HPE #ProLiant #ServerAdmin #SysAdmin #ITOps #HardwareTroubleshooting #iLO #DataCenter #LazyAdmin #TechTips
RDP Rescue: How to Fix Remote Desktop Issues Without a Reboot | Lazy Admin Blog

If you can reach a server via ping or the VM console but RDP is failing, you can often “kick-start” the service by toggling specific registry keys. This forces the Terminal Services stack to re-read its configuration without dropping the entire OS.
1. The Firewall Check
Before diving into the registry, ensure the Windows Firewall isn’t blocking Port 3389. If you have console access, try disabling it temporarily to rule it out.
- Quick Command:
netsh advfirewall set allprofiles state off
2. The “Deny” Toggle (The Most Common Fix)
Sometimes the registry says RDP is allowed, but the service isn’t honoring it. Toggling the value can reset the listener.
Path: HKLM\SYSTEM\CurrentControlSet\Control\Terminal Server
- fDenyTSConnection: Should be 0. (If it’s already 0, change it to 1, refresh, then back to 0).
- fAllowToGetHelp: Should be 0 to ensure Remote Assistance isn’t conflicting.
3. WinStation Listeners (RDP & Citrix)
If the main switch is on but the specific “listener” is disabled, you’ll get a “Connection Refused” error.
For Standard RDP: Path: HKLM\System\CurrentControlSet\Control\TerminalServer\WinStations\RDP-Tcp
- fEnableWinStation: Must be 1. Toggle this (1 -> 0 -> 1) to reset the listener.
For Citrix Servers (ICA): Path: HKLM\System\CurrentControlSet\Control\TerminalServer\WinStations\ICA-Tcp
- fEnableWinStation: Must be 1.
4. Port Verification
Ensure the server is actually listening on the standard port. If someone changed the RDP port for “security,” your connection will fail.
Path: HKLM\System\CurrentControlSet\Control\TerminalServer\WinStations\RDP-Tcp
- PortNumber: Should be 3389 (Decimal).
Test it from your workstation: tnc <ServerIP> -port 3389 (PowerShell) or telnet <ServerIP> 3389
5. The Winlogon Block
In rare cases, the entire Winlogon station for terminal services is disabled at the software level.
Path: HKLM\SOFTWARE\Microsoft\Windows NT\CurrentVersion\Winlogon
- WinStationsDisabled: Must be 0. If set to 1, no one can log in via RDP regardless of other settings.
Lazy Admin Tip 💡
If you can’t get to the console, you can change these registry keys remotely from your workstation! Open Regedit, go to File > Connect Network Registry, and enter the target server’s name. You can perform all the toggles mentioned above without ever leaving your desk.
#WindowsServer #RDP #SysAdmin #Troubleshooting #ITOps #TechTips #Networking #RemoteDesktop #LazyAdmin #ServerManagement
The Ultimate IT Compliance & Terminology Encyclopedia (2026 Edition) | Lazy Admin Blog

In the enterprise world, “Standard” is a myth. Every system you touch falls into a bucket that defines how you patch it, who can access it, and how long you keep the logs. If you misclassify a system, you’re not just breaking a rule—you’re inviting an auditor to move into your office for a month.
1. The “Big Three” of Regulatory Compliance
Sarbanes-Oxley (SOx)
- Industry: Finance / Publicly Traded Companies (US).
- The Focus: Preventing financial fraud.
- IT Impact: Controls over who can modify financial data. If a system supports a key business financial process (ERP, Payroll, Billing), it is In-Scope for SOx.
- The Issue: A failure to rotate admin passwords or an unlogged manual change to a database.
GxP (Good Practice)
- Industry: Life Sciences / Pharmaceuticals / Medical Devices.
- The Focus: Product safety and human life. (GMP = Manufacturing, GLP = Lab, GCP = Clinical).
- IT Impact: Systems must be Validated (proven to do exactly what they say). Any uncontrolled change can “De-validate” the environment.
- The Issue: Loss of clinical data or unscheduled downtime during a manufacturing run.
GDPR / CCPA / LGPD
- Industry: Global / Consumer Data.
- The Focus: Individual Privacy.
- IT Impact: The “Right to be Forgotten.” You must be able to delete a specific user’s data from all production systems and backups upon request.
- The Issue: A data leak of personal information or failing to delete data within the legal timeframe.
2. Industry-Specific Verticals
| Compliance | Industry | Key Requirement |
| HIPAA | Healthcare (US) | Protection of ePHI (Electronic Protected Health Information). Encryption is non-negotiable. |
| PCI-DSS | Retail / Finance | Security of the CDE (Cardholder Data Environment). Strict network isolation for credit card traffic. |
| FERPA | Education (US) | Protection of student records and privacy. |
| FISMA | Government (US) | Security standards for federal agencies and contractors. |
3. Internal Quality vs. Security Issues
Quality Issue (Non-Conformance)
A failure to follow internal Standard Operating Procedures (SOPs).
- Example: You applied a patch during a blackout period without CAB approval. The server didn’t break, and it’s not a legal breach, but it is a Quality Issue because you ignored the process.
Security Issue (Breach)
An uncontrolled event that compromises the Confidentiality, Integrity, or Availability of data.
- Example: Social engineering (phishing), unauthorized root access, malicious code (Trojans/Worms), or theft of hardware.
4. Technical Audit Terminology
- ALCOA+: The gold standard for data integrity. Data must be Attributable, Legible, Contemporaneous, Original, and Accurate.
- Segregation of Duties (SoD): The person who requests a change cannot be the same person who approves it or implements it.
- SOC 2 (Type I & II): An audit report demonstrating that a service provider manages data securely (Common for SaaS).
- SLA (Service Level Agreement): The promised uptime. Exceeding downtime isn’t just a technical fail; it’s a Quality Issue.
- Tombstone Lifetime: In AD, the number of days a deleted object is kept before being physically removed from the database (usually 60–180 days).
Lazy Admin Tip 💡
Always keep a “Compliance Map” of your server rack. Knowing which VLAN is PCI-In-Scope versus which one is just Dev/Test will save you from accidentally triggering a massive audit trail for a routine reboot.
#ITCompliance #GDPR #CyberSecurity #SysAdmin #ITAudit #EnterpriseIT #LazyAdmin #CareerDevelopment
Mastering Memory: A Guide to the Cisco UCS B200 M3 Blade Server | Lazy Admin Blog

Optimizing a Cisco UCS B200 M3 blade server begins with proper memory configuration. In the enterprise world, an incorrectly seated DIMM or a mismatched channel doesn’t just lower performance—it can trigger a cascade of system errors and costly downtime.
🛠️ The Installation Procedure
Before you begin, ensure you are wearing an ESD (Electrostatic Discharge) wrist strap and that the blade is placed on an antistatic mat.
Step 1: Prepare the Slot
Locate the target DIMM slot and push the two white connector latches outward to the open position.
Step 2: Seat the DIMM
Align the notch on the bottom edge of the DIMM with the key in the slot.
- Precision is key: Press down evenly on both ends of the DIMM until the latches snap up and click into place.
- Warning: DIMMs are keyed. If it doesn’t seat with gentle pressure, check the alignment. Forcing a misaligned DIMM can permanently damage the motherboard or the module.
Step 3: Final Lock
Manually press the connector latches inward slightly to ensure they are fully seated and the DIMM is securely locked.
📐 Understanding Memory Architecture
The B200 M3 is a powerhouse, supporting up to 24 DIMM slots (12 per CPU). To maximize throughput, you must understand how these slots are mapped.
Channels and Slots
Each CPU manages four channels, with three DIMM slots per channel. Cisco uses a color-coding system to indicate the population order:
| Slot Number | Color | Order |
| Slot 0 | Blue | Populate First |
| Slot 1 | Black | Populate Second |
| Slot 2 | White/Beige | Populate Last |
Physical Mapping
- CPU 1 (Left): Manages Channels A, B, C, and D.
- CPU 2 (Right): Manages Channels E, F, G, and H.
[!IMPORTANT]
Single CPU Configurations: If only one CPU is installed, only the 12 slots associated with CPU 1 (left side) are functional. Memory installed in CPU 2 slots will not be recognized.
⚠️ Support and Compliance
- Third-Party Warning: Cisco does not support third-party memory. Using non-Cisco DIMMs can lead to “Inoperable” status in UCS Manager, hardware damage, or the denial of RMA requests.
- Verification: Always check the official Cisco Data Sheets for the latest supported DIMM capacities and speeds.
- Validation: After installation, boot into Cisco UCS Manager to verify that all DIMMs are discovered and show a “Healthy” status.
Courtesy: Cisco


Master the Forest: Top Active Directory Interview Questions & Answers | Lazy Admin Blog

Part 1: The Logical vs. Physical Structure
Understanding how AD is organized is the first step in mastering the service. Interviewers often look for the distinction between how objects are managed (logical) and how traffic flows (physical).
Logical Components
These define the administrative boundaries and hierarchy:
- Forest: The uppermost boundary. It contains one or more trees that share a common schema and global catalog.
- Tree: A collection of domains that share a contiguous namespace (e.g.,
corp.comanddev.corp.com). - Domain: The primary unit of replication and security. All objects in a domain share a common database (
ntds.dit). - Organizational Unit (OU): Containers used to organize objects within a domain. OUs are primarily used to delegate administration and apply Group Policy.
Physical Components
These define how AD exists on hardware and over the network:
- Domain Controllers (DC): The servers that host the AD database and handle authentication.
- Sites: A grouping of IP subnets connected by high-speed links. Sites are used to control replication traffic and ensure users log on to a local DC rather than one across a slow WAN link.
Part 2: The Core “Under the Hood” Mechanics
The Active Directory Database
The database is stored in %systemroot%\ntds as ntds.dit. Key files include:
- edb.log: Transaction logs (changes are written here first).
- res1.log / res2.log: Reserve logs to ensure the system can write to disk if space runs out.
- edb.chk: The checkpoint file that tracks which transactions have been committed to the database.
The Global Catalog (GC)
The GC is a partial, read-only replica of every object in the forest. It allows users to search for resources (like a printer in another domain) without needing to query every single DC in the forest.
SYSVOL Folder
The SYSVOL folder is a shared directory on every DC that stores the domain’s public files, including:
- Login scripts (Netlogon share).
- Group Policy Templates.
- It is kept in sync across all DCs using the File Replication Service (FRS) or DFSR.
Part 3: Protocols and Naming
LDAP (Lightweight Directory Access Protocol)
LDAP is the language used to talk to Active Directory. It follows the X.500 standard and uses TCP/IP.
- Distinguished Name (DN): The full path to an object (e.g.,
CN=JohnDoe,OU=Sales,DC=corp,DC=com). - Relative Distinguished Name (RDN): Just the object’s name (e.g.,
JohnDoe). - UPN (User Principal Name): The “email-style” login name (e.g.,
johndoe@corp.com).
Part 4: Essential Admin Tools
| Tool | Purpose |
| ADSIEdit | A low-level “registry editor” for Active Directory objects and attributes. |
| LDP | A tool for performing LDAP searches and operations manually. |
| Repadmin | The go-to command-line tool for diagnosing replication health. |
| Netdom | Used for managing trust relationships and joining computers to domains via CLI. |
| Dcpromo | (Legacy) The command to promote or demote a Domain Controller. |
Common Interview Scenario: “My Replication is Broken”
Answer: I would start by checking connectivity between sites. Then, I would use repadmin /showrepl to see which naming contexts (Domain, Configuration, or Schema) are failing. I’d also check the DNS SRV records to ensure the DCs can find each other.
#ActiveDirectory #SysAdmin #WindowsServer #ITJobs #TechInterview #Microsoft #Networking #ITOps #LazyAdmin
- ← Previous
- 1
- 2
- 3
- Next →