
Month: Oct 2015
How to generate diagnostic logs for SRM if you cannot login to the SRM via vSphere Client
Browse to the below path on the server where SRM() is intalled:
- In 32bit Windows –
C:\Program Files (32 bit)\VMware\VMware vCenter Site Recovery Manager\bin\ - In 64bit Windows –
C:\Program Files\VMware\VMware vCenter Site Recovery Manager\bin\
SRM 1.0 – C:\Program Files\VMware\VMware Site Recovery Manager\bin\
Double Click the file srm-support.wsf, in a few seconds a compressed log bundle named srm-plugin-support- MM-DD-YYYY-hh-mm.zip will be placed on the Desktop of the current user. You can share this log with VMware support for analysis.
Depending on the issue, VMware support may need Site Recovery Manager logs from the protected site, the recovery site, or both.
Site Recovery Manager log bundles do not specify the role of the site where they were collected, as a single site may have both protected and recovery roles at the same time. To help VMware support quickly distinguish between logs, VMware recommends that you prepend the wordsprotected or recovery to each log bundle name before uploading. For example:
protected-srm-support-MM-DD-YYYY-hh-mm.ziprecovery-srm-support-MM-DD-YYYY-hh-mm.zip
To upload to VMware, please check How to generate VMware ESXi logs and how to Upload via the FTP portal using a third party FTP client for a VMware Support Case
Storage Replication Adapters (SRAs) write logs in locations specific to the SRA type and vendor. Contact the SRA vendor’s documentation for more information. Common locations include:
C:\Program Files\VMware\VMware vCenter Site Recovery Manager\scripts\SAN\<SRA Vendor Name>\log\C:\Program Files\<SRA Vendor Name>\
Note: The logs can also be gathered from the GUI of the vSphere Client if connection to the SRM plug-in is still available. The Gather Logslink from the SRM Site window imports the logs from the preceding location(s).
-
\config\extention.xml -
\config\vmware-dr.xml
How to recover the only administrator account for Cisco UCS Manager
Recovering the only administrator account for Cisco UCS Manager:
If we lost/forgot the password of the only administrator account, you cannot retrieve the original password. However you have the option to recover it by changing the password for which you need to to power cycle all fabric interconnects (FI) in a Cisco UCS domain.
You can reset the password for all other local accounts through Cisco UCS Manager. However, you must log in to Cisco UCS Manager with an account that includes aaa or admin privileges. If you do not have access to a admin account then read below:
I am going to tell you in steps how to do that:
Prerequisite 1: Determining the Leadership Role of a Fabric Interconnect
- In the Navigation pane, click the Equipment tab.
- In the Equipment tab, expand Equipment > Fabric Interconnects.
- Click the fabric interconnect for which you want to identify the role.
- In the Work pane, click the General tab.
- In the General tab, click the down arrows on the High Availability Details bar to expand that area.
- View the Leadership field to determine whether the fabric interconnect is the primary or subordinate.
Prerequisite 2: Verifying the Firmware Versions on a Fabric Interconnect
You can use the following procedure to verify the firmware versions on all fabric interconnects in a Cisco UCS domain. You can verify the firmware for a single fabric interconnect through the Installed Firmware tab for that fabric interconnect.
- In the Navigation pane, click the Equipment tab.
- In the Equipment tab, click the Equipment node.
- In the Work pane, click the Firmware Management tab.
- In the Installed Firmware tab, verify that the following firmware versions for each fabric interconnect match the version to which you updated the firmware:
Kernel version
System version
Scenario 1: Recovering the Admin Account Password in a Standalone Configuration
This procedure will help you to recover the password that you set for the admin account when you performed an initial system setup on the fabric interconnect. The admin account is the system administrator or superuser account.
Before You Begin:
- Physically connect the console port on the fabric interconnect to a computer terminal or console server
- Determine the running versions of the following firmware:
The firmware kernel version on the fabric interconnect
The firmware system version
- Connect to the console port.
- Power cycle the fabric interconnect:
Turn off the power to the fabric interconnect.
Turn on the power to the fabric interconnect.
- In the console, press one of the following key combinations as it boots to get the loader prompt:
Ctrl+l
Ctrl+Shift+r
You may need to press the selected key combination multiple times before your screen displays the loader prompt.
- Boot the kernel firmware version on the fabric interconnect.
loader >
boot /installables/switch/
kernel_firmware_version
Example:
loader >
boot /installables/switch/ucs-6100-k9-kickstart.4.1.3.N2.1.0.11.gbin
- Enter config terminal mode.
Fabric(boot)#
config terminal
- Reset the admin password.
Fabric(boot)(config)#
admin-password
password
Choose a strong password that includes at least one capital letter and one number. The password cannot be blank. The new password displays in clear text mode.
- Exit config terminal mode and return to the boot prompt.
- Boot the system firmware version on the fabric interconnect.
Fabric(boot)#
load /installables/switch/
system_firmware_version
Example:
Fabric(boot)#
load /installables/switch/ucs-6100-k9-system.4.1.3.N2.1.0.211.bin
- After the system image loads, log in to Cisco UCS Manager.
Scenario 2: Recovering the Admin Account Password in a Cluster Configuration
This procedure will help you to recover the password that you set for the admin account when you performed an initial system setup on the fabric interconnects. The admin account is the system administrator or superuser account.
Before You Begin
- Physically connect a console port on one of the fabric interconnects to a computer terminal or console server.
- Obtain the following information:
The firmware kernel version on the fabric interconnect
The firmware system version
Which fabric interconnect has the primary leadership role and which is the subordinate
- Connect to the console port.
- For the subordinate fabric interconnect.
- Turn off the power to the fabric interconnect.
- Turn on the power to the fabric interconnect.
- In the console, press one of the following key combinations as it boots to get the loader prompt:
Ctrl+l
Ctrl+Shift+r
You may need to press the selected key combination multiple times before your screen displays the loader prompt.
- Power cycle the primary fabric interconnect:
- Turn off the power to the fabric interconnect.
- Turn on the power to the fabric interconnect.
- In the console, press one of the following key combinations as it boots to get the loader prompt:
Ctrl+l
Ctrl+Shift+r
You may need to press the selected key combination multiple times before your screen displays the loader prompt.
- Boot the kernel firmware version on the primary fabric interconnect.
loader > boot /installables/switch/
kernel_firmware_version
Example:
loader > boot /installables/switch/ucs-6100-k9-kickstart.4.1.3.N2.1.0.11.gbin
- Enter config terminal mode.
Fabric(boot)# config terminal
- Reset the admin password.
Fabric(boot)(config)# admin-password password
Choose a strong password that includes at least one capital letter and one number. The password cannot be blank. The new password displays in clear text mode.
- Exit config terminal mode and return to the boot prompt.
- Boot the system firmware version on the primary fabric interconnect.
Fabric(boot)# load /installables/switch/
system_firmware_version
Example:
Fabric(boot)# load /installables/switch/ucs-6100-k9-system.4.1.3.N2.1.0.211.bin
- After the system image loads, log in to Cisco UCS Manager.
- In the console for the subordinate fabric interconnect, do the following to bring it up:
- Boot the kernel firmware version on the subordinate fabric interconnect.
loader > boot /installables/switch/
kernel_firmware_version
- Boot the system firmware version on the subordinate fabric interconnect.
Fabric(boot)# load /installables/switch/
system_firmware_version
How to configure a Dell iDRAC card without rebooting
First of all download the Racadm tool from the this link. It is included in Dell OpenManage DRAC Tools. The Dell Remote Access Controller (DRAC) console is management station software designed to provide remote management capabilities for the Dell systems. You can remotely connect to the DRAC hardware and access the DRAC features either by using a web browser or the RACADM Command Line Interface (CLI). RACADM CLI is the command line user interface to the DRAC.
Syntax Usage
The following shows an example of a simple RACADM subcommand, getsysinfo, used with each RACADM utility. See the end of this article for links to documentation containing the full list of RACADM commands.
Remote RACADM
Remote RACADM commands must include the ip address or hostname of the idrac, and the idrac username and password.
racadm -r <ip address or hostname> -u <username> -p <password> <subcommand>
racadm -r 10.1.1.1 -u root -p calvin getsysinfo
NOTE: Remote racadm uses the web server SSL certificate of the iDRAC to authenticate the session. You will receive a warning message if certificates have not been configured or if the certificate is invalid. However, the command will execute normally following the message. If you wish to halt the command on certificate errors, use the -S option in the command. For information on configuring certificates on the iDRAC, see the user’s guide for your iDRAC linked at the end of this article.
Local RACADM
You do not have to specify the ip address, username, or password in Local RACADM commands.
racadm <subcommand> eg. racadm getsysinfo
racadm getniccfg
racadm setniccfg –s 172.17.2.124 255.255.252.0 172.17.0.5racadm getconfig -g cfgLanNetworkingracadm config -g cfgLanNetworking -o cfgNicIpAddress 172.17.2.124racadm config -g cfgLanNetworking -o cfgNicNetmask 255.255.252.0racadm config -g cfgLanNetworking -o cfgNicGateway 172.17.0.7racadm config -g cfgLanNetworking -o cfgDNSServer1 172.17.0.6racadm config -g cfgLanNetworking -o cfgDNSServer2 172.17.0.5racadm config -g cfgLanNetworking -o cfgDNSRacName ServerName-DRACracadm config -g cfgLanNetworking -o cfgDNSDomainName corp.company.comSSH/Telnet/Serial (Firmware) RACADM
You do not have to specify the ip address, username, or password in Firmware RACADM commands.
racadm <subcommand> eg. racadm getsysinfo
or
racadm <Enter> – takes you to a racadm>> prompt eg. racadm>>getsysinfo
Raising a support case for ProLiant/Blades Series Servers, the step by step approach!
Now a days HP has segregated the support types, the server support comes under Hewlett Packard Enterprise.
Select your product
HP ProLiant DL Multi Node Servers
HP ProLiant Packaged Cluster Servers
HP ProLiant WS Workstation Blades
Or
if you are not able to find your product, check the below link to manually search the server model/ number in the Hewlett Packard Enterprise Products: eg. ProLiant DL360 Gen9

You will get log of results like below:
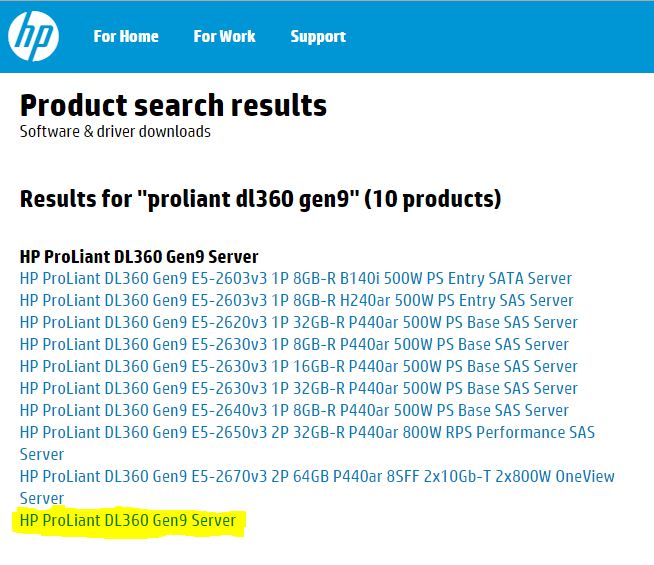

Finally if the above of these do not help then you can raise case by clicking the below link. You need to create a HP passport login in case you do not have an account. HP Passport is a single sign in service that lets you use one User ID and password for all HP Passport-enabled websites.
Submit or manage support cases

You may also check existing ticket updates by providing the case ID.
I hope techies find it useful 🙂
Connections and Ports in ESX and ESXi
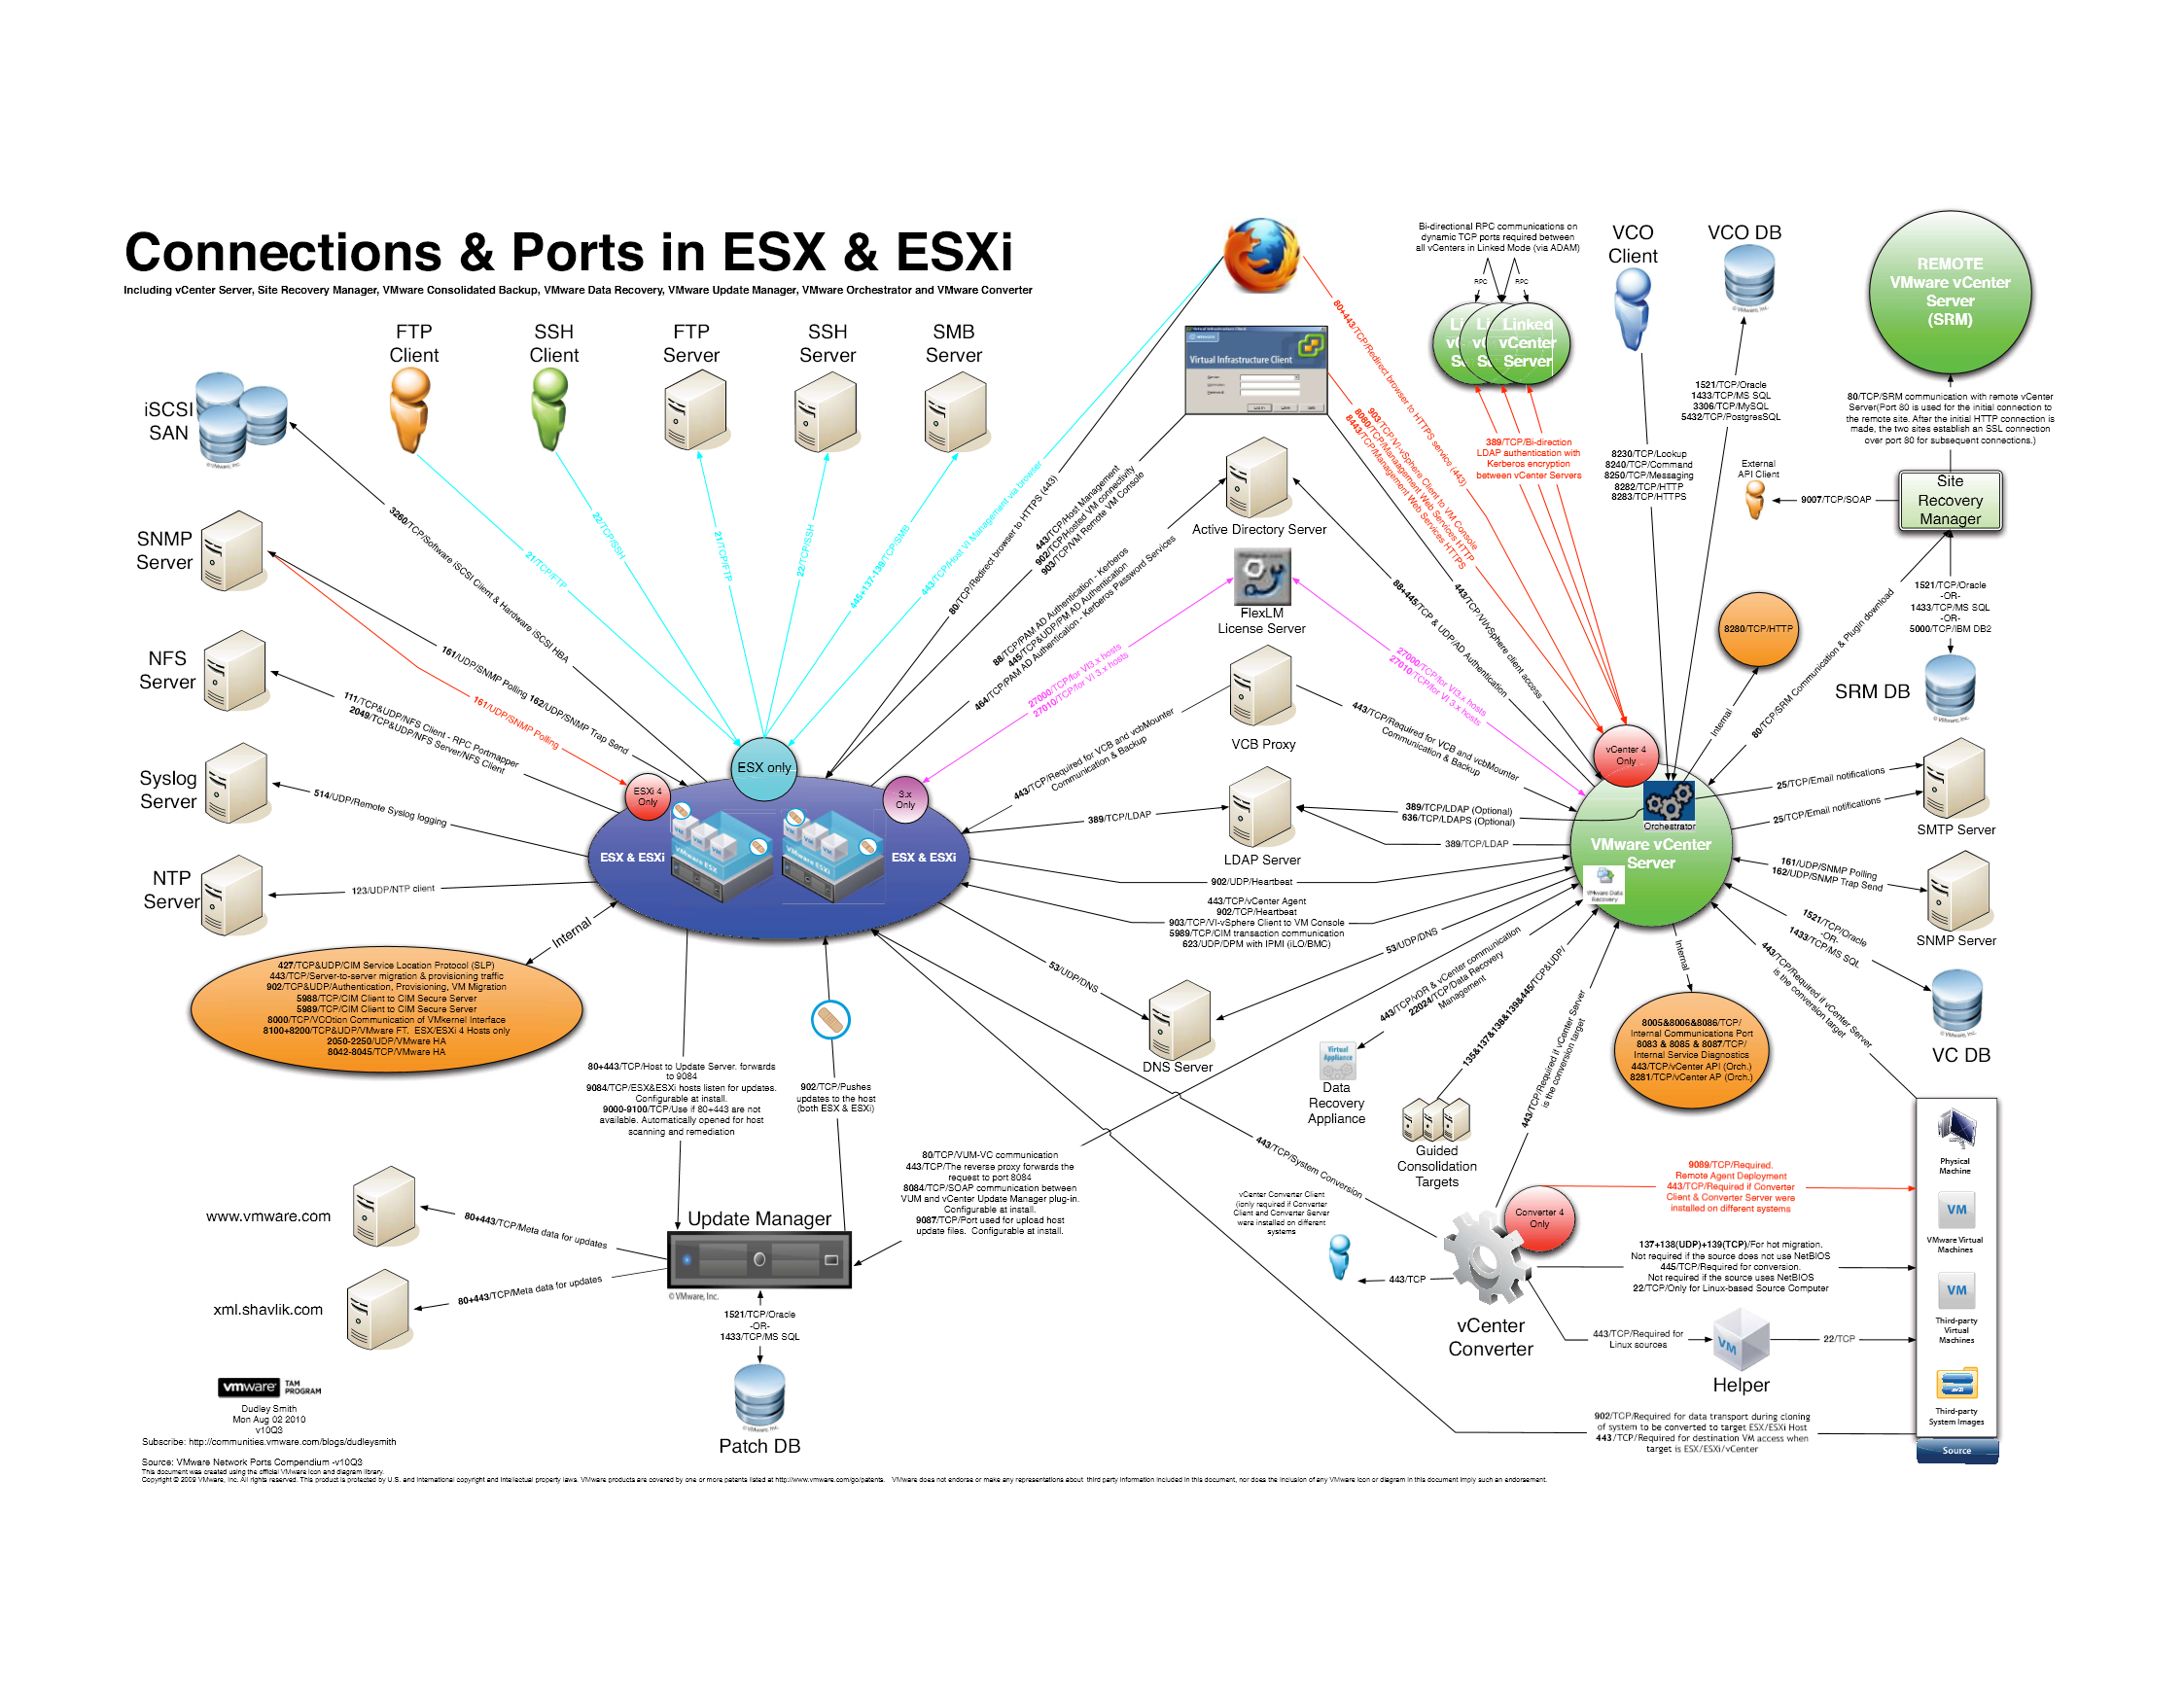
A high resolution pdf can be downloaded here Connections and Ports in ESX and ESXi
VMware ESXi Release and Build Number History – A must for confirming your ESXi hosts are up to date!
The following listings are a comprehensive collection of the flagship hypervisor product by VMware. All bold versions are downloadable releases.
vSphere ESXi 6.0
| Name | Version | Release | Build |
|---|---|---|---|
| ESXi600-201511001 | ESXi 6.0 Express Patch 4 | 2015-11-25 | 3247720 |
| ESXi600-201510001 | ESXi 6.0 Update 1a | 2015-10-06 | 3073146 |
| VMware ESXi 6.0 Update 1 | ESXi 6.0 Update 1 | 2015-09-10 | 3029758 |
| ESXi600-201507001 | ESXi 6.0b | 2015-07-07 | 2809209 |
| ESXi600-201505001 | ESXi 6.0 Express Patch 2 | 2015-05-14 | 2715440 |
| ESXi600-201504001 | ESXi 6.0 Express Patch 1 | 2015-04-09 | 2615704 |
| VMware ESXi 6.0 | ESXi 6.0 GA | 2015-03-12 | 2494585 |
vSphere ESXi 5.5
| Name | Version | Release | Build |
|---|---|---|---|
| ESXi550-201512001 | 2015-12-08 | 3248547 | |
| ESXi550-201510001 | ESXi 5.5 Update 3a | 2015-10-06 | 3116895 |
| VMware ESXi 5.5 Update 3 | ESXi 5.5 Update 3 | 2015-09-16 | 3029944 |
| ESXi550-201505002 | ESXi 5.5 Patch 5 | 2015-05-08 | 2718055 |
| ESXi550-201504002 | Recalled | 2015-04-30 | 2702864 |
| ESXi550-201504001 | ESXi 5.5 Express Patch 7 | 2015-04-07 | 2638301 |
| ESXi550-201502001 | ESXi 5.5 Express Patch 6 | 2015-02-05 | 2456374 |
| ESXi550-201501001 | ESXi 5.5 Patch 4 | 2015-01-27 | 2403361 |
| ESXi550-201412001 | ESXi 5.5 Express Patch 5 | 2014-12-02 | 2302651 |
| ESXi550-201410001 | ESXi 5.5 Patch 3 | 2014-10-15 | 2143827 |
| VMware ESXi 5.5 Update 2 | ESXi 5.5 Update 2 | 2014-09-09 | 2068190 |
| ESXi550-201407001 | ESXi 5.5 Patch 2 | 2014-07-01 | 1892794 |
| ESXi550-201406001 | ESXi 5.5 Express Patch 4 | 2014-06-10 | 1881737 |
| ESXi550-201404020 | ESXi 5.5 Express Patch 3 | 2014-04-19 | 1746974 |
| ESXi550-201404001 | ESXi 5.5 Update 1a | 2014-04-19 | 1746018 |
| VMware ESXi 5.5.1 Driver Rollup | 2014-03-11 | 1636597 | |
| VMware ESXi 5.5 Update 1 | ESXi 5.5 Update 1 | 2014-03-11 | 1623387 |
| ESXi550-201312001 | ESXi 5.5 Patch 1 | 2013-12-22 | 1474528 |
| vSAN Beta Refresh | 2013-11-25 | 1439689 | |
| VMware ESXi 5.5 | ESXi 5.5 GA | 2013-09-22 | 1331820 |
vSphere ESXi 5.1
| Name | Version | Release | Build |
|---|---|---|---|
| ESXi510-201510001 | 2015-10-01 | 3070626 | |
| ESXi510-201503001 | 5.1.0 Patch 7 | 2015-03-26 | 2583090 |
| VMware ESXi 5.1 Update 3 | 5.1.0 U3 | 2014-12-04 | 2323236 |
| ESXi510-201410001 | 5.1.0 Patch 6 | 2014-10-31 | 2191751 |
| ESXi510-201407001 | 5.1.0 Patch 5 | 2014-07-31 | 2000251 |
| ESXi510-201406001 | 5.1.0 Express Patch 5 | 2014-06-17 | 1900470 |
| ESXi510-201404001 | 5.1.0 Patch 4 | 2014-04-29 | 1743533 |
| ESXi510-201402001 | 5.1.0 Express Patch 4 | 2014-02-27 | 1612806 |
| VMware ESXi 5.1 Update 2 | 5.1.0 U2 | 2014-01-16 | 1483097 |
| ESXi510-201310001 | 5.1.0 Patch 3 | 2013-10-17 | 1312873 |
| ESXi510-201307001 | 5.1.0 Patch 2 | 2013-07-25 | 1157734 |
| ESXi510-201305001 | 5.1.0 Express Patch 3 | 2013-05-22 | 1117900 |
| VMware ESXi 5.1 Update 1 | 5.1.0 U1 | 2013-04-25 | 1065491 |
| ESXi510-201303001 | 5.1.0 Express Patch 2 | 2013-03-07 | 1021289 |
| ESXi510-201212001 | 5.1.0 Patch 1 | 2012-12-20 | 914609 |
| ESXi510-201210001 | 5.1.0a | 2012-10-24 | 838463 |
| KB2034796 | 5.1.0 | Hot-Patch | 837262 |
| VMware ESXi 5.1 | 5.1.0 GA | 2012-09-11 | 799733 |
vSphere ESXi 5.0
| Name | Version | Release | Build |
|---|---|---|---|
| ESXi500-201510001 | 2015-10-01 | 3086167 | |
| ESXi500-201502001 | 5.0.0 Patch 11 | 2015-02-26 | 2509828 |
| ESXi500-201412001 | 5.0.0 Patch 10 | 2014-12-04 | 2312428 |
| ESXi500-201408001 | 5.0.0 Patch 9 | 2014-08-28 | 2000308 |
| ESXi500-201407001 | 5.0.0 Express Patch 6 | 2014-07-01 | 1918656 |
| ESXi500-201405001 | 5.0.0 Patch 8 | 2014-05-29 | 1851670 |
| ESXi500-201401001 | 5.0.0 Patch 7 | 2014-01-23 | 1489271 |
| VMware ESXi 5.0 Update 3 | 5.0.0 U3 | 2013-10-17 | 1311175 |
| ESXi500-201308001 | 5.0.0 Patch 6 | 2013-08-29 | 1254542 |
| ESXi500-201305001 | 5.0.0 Express Patch 5 | 2013-05-15 | 1117897 |
| ESXi500-201303001 | 5.0.0 Patch 5 | 2013-03-28 | 1024429 |
| VMware ESXi 5.0 Update 2 | 5.0.0 U2 | 2012-12-20 | 914586 |
| ESXi500-201209001 | 5.0.0 Patch 4 | 2012-09-27 | 821926 |
| ESXi500-201207001 | 5.0.0 Patch 3 | 2012-07-12 | 768111 |
| ESXi500-201206001 | 5.0.0 Express Patch 4 | 2012-06-14 | 721882 |
| ESXi500-201205001 | 5.0.0 Express Patch 3 | 2012-05-03 | 702118 |
| ESXi500-201204001 | 5.0.0 Express Patch 2 | 2012-04-12 | 653509 |
| VMware ESXi 5.0 Update 1 | 5.0.0 U1 | 2012-03-15 | 623860 |
| ESXi500-201112001 | 5.0.0 Patch 2 | 2011-12-15 | 515841 |
| ESXi500-201111001 | 5.0.0 Express Patch 1 | 2011-11-03 | 504890 |
| ESXi500-201109001 | 5.0.0 Patch 1 | 2011-09-13 | 474610 |
| VMware ESXi 5.0 | 5.0.0 | 2011-08-24 | 469512 |
vSphere ESXi 4.1
| Name | Version | Release | Build |
|---|---|---|---|
| ESXi410-201404001 | 4.1.0 Patch 11 | 2014-04-10 | 1682698 |
| ESXi410-201312001 | 4.1.0 Patch 10 | 2013-12-05 | 1363503 |
| ESXi410-201307001 | 4.1.0 Patch 9 | 2013-07-31 | 1198252 |
| ESXi410-201304001 | 4.1.0 Patch 8 | 2013-04-30 | 1050704 |
| ESXi410-201301001 | 4.1.0 Patch 7 | 2013-01-31 | 988178 |
| ESXi410-201211001 | 4.1.0 Patch 6 | 2012-11-15 | 874690 |
| VMware ESXi 4.1 Update 3 | 4.1.0 U3 | 2012-08-30 | 800380 |
| ESXi410-201206001 | 4.1.0 Express Patch 3 | 2012-06-14 | 721871 |
| ESXi410-201205001 | 4.1.0 Express Patch 2 | 2012-05-03 | 702113 |
| ESXi410-201204001 | 4.1.0 Patch 5 | 2012-04-26 | 659051 |
| ESXi410-201201001 | 4.1.0 Patch 4 | 2012-01-30 | 582267 |
| VMware ESXi 4.1 Update 2 | 4.1.0 U2 | 2011-10-27 | 502767 |
| ESXi410-201107001 | 4.1.0 Patch 3 | 2011-07-28 | 433742 |
| ESXi410-201104001 | 4.1.0 Patch 2 | 2011-04-28 | 381591 |
| VMware ESXi 4.1 Update 1 | 4.1.0 U1 | 2011-02-10 | 348481 |
| ESXi410-201011001 | 4.1.0 Express Patch 1 | 2010-11-29 | 320137 |
| ESXi410-201010001 | 4.1.0 Patch 1 | 2010-11-15 | 320092 |
| VMware ESXi 4.1 | 4.1.0 | 2010-07-13 | 260247 |
