
Day: May 1, 2015
VMware Interview Questions
- ESX vs ESXi
- ESXi has no service console which is a modified version of RHEL
- ESXi is extremely thin hence results in fast installation + fast boot
- ESXi can be purchased as an embedded hypervisor on hardware
- ESXi has builtin server health status check
- ESXi 4.1 vs ESXi 5.0 – Migration
- Local upgrade from CD
- VMware update manager (only supports upgrade of ESX/ESXi 4.x to ESXi 5.0)
- ESXi 4.1 vs ESXi 5.0 – Features
- vSphere Auto deploy
- Storage DRS
- HA – Primary/secondary concept changed to master/slave
- Profile driven storage
- VMFS version – 3 → 5
- ESXi firewall
- VMware hardware version – 7 → 8
- VMware tools version – 4.1 → 5
- vCPU – 8 → 32
- vRAM – 256 → 1 TB
- VMs per host – 320 → 512
- RAM per host – 1TB → 2TB
- USB 3.0 support
- vApp
- HA 5.0
- Uses an agent called FDM – Fault domain manager
- HA now talks directly to hostd instead of using vcenter agent vpxa
- Master/slave concept
- Master
- monitors availability of hosts/VMs
- manages VM restarts after host failure
- maintains list of all VMs in each host
- restarting failed VMs
- exchanging state with vcenter
- monitor state of slaves
- Slave
- monitor running VMs and send status to master and performs restart on request from master
- monitors master node health
- if master fails, participates in election
- Two different heartbeat mechanisms – Network heartbeat and datastore heartbeat
- Network heartbeat
- Sends between slave and master per second
- When slave is not receiving heartbeat from master, checks whether it is isolated or master is isolated or has failed
- Datastore heartbeat
- To distinct between isolation and failure
- Uses ‘Power On’ file in datastore to determine isolation
- This mechanism is used only when master loses network connectivity with hosts
- 2 datastores are chosen for this purpose
- Isolation response
- PowerOff
- Leave Powered On
- Shutdown
- vMotion
- vMotion enables live migration of running virtual machines from one host to another with zero downtime
- Prerequisites
- Host must be licensed for vMotion
- Configure host with at least one vMotion n/w interface (vmkernel port group)
- Shared storage (this has been compromised in 5.1)
- Same VLAN and VLAN label
- GigaBit ethernet network required between hosts
- Processor compatibility between hosts
- vMotion does not support migration of applications clustered using Microsoft clustering service
- No CD ROM attached
- No affinity is enabled
- vmware tools should be installed
- What is DRS? Types of DRS
- Distributed Resource Scheduler
- It is a feature of a cluster
- DRS continuously monitors utilization across the hosts and moves virtual machines to balance the computing capacity
- DRS uses vMotion for its functioning
- Types of DRS
- Fully automated – The VMs are moved across the hosts automatically. No admin intervention required.
- Partially automated – The VMs are moved across the hosts automatically during the time of VM bootup. But once up, vCenter will provide DRS recommendations to admin and has to perform it manually.
- Manual – Admin has to act according to the DRS recommendations
- DRS prerequisites
- Shared storage
- Processor compatibility of hosts in the DRS cluster
- vMotion prerequisites
- vMotion is not working. What are the possible reasons?
- Ensure vMotion is enabled on all ESX/ESXi hosts
- Ensure that all vmware pre requisites are met
- Verify if the ESXi/ESX host can be reconnected or if reconnecting the ESX/ESXi host resolves the issue
- Verify that time is synchronized across environment
- Verify that the required disk space is available
- What happens if a host is taken to maintenance mode
- Hosts are taken to maintenance mode during the course of maintenance
- In a single ESX/ESXi setup, all the VMs need to be shutdown before getting into maintenance mode
- In a vCenter setup If DRS is enabled, the VMs will be migrated to other hosts automatically.
- How will you clone a VM in an ESXi without vCenter
- Using vmkftools
- Copy the vmdk file and attach to a new VM
- Using VMware converter
- What is vSAN?
- It is a hypervisor-converged storage solution built by aggregating the local storage attached to the ESXi hosts managed by a vCenter.
- Recommended iSCSI configuration?
- A separate vSwitch, and a separate network other than VMtraffic network for iSCSI traffic. Dedicated physical NICs should be connected to vSwitch configured for iSCSI traffic.
- What is iSCSI port binding ?
- Port binding is used in iSCSI when multiple VMkernel ports for iSCSI reside in the same broadcast domain and IP subnet, to allow multiple paths to an iSCSI array that broadcasts a single IP address.
- iSCSI port binding considerations ?
- Array Target iSCSI ports must reside in the same broadcast domain and IP subnet as the VMkernel port.
- All VMkernel ports used for iSCSI connectivity must reside in the same broadcast domain and IP subnet.
- All VMkernel ports used for iSCSI connectivity must reside in the same vSwitch.
- Currently, port binding does not support network routing.
- Recommended iSCSI configuration of a 6 NIC infrastructure ? (Answer changes as per the infrastructure requirements)
- 2 NICs for VM traffic
- 2 NICs for iSCSI traffic
- 1 NIC for vMotion
- 1 NIC for management network
- Post conversion steps in P2V
- Adjust the virtual hardware settings as required
- Remove non present device drivers
- Remove all unnecessary devices such as serial ports, USB controllers, floppy drives etc..
- Install VMware tools
- Which esxtop metric will you use to confirm latency issue of storage ?
- esxtop –> d –> DAVG
- What are standby NICs
- These adapters will only become Active if the defined Active adapters have failed.
- Path selection policies in ESXi
- Most Recently Used (MRU)
- Fixed
- Round Robin
- Which networking features are recommended while using iSCSI traffic
- iSCSI port binding
- Jumbo Frames
- Ports used by vCenter
- 80,443,902
- What is ‘No Access’ role
- Users assigned with the ‘No Access’ role for an object, cannot view or change the object in any way
- When is a swap file created
- When the guest OS is first installed in the VM
- The active directory group, where the members will be ESXi administrators by default.
- ESX Admins
- Which is the command used in ESXi to manage and retrieve information from virtual machines ?
- vmware-cmd
- Which is the command used in ESXi to view live performance data?
- esxtop
- Command line tool used in ESXi to manage virtual disk files?
- vmkfstools
- Port used for vMotion
- 8000
- Log file location of VMware host
- \var\log\vmware
- Can you map a single physical NIC to multiple virtual switches ?
- No
- Can you map a single virtual switch to multiple physical NICs?
- Yes. This method is called NIC teaming.
- VMKernel portgroup can be used for:
- vMotion
- Fault Tolerance Logging
- Management traffic
- Major difference between ESXi 5.1 and ESXi 5.5 free versions
- Till ESXi 5.1 free version there was a limit to the maximum physical memory to 32 GB. But from 5.5 onwards this limit has been lifted.
- Maximum number of LUNs that can be attached to a host (ESXi 5.0)
- 256
- Maximum number of vCPUs that can be assigned to a VM (ESXi 5.0)
- 32
- What is CPU affinity in VMware? Its impact on DRS?
- CPU refers to a logical processor on a hyperthreaded system and refers to a core on a non-hyperthreaded system
- By setting CPU affinity for each VM, you can restrict the assignment of VMs to a subset of available processors
- The main use of setting CPU affinity is when there are display intensive workloads which requires additional threads with vCPUs.
- DRS will not work with CPU affinity
- VMversion 4 vs VMversion 7
- Version 4
- Runs on ESX 3.x
- Max supported RAM 64 GB
- Max vCPUs 4
- MS cluster is not supported
- 4 NICs/VM
- No USB Support
- Version 7
- Runs on vSphere 4.x
- Max supported RAM 256 GB
- Max vCPUs 8
- MS cluster is supported
- 10 NICs/VM
- USB support
- What happens to the VMs if a standalone host is taken to maintenance mode?
- In case of standalone servers , VMware recommends that VMs should be powered off before putting the server in maintenance mode
- If we put the standalone host in maintenance mode without powering off the VMs, it will remain in the ‘entering maintenance mode’ state until the VMs are all shutdown
- When all the VMs are powered down, the host status changes to ‘under maintenance’
- How can you edit a vm template?
- The VM templates cannot be modified as such
- First , the VM template have to be converted to a virtual machine
- After making necessary machines in the virtual machine, convert the virtual machine back to template
- VMware hardware version comparison

How to change default snapshot location in VMware ESXi 5
Defaulty the snapshots which are taken for any virtual machine are stored with their parent in the same directory or storage. Sometimes you may run out of space and you might not be able to take anymore snapshots so in that case you can always use some other location for the storage of snapshots.
These are the required steps to be taken to change the default locations of all the snapshots .
NOTE: Please ensure that the vm you are working on is powered OFF.
Right Click the vm and select Edit Settings
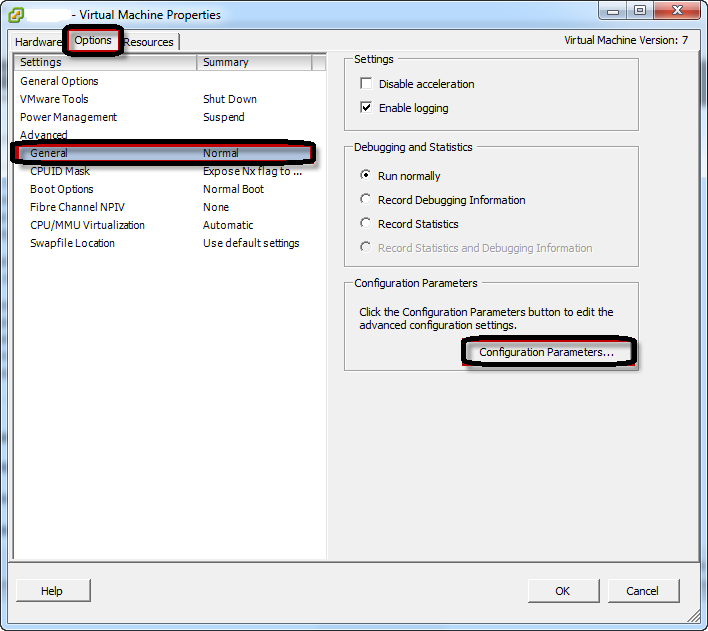
Click on Options from the top TAB, select General and open the Configuration parameters
Add a new row with the following details
snapshot.redoNotWithParent
Save this parameter with a value “true” as shown below
Now open the CLI of the host where the vm is located
Go to the vm’s parent directory where all the vm files are stored and open the main .vmx file
As in my case
# cd /vmfs/volumes/53652b45-90f342h4-v3r3-s5dw676h5674/Windows2003
# vi Windows2003.vmx
Now add this line anywhere in the .vmx file with the path location where you want your snapshots to be stored
workingDir = “/vmfs/volumes/54332bf4-gd3bf353-g45b-g2ft353b5545/snapshots”
Save the file and exit
Now you need to reload this vm to make the changes take affect.
# vim-cmd vmsvc/getallvms | grep Windows2003
13 Windows2003 [iSCSI-Datastore15] Windows2003/Windows2003 win2003 vmx-07
Here 13 is the vm id which you can find out using the above command
# vim-cmd vmsvc/reload 13
Now when you take snapshots the snapshot files and vm swap files will be created in a different location.
How to redirect vm’s swap file
In case you do not want vm swap file to be redirected to another location and you want it to the same parent directory.
Add an extra parameter in the Configuration Parameter option shown above
sched.swap.dir=”<path_to_vm_directory>”
For example
/vmfs/volumes/54332bf4-gd3bf353-g45b-g2ft353b5545/vmswap
Save the settings and exit. Now each time you take snapshot the snapshot files and vm swap files will be saved at specified different location.
Test Cluster Failures and Failover Policies
Test cluster failures and failover policies
- Test group failover policy
- Test whether group resources can fail over
- Test private network failures
- Test node failure
Test group failover policy
To test group failover policy
- Open Cluster Administrator.
- In the console tree, double-click the Groups folder.
- In the details pane, click the group.
- On the File menu, click Properties.
- On the Failover tab, set the Threshold to 0, and then click OK.
- In the Cluster Administrator console tree, click the group.
- In the details pane, click a resource.
- On the File menu, click Properties.
- On the Advanced tab, select the Affect the group check box, if it is not already selected.
- On the Advanced tab, set the Threshold to 0, and then click OK.
- On the File menu, click Initiate Failure.
Test whether group resources can fail over
To test whether group resources can fail over
- Open Cluster Administrator.
- In the console tree, double-click the Groups folder.
- In the console tree, click a group.
- On the File menu, click Move Group.On a multinode cluster server, when using Move Group, select the node to move the group to.
Make sure the Owner column in the details pane reflects a change of owner for all of the group’s dependencies.
Test private network failures
To test private network failures
- Open Cluster Administrator.
- Verify that there are at least two networks set up for internal cluster communication and determine which network has the highest priority for internal cluster communications.For more information, see “To change network priority for communication between nodes” in Related Topics. When you follow that procedure, Cluster Administrator will only list those networks that support internal cluster communication.
- If there are two or more internal networks, continue to step 4, otherwise stop here and do not continue.
- On one node, unplug the cable for the highest priority network identified above.
- In the console tree, click the cluster node and verify that the state of the node is still Up (that is, actively participating in all cluster operations).
Test node failure
To test node failure
- Test node failure using one of the following four methods:
- Stop the Cluster service on the node.This prevents clients from accessing cluster resources through that node. In this event, all resources owned by this node fail over to other nodes in the server cluster.
- Turn off the power on the node.This tests the ability of the server cluster to fail over all the resources that were owned by the powered down node.
- On one node, unplug the network cables for all networks enabled for intracluster communications.This test disables all intracluster network interfaces for the node and prevents the node from exchanging heartbeats with the Cluster Network Driver on the other active nodes. In this event, the Cluster service then initiates failover of the resources owned by the node to the other nodes in the server cluster.
Start Cluster Administrator in Microsoft Management Console
To start Cluster Administrator in Microsoft Management Console
- Open Computer Management.
- In the console tree, double-click to expand Services and Applications.
- Right-click Cluster, and then click
Pause a node
To pause a node
- Open Cluster Administrator.
- In the console tree, click the node.
- On the File menu, click Pause Node.
Resume a node
To resume a node
- Open Cluster Administrator.
- In the console tree, click the node.
- On the File menu, click Resume Node.
Stop the Cluster service
To stop the Cluster service
- Open Cluster Administrator.
- In the console tree, click the node.
- On the File menu, click Stop Cluster Service.
Start the Cluster service
To start the Cluster service
- Open Cluster Administrator.
- In the console tree, click the node.
- On the File menu, click Start Cluster Service.
Set the Cluster service to only start manually
To set the Cluster service to only start manually
- Open Computer Management.
- In the console tree, click Services.Where?
- Computer Management/Services and Applications/Services
- In the details pane, click Cluster Service.
- On the Action menu, click Properties.
- In Startup type, select Manual, and then click OK.
Notes
- To perform this procedure, you must be a member of the Administrators group on the local computer, or you must have been delegated the appropriate authority. If the computer is joined to a domain, members of the Domain Admins group might be able to perform this procedure. As a security best practice, consider using Run as to perform this procedure.
- To open Cluster Administrator, click Start, click Control Panel, double-click Administrative Tools, and then double-click Cluster Administrator.
![clusterrosourcemovement[1]](https://lazyadminblog.com/wp-content/uploads/2015/05/clusterrosourcemovement1.gif)
