
Month: February 2026
Hyper-V Performance Hack: The Essential Antivirus Exclusions List | Lazy Admin Blog
Running antivirus on your Hyper-V host is a security must, but if you don’t configure it correctly, you’re asking for trouble. We’re talking “disappearing” VMs, corrupted virtual disks, and performance so sluggish you’ll think you’re back on physical hardware from 2005.
The culprit is usually the Real-Time Scanning engine trying to “inspect” a 100GB .vhdx file every time the guest OS writes a single bit. Here is the definitive “Lazy Admin” guide to Hyper-V AV exclusions.
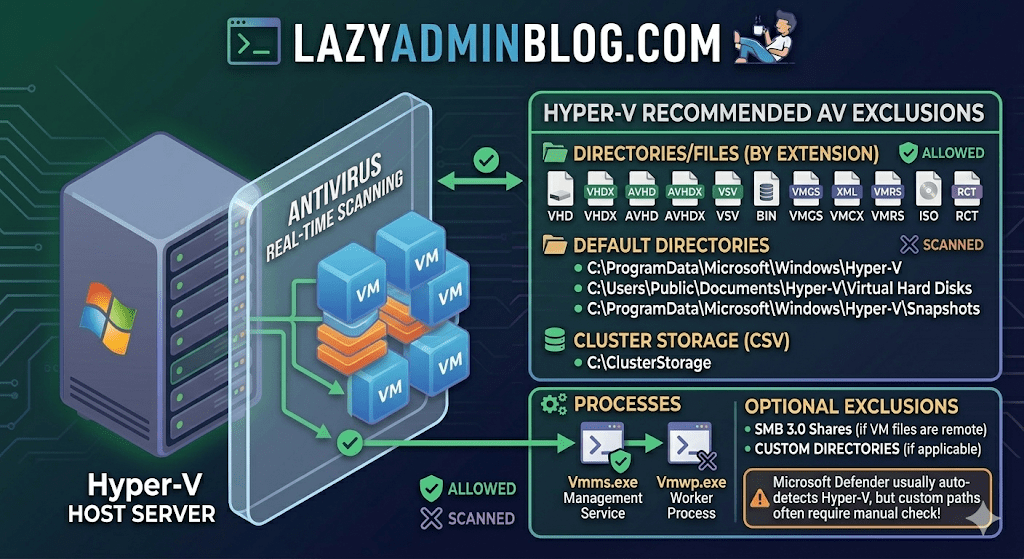
1. File Extension Exclusions
Tell your AV to keep its hands off these specific virtual machine file types:
- Virtual Disks:
.vhd,.vhdx - Snapshots/Checkpoints:
.avhd,.avhdx - Saved State:
.vsv,.bin,.vmgs - Configuration:
.xml,.vmcx,.vmrs - ISO Images:
.iso - Tracking:
.rct(Resilient Change Tracking)
2. Directory Exclusions
If you are using the default paths, exclude these. If you have a dedicated D:\VMs drive (which you should!), exclude that entire custom path as well.
- Default Configs:
C:\ProgramData\Microsoft\Windows\Hyper-V - Default VHDs:
C:\Users\Public\Documents\Hyper-V\Virtual Hard Disks - Default Snapshots:
C:\ProgramData\Microsoft\Windows\Hyper-V\Snapshots - Cluster Shared Volumes (CSV):
C:\ClusterStorage - Hyper-V Replica: Any custom replication data folders.
- SMB 3.0 Shares: If your VMs live on a remote file server, apply these same exclusions to that file server!
Lazy Admin Pro-Tip: If you’re using a Cluster, don’t just exclude the
C:\ClusterStoragefolder by path. Use the Volume ID (get it viamountvol) to ensure the exclusion sticks even if drive letters or paths shift.
3. Process Exclusions
Sometimes excluding the file isn’t enough; you need to exclude the “person” opening the file. Exclude these core Hyper-V executables:
- Vmms.exe: The Virtual Machine Management Service.
- Vmwp.exe: The Virtual Machine Worker Process (one runs for every active VM).
- Vmcompute.exe: (For Windows Server 2019+) The Host Compute Service.
Why this matters (The “Error 0x800704C8”)
If you don’t set these, you’ll eventually see the dreaded Error 0x800704C8 (The process cannot access the file because it is being used by another process). This happens when your AV locks the VM’s configuration file exactly when Hyper-V tries to start it.
What about Windows Defender?
Good news for the truly lazy: if you are using built-in Microsoft Defender on Windows Server, it automatically detects the Hyper-V role and applies most of these exclusions for you. However, it does not always catch your custom storage paths (like E:\MyVMs), so always double-check your work!
Windows Server 2008 R2 Stuck in Recovery Loop? Here’s the Fix | Lazy Admin Blog

A sudden power failure is the ultimate “stress test” for a server, and sometimes the OS fails that test, landing you in an endless loop of Startup Repair. If F8 > Last Known Good Configuration didn’t save your skin, it’s time to break out the installation media.
The Prerequisites
Before you start, ensure you have your Windows Server 2008 R2 Installation Disc (or a bootable USB) ready.
- Boot from the media.
- Select your language/input settings and click Next.
- Select Repair your computer.
- Choose the OS you want to fix and click Next.
- Select Command Prompt from the System Recovery Options.
Method 1: The System File Checker (SFC)
If the power cut corrupted a core system file, SFC is your first line of defense. It compares your system files against the “known good” versions on the disc.
- In the Command Prompt, type:
sfc /scannow - Wait: This can take a while. If it finds and fixes errors, reboot and see if the loop is broken.
Method 2: Rebuilding the BCD
Sometimes the boot configuration data gets scrambled. This command scans for Windows installations and lets you add them back to the boot list.
- In the Command Prompt, type:
Bootrec /RebuildBcd - If it finds a Windows installation, press Y to add it to the boot list.
Method 3: The “Nuclear” Boot Repair
If the Master Boot Record (MBR) or the boot sector itself is toast, you need to rewrite them entirely. This is the heavy-duty fix for when the BIOS simply can’t find where Windows starts.
Run these three commands in order:
- Fix the MBR:
BOOTREC /FIXMBR - Fix the Boot Sector:
BOOTREC /FIXBOOT - Force the Update:
D:\boot\Bootsect.exe /NT60 All(Note: Replace D: with the actual drive letter of your installation disc).