
Author: Ashish Kumar Singh
Azure Alert: Default Outbound Access Ends March 31st
Is your “Internet-less” VM about to lose its connection? Here is the fix.
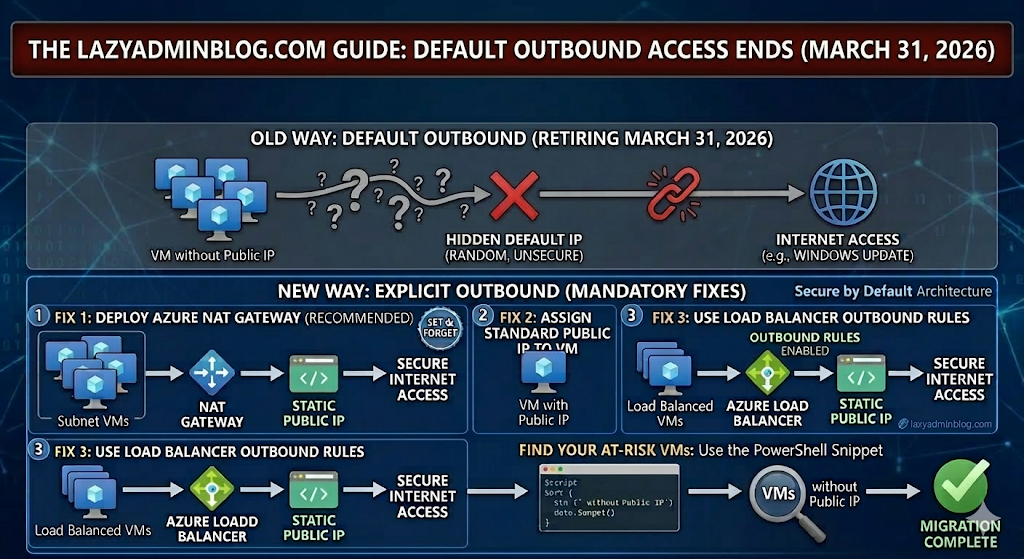
For years, Azure allowed Virtual Machines without an explicit outbound connection (like a Public IP or NAT Gateway) to “cheat” and access the internet using a default, hidden IP. That ends on March 31st 2026. If you haven’t transitioned your architecture, your updates will fail, your scripts will break, and your apps will go dark.
1. What exactly is changing?
Microsoft is moving toward a “Secure by Default” model. The “Default Outbound Access” (which was essentially a random IP assigned by Azure) is being retired. From now on, you must explicitly define how a VM talks to the outside world.
2. The Three “Lazy Admin” Solutions
You have three ways to fix this before the deadline. Choose the one that fits your budget and security needs:
Option A: The NAT Gateway (Recommended)
This is the most scalable way. You associate a NAT Gateway with your Subnet. All VMs in that subnet will share one (or more) static Public IPs for outbound traffic.
- Pro: Extremely reliable and handles thousands of concurrent sessions.
- Con: There is a small hourly cost + data processing fee.
Option B: Assign a Public IP to the VM
The simplest “Quick Fix.” Give the VM its own Standard Public IP.
- Pro: Immediate fix for a single server.
- Con: It’s a security risk (opens a door into the VM) and gets expensive if you have 50 VMs.
Option C: Use a Load Balancer
If you already use an Azure Load Balancer, you can configure Outbound Rules.
- Pro: Professional, enterprise-grade setup.
- Con: More complex to configure if you’ve never done it before.
3. How to find your “At Risk” VMs
Don’t wait for March 31st 2026 to find out what’s broken. Run this PowerShell snippet to find VMs that might be relying on default outbound access:
# Find VMs without a Public IP in a specific Resource Group$VMs = Get-AzVM -ResourceGroupName "YourRGName"foreach ($vm in $VMs) { $nic = Get-AzNetworkInterface -ResourceId $vm.NetworkProfile.NetworkInterfaces[0].Id if ($null -eq $nic.IpConfigurations.PublicIpAddress) { Write-Host "Warning: $($vm.Name) has no Public IP and may rely on Default Outbound Access!" -ForegroundColor Yellow }}🛡️ Lazy Admin Verdict:
If you have more than 3 VMs, deploy a NAT Gateway. It’s the “Set and Forget” solution that ensures you won’t get a 2 AM call on April 1st when your servers can’t reach Windows Update.
LazyAdminBlog.com : M365 E7: The “Super SKU” is Here (And it Costs $99)

Is the new ‘Frontier Suite’ a lazy admin’s dream or a budget nightmare?
After 11 years of E5 being the king of the mountain, Microsoft has officially announced its successor: Microsoft 365 E7. Launching May 1, 2026, this isn’t just a minor update—it’s a $99/month powerhouse designed for an era where AI agents are treated like actual employees.
1. What’s inside the E7 Box?
If you’ve been “nickel and dimed” by add-on licenses for the last two years, E7 is Microsoft’s way of saying “Fine, here’s everything.”
- Microsoft 365 Copilot (Wave 3): No more $30 add-on. It’s baked in, including the new “Coworker” mode developed with Anthropic.
- Agent 365: This is the big one. A brand-new control plane to manage, secure, and govern AI agents across your tenant.
- Microsoft Entra Suite: You get the full identity stack, including Private Access (ZTNA) and Internet Access (SSE), which were previously separate costs.
- Advanced Security: Enhanced features for Defender, Intune, and Purview specifically tuned for “Agentic AI” (AI that actually performs tasks, not just answers questions).
2. The $99 Math: Is it worth it?
At first glance, $99 per user per month sounds like a typo. But let’s look at the “Lazy Admin” math:
| Component | Standalone Cost (Est.) |
| M365 E5 | $60 (post-July 2026 hike) |
| M365 Copilot | $30 |
| Agent 365 | $15 |
| Entra Suite Add-on | $12 |
| Total Value | $117/month |
By moving to E7, you’re saving about $18 per user and, more importantly, you stop managing four different license renewals. That is the definition of working smarter.
3. The “Agentic” Shift
Why do we need E7? Because in 2026, agents are becoming “Frontier Workers.” Microsoft’s new stance is that AI agents need their own identities. Under E7, your automated agents get their own Entra ID, mailbox, and Teams access so they can attend meetings and file reports just like a human. E7 provides the governance layer to make sure these agents don’t go rogue and start emailing your CEO the company’s secrets.
📊 Microsoft 365 License Comparison: E3 vs. E5 vs. E7
| Feature Category | M365 E3 | M365 E5 | M365 E7 (Frontier) |
| Monthly Cost | ~$36.00 | ~$57.00 | $99.00 |
| Core Productivity | Full Apps + Teams | Full Apps + Teams | Full Apps + Teams |
| Security | Basic (Entra ID P1) | Advanced (Entra ID P2) | Autonomous (P3) |
| Compliance | Core eDiscovery | Inner Risk + Priva | Agentic Governance |
| AI Integration | Add-on Required | Add-on Required | Native Copilot Wave 3 |
| Specialized Tooling | None | Power BI Pro | Agent 365 (Suite) |
| Threat Protection | Defender for Endpoint | Defender XDR Full | Quantum Defender |
| Endpoint Mgmt | Intune (Basic) | Intune (Plan 2) | Autopilot Frontie |
🛡️ Lazy Admin Verdict:
- Upgrade to E7 if: You already have 50%+ Copilot adoption and you’re starting to build custom AI agents in Copilot Studio.
- Stay on E5 if: You’re still fighting with users to turn on MFA and haven’t touched AI yet.
📚 References & Further Reading
- Official Microsoft Announcement: Introducing the First Frontier Suite built on Intelligence + Trust – The primary source for E7 pricing and the “Wave 3” Copilot vision.
- Technical Deep Dive: Secure Agentic AI for your Frontier Transformation – Details on how Agent 365 integrates with Defender and Purview.
- Partner Insights: Leading Frontier Firm Transformation with Microsoft 365 E7 – Great for understanding the licensing shift from an MSP/Partner perspective.
- Analysis: M365 E7 to Launch May 1 for $99 Per User Per Month – Independent analysis of the “Super SKU” value proposition.
LazyAdminBlog.com : Guide to the Entra ID Passkey Rollout (March 2026)
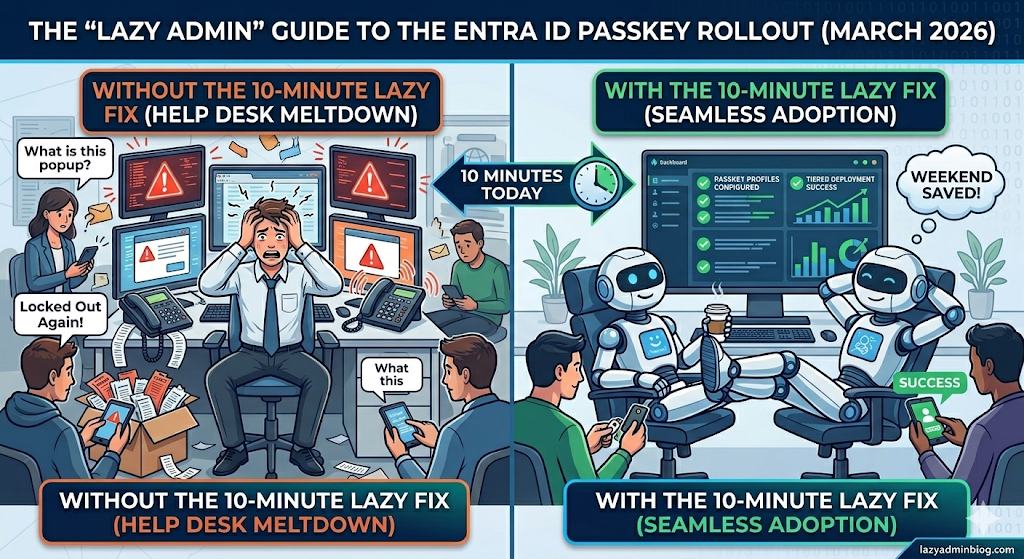
How to avoid 500 helpdesk tickets by spending 10 minutes in the Admin Center today.
If you woke up this morning to find a new “Default Passkey Profile” in your Entra tenant, don’t panic. Microsoft is officially “encouraging” (read: forcing) the world toward phishing-resistant auth. As a Lazy Admin, your goal isn’t to fight the change—it’s to control it so it doesn’t control your weekend.
1. The Big Change: Passkey Profiles
Previously, FIDO2 was a simple “On/Off” switch. Now, we have Passkey Profiles.
- The Default Behavior: If you didn’t opt-in, Microsoft has created a “Default Profile” for you.
- The Trap: If you had “Enforce Attestation” set to No, Microsoft is now allowing Synced Passkeys (iCloud Keychain, Google Password Manager). This means users can put corporate credentials on their personal iPhones.
2. The “Lazy” Strategy: Tiered Security
Don’t treat your CEO and your Summer Intern the same way. Use the new Group-Based Profiles to save yourself the headache of “One Size Fits None.”
| User Group | Recommended Profile | Why? |
| IT Admins | Device-Bound Only | Requires a physical YubiKey or Windows Hello. No syncing to the cloud. |
| Standard Users | Synced & Device-Bound | Maximum convenience. If they lose their phone, iCloud/Google restores the key. Zero helpdesk calls. |
| Contractors | AAGUID Restricted | Only allow specific hardware models you’ve issued to them. |
3. Avoid the “Registration Deadlock”
Many admins are seeing “Helpdesk Hell” because their Conditional Access (CA) policies are too strict.
The Problem: You have a policy requiring “Phishing-Resistant MFA” to access “All Apps.” A user tries to register a passkey, but they can’t log in to the registration page because… they don’t have a passkey yet.
The Lazy Fix: Exclude the “Register security information” user action from your strictest CA policies, or better yet, issue a Temporary Access Pass (TAP) for 24 hours. A TAP satisfies the MFA requirement and lets them onboard themselves without calling you.
🛠️ The 5-Minute “Lazy Admin” Checklist
- [ ] Check your Attestation: Go to Security > Authentication Methods > Passkey (FIDO2). If you want to block personal iPhones, set Enforce Attestation to Yes.
- [ ] Kill the Nudges: If you aren’t ready for the rollout, disable the “Microsoft-managed” registration campaigns before they start bugging your users on Monday.
- [ ] Review AAGUIDs: If you only use YubiKeys, make sure their AAGUIDs are explicitly whitelisted in your Admin profile.
Bottom Line: Spend 10 minutes setting up your profiles today, or spend 10 hours resetting MFA sessions next week. Choose wisely.
LazyAdminBlog.com : Setting Up Microsoft Entra Connect (Step-by-Step)
Why do manual user management when you can let a sync engine do the heavy lifting?
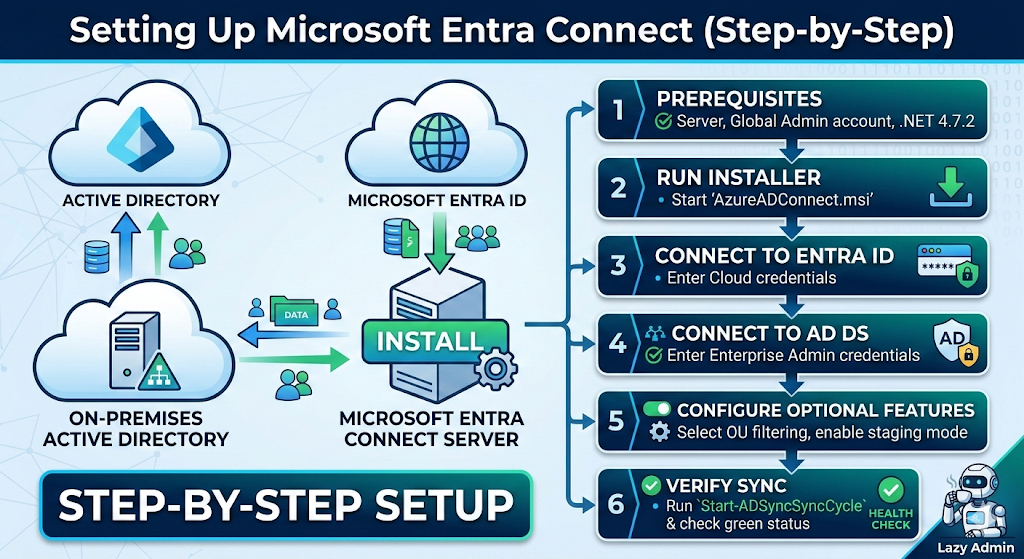
If you’re still manually creating users in both on-premises Active Directory and the Microsoft 365 portal, stop. You’re working too hard. Microsoft Entra Connect (formerly Azure AD Connect) is the “bridge” that syncs your local identities to the cloud. Set it up once, and your users get one identity for everything.
1. The “Pre-Flight” Checklist (Don’t skip this!)
The biggest mistake admins make is running the installer before the environment is ready. To be truly “lazy,” do the prep work so the installation doesn’t fail midway.
- Server: A domain-joined Windows Server 2016 or later (2022 is recommended).
- Hardware: Minimum 4GB RAM and a 70GB hard drive.
- Permissions: * Local: You need to be a Local Admin on the sync server.
- On-Prem: An Enterprise Admin account for the initial setup.
- Cloud: A Global Administrator or Hybrid Identity Administrator account in Entra ID.
- Software: .NET Framework 4.7.2 or higher and TLS 1.2 enabled.
Pro Tip: Run the Microsoft IdFix tool first. It finds duplicate emails and weird characters in your AD that would otherwise break the sync.
2. Step-by-Step Installation
Download the latest version of the Entra Connect MSI here.
Step A: The Express Route
- Launch
AzureADConnect.msi. - Agree to the terms and click Use Express Settings. (Note: Use “Custom” only if you have multiple forests or need specific attribute filtering).
- Connect to Entra ID: Enter your Cloud Admin credentials.
- Connect to AD DS: Enter your Enterprise Admin credentials.
- Entra ID Sign-in: Ensure your UPN suffixes match. If your local domain is
corp.localbut your email islazyadminblog.com, you need to addlazyadminblog.comas a UPN suffix in AD.
Step B: The “Staging Mode” Safety Net
Before you hit install, you’ll see a checkbox for “Start the synchronization process when configuration completes.” If you are replacing an old server or are nervous about what will happen to your 5,000 users, check the “Enable staging mode” box. This allows the server to calculate the sync results without actually exporting anything to the cloud. You can “peek” at the results before going live.
3. Post-Setup: The “Lazy” Health Check
Once installed, the sync runs every 30 minutes by default. You don’t need to babysit it, but you should know how to check it:
- The Desktop Tool: Open the Synchronization Service Manager to see a green “Success” status for every run.
- The PowerShell Way: To force a sync right now (because you’re too impatient for the 30-minute window), run:PowerShell
Start-ADSyncSyncCycle -PolicyType Delta
4. Troubleshooting Common “Gotchas”
- “Top-level domain not verified”: You forgot to add your domain (e.g., https://www.google.com/search?q=myblog.com) to the Entra ID portal.
- “Object Synchronization Triggered Deletion”: By default, Entra Connect won’t delete more than 500 objects at once. This is a safety feature to stop you from accidentally wiping your cloud directory. If you intended to delete them, you’ll need to disable the export deletion threshold.
The “Lazy Admin” Sync Monitor Script
Copy and save this as Monitor-EntraSync.ps1 on your sync server.
# --- CONFIGURATION ---
$SMTPServer = "smtp.yourrelay.com"
$From = "EntraAlert@lazyadminblog.com"
$To = "you@yourcompany.com"
$Subject = "⚠️ ALERT: Entra ID Sync Failure on $(hostname)"
# --- THE LOGIC ---
# Import the AdSync module (usually already loaded on the server)
Import-Module ADSync
# Get the statistics of the very last sync run
$LastRun = Get-ADSyncRunProfileResult | Sort-Object StartDateTime -Descending | Select-Object -First 1
# Check if the result was NOT 'success'
if ($LastRun.Result -ne "success") {
    $Body = @"
    The last Entra ID Sync cycle failed!

    Server: $(hostname)
    Run Profile: $($LastRun.RunProfileName)
    End Time: $($LastRun.EndDateTime)
    Result: $($LastRun.Result)

    Please log in to the Synchronization Service Manager to investigate.
"@
    # Send the alert
    Send-MailMessage -SmtpServer $SMTPServer -From $From -To $To -Subject $Subject -Body $Body -Priority High
}
🛠️ How to set it up (The Lazy Way)
To make this fully automated, follow these steps:
- Create a Scheduled Task: Open Task Scheduler on your Entra Connect server.
- Trigger: Set it to run every hour (or every 30 minutes to match your sync cycle).
- Action: * Program/script:
powershell.exe- Add arguments:
-ExecutionPolicy Bypass -File "C:\Scripts\Monitor-EntraSync.ps1"
- Add arguments:
- Security Options: Run it as SYSTEM or a Service Account that has local admin rights so it can access the ADSync module.
Why this is better than “Default” monitoring:
- No Noise: You only get an email if there is an actual problem.
- Proactive: You’ll likely know the sync is broken before your users start complaining that their new passwords aren’t working.
- Zero Cost: No need for expensive third-party monitoring tools for a single-server task.
References & Further Reading
EVC and CPU Compatibility FAQ
What is EVC?
EVC is short for Enhanced vMotion Compatibility. EVC allows you to migrate virtual machines between different generations of CPUs.
Because EVC allows you to migrate virtual machines between different generations of CPUs, with EVC you can mix older and newer server generations in the same cluster and be able to migrate virtual machines with vMotion between these hosts. This makes adding new hardware into your existing infrastructure easier and helps extend the value of your existing hosts. With EVC, full cluster upgrades can be achieved with no virtual machine downtime whatsoever. As you add new hosts to the cluster, you can migrate your virtual machines to the new hosts and retire the older hosts.
EVC is enabled for a cluster in the VirtualCenter or vCenter Server inventory. After it is enabled, EVC ensures that migration with vMotion is possible between any hosts in the cluster. Only hosts that preserve this property can be added to the cluster.
After EVC is enabled, all hosts in the cluster are configured to present the CPU features of a user-selected processor type to all virtual machines running in the cluster. This ensures CPU compatibility for vMotion even though the underlying hardware might be different from host to host. Identical CPU features are exposed to virtual machines regardless of which host they are running on, so that the virtual machines can migrate between any hosts in cluster.
Can migrations with vMotion still fail for virtual machines within an EVC cluster?
Yes. More factors than CPU compatibility are used to determine vMotion compatibility. For example, if the virtual machine does not reside on storage shared by the source and destination hosts, then migration with vMotion cannot occur between these hosts.
Does EVC allow AMD and Intel CPUs to be vMotion compatible?
No. An EVC-enabled cluster only allows CPUs from a single vendor in the cluster. VirtualCenter and vCenter Server do not allow you to add a host from a different CPU vendor into an EVC-enabled cluster.
ESXi/ESX 3.5 Update 2 and later supports two EVC modes:
- AMD Opteron Generation 1 (Rev. E)
- Intel “Merom” Generation (Intel Xeon Core 2)
In the earlier ESXi/ESX 3.5 releases, these modes were labeled simply AMD and Intel. Later updates use the names listed above.
ESXi/ESX 4.0 supports these EVC modes:
- AMD Opteron Generation 1 (Rev. E)
- AMD Opteron Generation 2 (Rev. F)
- AMD Opteron Generation 3 (Greyhound)
- Intel “Merom” Generation (Intel Xeon Core 2)
- Intel “Penryn” Generation (Intel Xeon 45nm Core2)
- Intel “Nehalem” Generation (Intel Xeon Core i7)
ESXi/ESX 4.0 Update 1 and later supports these EVC modes:
- AMD Opteron Generation 1 (Rev. E)
- AMD Opteron Generation 2 (Rev. F)
- AMD Opteron Generation 3 (Greyhound)
- Intel “Merom” Generation (Intel Xeon Core 2)
- Intel “Penryn” Generation (Intel Xeon 45nm Core2)
- Intel “Nehalem” Generation (Intel Xeon Core i7)
- Intel “Westmere” Generation (Intel Xeon 32nm Core i7)
ESXi/ESX 4.1 supports these EVC modes:
- AMD Opteron Generation 1 (Rev. E)
- AMD Opteron Generation 2 (Rev. F)
- AMD Opteron Generation 3 (Greyhound)
- AMD Opteron Generation 3 (no 3DNow!) (Greyhound)
- Intel “Merom” Generation (Intel Xeon Core 2)
- Intel “Penryn” Generation (Intel Xeon 45nm Core2)
- Intel “Nehalem” Generation (Intel Xeon Core i7)
- Intel “Westmere” Generation (Intel Xeon 32nm Core i7)
ESXi 5.0 supports these EVC modes:
- AMD Opteron Generation 1 (Rev. E)
- AMD Opteron Generation 2 (Rev. F)
- AMD Opteron Generation 3 (Greyhound)
- AMD Opteron Generation 3 (no 3Dnow!) (Greyhound)
- AMD Opteron Generation 4 (Bulldozer)
- Intel “Merom” Generation (Intel Xeon Core 2)
- Intel “Penryn” Generation (Intel Xeon 45nm Core2)
- Intel “Nehalem” Generation (Intel Xeon Core i7)
- Intel “Westmere” Generation (Intel Xeon 32nm Core i7)
- Intel “Sandy Bridge” Generation
ESXi 5.1 supports these EVC modes:
- AMD Opteron Generation 1 (Rev. E)
- AMD Opteron Generation 2 (Rev. F)
- AMD Opteron Generation 3 (Greyhound)
- AMD Opteron Generation 3 (no 3Dnow!) (Greyhound)
- AMD Opteron Generation 4 (Bulldozer)
- AMD Opteron “Piledriver” Generation
- Intel “Merom” Generation (Intel Xeon Core 2)
- Intel “Penryn” Generation (Intel Xeon 45nm Core2)
- Intel “Nehalem” Generation (Intel Xeon Core i7)
- Intel “Westmere” Generation (Intel Xeon 32nm Core i7)
- Intel “Sandy Bridge” Generation
- Intel “Ivy Bridge” Generation
ESXi 6.0 supports these EVC modes:
- AMD Opteron Generation 1 (Rev. E)
- AMD Opteron Generation 2 (Rev. F)
- AMD Opteron Generation 3 (Greyhound)
- AMD Opteron Generation 3 (no 3Dnow!) (Greyhound)
- AMD Opteron Generation 4 (Bulldozer)
- AMD Opteron “Piledriver” Generation
- Intel “Merom” Generation (Intel Xeon Core 2)
- Intel “Penryn” Generation (Intel Xeon 45nm Core2)
- Intel “Nehalem” Generation (Intel Xeon Core i7)
- Intel “Westmere” Generation (Intel Xeon 32nm Core i7)
- Intel “Sandy Bridge” Generation
- Intel “Ivy Bridge” Generation
- Intel “Haswell” Generation
Which CPUs are compatible with each EVC mode?
To determine the EVC modes compatible with your CPU, search the VMware Compatibility Guide. Search for the server model or CPU family, and click the entry in the CPU Series column to display the compatible EVC modes.
What are the differences between the modes?
Each mode corresponds very closely to the features available in processors with the same name. Newer processors and their corresponding modes include additional features such as new instructions. For example, the Intel Xeon Core i7 processor added the SSE4.2 instruction set. These instructions are not available in earlier processors or their corresponding EVC modes.
AMD EVC modes expose these features:
| EVC Mode |
Available Features |
| AMD Opteron Generation 1 | All features of AMD Opteron Rev. E CPUs |
| AMD Opteron Generation 2 | All features of AMD Opteron Generation and additional CPU features including CMPXCHG16B and RDTSCP |
| AMD Opteron Generation 3 | All features of AMD Opteron Generation 2 and additional CPU features including SSE4A, MisAlignSSE, POPCOUNT, ABM (LZCNT) |
| AMD Opteron Generation 3 (no 3Dnow!) | Applies baseline feature set of AMD Opteron Generation 3 (Greyhound) processors, with 3DNow! support removed, to all hosts in the cluster.
This mode allows you to prepare clusters containing AMD hosts to accept AMD processors without 3DNow! support. |
| AMD Opteron Generation 4 | Applies baseline feature set of AMD Opteron Generation 4 (Bulldozer) processors to all hosts in the cluster.
This EVC mode exposes additional CPU features including SSSE3, SSE4.1, AES, PCLMULQDQ, XSAVE, AVX, XOP and FMA4. |
| AMD Opteron “Piledriver” Generation | Applies baseline feature set of AMD Opteron “Piledriver” Generation processors to all hosts in the cluster.
This EVC mode exposes additional CPU features including FMA3 (three operand FMA, aka Intel’s FMA), BMI1 and TBM. |
| EVC Mode | Available Features |
| Intel “Merom” Generation (Intel Xeon Core2) | All features of Intel Core2 CPUs |
| Intel “Penryn” Generation (Intel Xeon 45nm Core2) | All features of Intel Core2 CPUs and additional CPU features including SSE4.1 |
| Intel “Nehalem” Generation (Intel Xeon Core i7) | All features of Intel Core2 CPUs and additional CPU features including SSE4.2 and POPCOUNT |
| Intel “Westmere” Generation (Intel Xeon 32nm Core i7) | Applies baseline feature set of Intel Xeon 32nm Corei7 (Westmere) processors to all hosts in the cluster. Compared to the Intel Xeon Corei7 mode, this EVC mode exposes additional CPU features including AES and PCLMULQDQ.
Note: Intel i3/i5 Xeon Clarkdale Series processors that do not support AESNI and PCLMULQDQ cannot be admitted to EVC modes higher than the Intel Xeon Corei7 mode. |
| Intel “Sandy Bridge” Generation | Applies baseline feature set of Intel “Sandy Bridge” Generation processors to all hosts in the cluster.
This EVC mode exposes additional CPU features including AVX, XSAVE and ULE. Note: Some Sandy Bridge microarchitecture processors do not provide the full Sandy Bridge feature set. Such processors do not support EVC mode; they will only be admitted to the Intel Nehalem Generation mode or below. |
| Intel “Ivy Bridge” Generation | Applies baseline feature set of Intel “Ivy Bridge” Generation processors to all hosts in the cluster.
This EVC mode exposes additional CPU features including ENFSTRING, F16C, FSGSBASE, SMEP and CPUID Faulting. |
| Intel “Haswell” Generation |
Applies the baseline feature set of Intel “Haswell” Generation processors to all hosts in the cluster.
This EVC mode exposes additional CPU features including Advanced Vector Extensions 2, fused multiply-adds, Transactional Synchronization Extensions, and new bit manipulation instructions. |
How can I find the EVC mode supported by a host?
In the vSphere Client connected to vCenter Server 4.0, the host Summary tab indicates whether EVC is enabled, and displays the current EVC mode for the host. Click the blue icon next to the EVC mode to display a list of all the supported EVC modes for the host.
VMware also provides a free CPU identification utility that displays compatible EVC modes, in addition to other CPU features. You can download this utility and boot the host from the ISO image.
If I have an EVC-enabled cluster set to a particular EVC mode, and I have a host outside the cluster that matches the EVC mode, can I migrate a virtual machine with vMotion between that host and the cluster?
Yes, in both directions.
How do I handle Intel Xeon E3 and E5 Processors or Intel Xeon X-series, E-series, L-series Processors that have different revision or series numbers (e.g. v2, v3, v4 or x5680, x5687, x5690)
When enabling EVC for a cluster with Intel processors of the Xeon E3 or Xeon E5 family that have different revision numbers (v2, v3, v4), an EVC baseline is required. This is due to new instruction sets being available in the different revisions. Although the processors will be the same EVC baseline, this is required for the processors to all present the same instruction sets to the virtual machines.
As with Xeon process with different revisions, when enabling EVC for a cluster with Intel processors of the same Xeon family (e.g. E56xx, X56xx, L56xx), an EVC baseline is required. This is due to new instruction sets being available in the different revisions. Although the processors will be the same EVC baseline, this is required for the processors to all present the same instruction sets to the virtual machines.
What is the difference between EVC and the old CPUID masking feature (accessed from the Virtual Machine Settings dialog box, Options tab, CPUID mask option)?
The older masking feature involved applying manual masks to individual virtual machines. EVC takes effect on a whole cluster and all virtual machines in the cluster. More accurately, EVC affects the hosts themselves, making all the hosts in the cluster appear to be the same type of CPU hardware, even if they are different.
Why is the . vmx config file for the virtual machine updated with CPUID bits?
The .vmx file contains information about the features that the virtual machine is using. VirtualCenter and vCenter Server need this information to provide accurate vMotion compatibility checks. These values are unrelated to the old CPUID mask values that also appear in the .vmx file.
What happens when a host is removed from an EVC-enabled cluster?
When a host leaves an EVC-enabled cluster, it reverts to its normal behavior. New virtual machines started on that host can access all the features of the CPU, and are not limited by the EVC mode that was in effect while the host was in the EVC cluster. Note that virtual machines that were once able to migrate to the host might no longer be permitted to do so.
If I raise the EVC mode, will virtual machines be able to access the new features available in that mode?
Not until you power off and then power on the virtual machines. A reboot of the guest operating system is not sufficient. A virtual machine determines which features are available to it at power on, and cannot access any new features that are added until it is powered off.
What is an ill-behaved application, and why does it affect EVC?
An ill-behaved application is one that does not use CPU-vendor-recommended methods of detecting features supported on a CPU. The recommended method is to run the CPUID instruction and look for the correct feature bits for the capabilities the application is expected to use. Unsupported methods used by ill-behaved applications include try-catch-fail or inferring the features present from the CPU version information. When unsupported methods are used, an application might detect features on a host in an EVC cluster that are being masked from the virtual machines. The CPUID-masking MSRs provided by CPU vendors do not disable the actual features. Therefore, an application can still use masked features. If a virtual machine running such an application is then migrated with vMotion to a host that does not physically support those features, the application might fail. VMware is not aware of any commercially-available ill-behaved applications. For more information, see Detecting and Using CPU Features in Applications (1005763).
Can I create an EVC-enabled cluster if some of the hosts I want to add do not have AMD-V Extended Migration or Intel VT FlexMigration?
Yes. EVC-enabled clusters can contain hosts that do not feature AMD-V Extended Migration or Intel VT FlexMigration technology. For example, Intel Xeon Core2 processors do not have Intel VT FlexMigration technology, but can be added to clusters configured with an Intel Xeon Core2 EVC mode.
Can I add an ESXi/ESX 3.5 Update 1 or earlier host to an EVC-enabled cluster?
No. EVC is supported only on ESXi/ESX 3.5 Update 2 and later. vCenter Server does not permit the addition of hosts that do not provide support for EVC into an EVC-enabled cluster.
If I add newer hardware into an EVC-enabled cluster with a lower EVC mode, do I lose performance?
All CPU features provided by your host hardware are available to the hypervisor. Optimizations for CPU virtualization such as AMD-V and Intel VT-x or facilities for MMU virtualization such as AMD RVI or Intel EPT support are still used by the hypervisor. Only those CPU instructions that are unique to the new CPU are hidden from virtual machines when the host joins the EVC-enabled cluster. Typically this includes new SIMD instructions, such as the latest SSE additions. It is possible, but unlikely, that an application running in a virtual machine would benefit from these features, and that the application performance would be lower as the result of using an EVC mode that does not include the features. Check with the application vendor to determine which CPU features are used by the application.
How do I know when I can raise the EVC mode for a cluster?
- vSphere HA (High Availability): vSphere HA is not impacted due to the failover power-cycling the virtual machines when starting them on a a new host. This allows the virtual machine to pick up the new CPU ID and allows it to start without a problem
- vSphere DRS (Distributed Resource Scheduler):
- vMotion:
- Prior to power cycling the virtual machines:
- They will maintain CPU level until a power cycle occurs.
- DRS and vMotion operations will be the same as prior to disabling EVC mode.
- Once the virtual machine is power cycled:
- They are only able to move to other ESX/ESXi hosts that are at the same CPU generation or newer.
- They will take on the CPU settings from the ESXi host it is running on. This can prevent DRS operations and vMotioning of the virtual machine to another host due to CPU incompatibility.
- Prior to power cycling the virtual machines:
- Storage vMotion: Virtual machines are able to be moved to Storage vMotion with EVC mode disabled within a cluster
- vMotion:
- Swapfile Location: This is not impacted.
VMware View 4.0 Installation and Configuration
VMware View 4 allows you to consolidate virtual desktops on datacenter servers and manage operating systems with improved reliability, better managementOverview
Features
- Print from a virtual desktop to any local or networked printer that is defined on the client device.
- Use multiple monitors With VMware PCoIP multiple-monitor support.
- Access USB devices and other peripherals that are connected to the local device that displays your virtual desktop.
- Use Microsoft Active Directory to manage access to virtual desktops and to manage policies.
- Use the Web-based administrative console to manage virtual desktops from any location.
- Use a template, or master image, to quickly create and provision pools of desktops.
- Send updates and patches to virtual desktops without affecting user settings, data, or preferences.
Components of VMware View Enterprise:
- View Connection Server 4 (Install on dedicated server)
- View Agent (Install on virtual desktop VM)
- View Client (Install on client physical desktop
Components of VMware View Premier:
- View Connection Server 4 (Install on dedicated server)
- View Composer 2 (Install on vCenter server)
- View Agent (Install on virtual desktop VM)
- View Client (Install on client physical desktop)
- View Client Offline Desktop (Install on client physical laptop)
Pre-requisites:
| Components | Requirements |
| View Connection Server 4.0 | · 32bit or 64bit server
· Pentium IV 2.0GHz processor or higher · 2GB RAM or higher · One or more 10/100Mbps network interface cards (NIC) · Windows Server 2003 Standard or Enterprise with Service Pack 2 · Valid View 4.0 license keys · Administrator rights on the domain user account used to install View Connection Server 4.0 · VMware Infrastructure 3.0.2, VMware Infrastructure 3.5 Updates 3 or 4 or vSphere 4 Update 1 · RSA Authentication Manager · Windows 2000, 2003 or 2008 Active Directory |
| View Composer 2.0 | · Windows Server 2003 Standard or Enterprise with Service Pack 1 or Windows XP Professional with Service Pack 2
· A supported SQL database. |
| View Administrator | · Internet Explorer 7, Internet Explorer 8, Firefox 3.0 or Firefox 3.5 |
Installation Overview
The complete setup of Vmware View 4.0 environment includes 3 steps:
- Installing VMware View Connection Server 4
- Installing VMware View Composer 2
- Configuring VMware View Connection Server 4 with View Manager
Installing VMware View Connection Server 4
Note:
- The View Connection Server must be installed on its own dedicated server. It cannot be installed on the vCenter server.
- It acts as a broker for client connections by authenticating directing incoming remote desktop user requests to a virtual desktop, physical desktop, or terminal server.
- Double Click “VMware-viewconnectionserver-4.xxxxx.exe” to start the installer.
- The installation wizard is displayed. Click Next.
- Read and Accept the VMware license agreement, Click Next.
- Enter the destination folder to install VMware View Composer. Click Next.
- Select “Standard” for the server instance type (as this is the first server). Click Next.
- Read and Accept the Microsoft ADAM license agreement, Click Next.
- Click Install to start the installation of the View Connection Server.
- Once the installation has completed Click Finish.
Installing VMware View Composer 2
Note:
- VMware View Composer 2 is a component of View 4 Premier Edition.
- Composer must be installed on the vCenter Server.
- Double Click “VMware-viewcomposer-2.0.0-210930.exe” to start the installer.
- You may receive a message about updating Microsoft .NET depending on which version you have installed. Click Ok to update .NET.
- After updating .NET (if it was required) the installation wizard is displayed. Click Next.
- Read and Accept the license agreement, Click Next.
- Enter the destination folder to install VMware View Composer. Click Next.
- VMware View Composer requires a MS SQL database. Enter the required details and Click Next.
- Confirm the SOAP port to use and note the SSL certificate being created. Click Next.
- Click Install to start the installation of Composer.
- Once the installation has completed Click Finish.
- It is required to restart the server to complete the installation. Click Yes to Restart.
Configuring VMware View Connection Server 4 with View Manager
- View Manager 4 is a core component of VMware View 4 that is installed on the View Connection Server.
- View Manager is a single console used to manage and deploy virtual desktops
Follow the below steps to configure the Vmware View Connection Sevrer
- Login to View Manager Administrator
- https://<your-connectionserver>/admin/
- Login with an account which is part of the BUILTIN\Administrators group on the connection server.
- License the server.
- Navigate to the “Configuration” tab and the “Product Licensing and Usage” section.
- Click “Edit License” and enter the license.
- Add the vCenter Server.
- Navigate to the “Configuration” tab and the “Servers” section.
- Click “Add” to add the vCenter server.
- Enter the vCenter server details:
- Server Address (FQDN)
- Username
- Password
- Optionally (If Premier Edition) enter View Composer Server details:
- Click “Add” to add a Quick Prep domain.
- Click Ok to save all the settings.
- Confirm the vCenter Server details are added correctly.
- Confirm the View Connection Server is activated.
- Navigate to the “Configuration” tab and the “Registered Desktop Sources” section.
- Configure Connection Server Settings.
- Select a Connection Server and Click “Edit”.
- By default these settings do not need to be changed for View to work. However here you will find settings for smart cards, 2-factor authenication and backup of the View Manager Configuration.
- Configure any additional Administrators of VMware View Manager.
- Navigate to the “Configuration” tab and the “Administrators” section.
- Click “Add” to add any additionally groups that require administrator permissions in View Manager.
- By default this is only BUILTIN\Administrators group on the connection server.
- Configure any require global settings.
- Navigate to the “Configuration” tab and the “Global Settings” section.
- Under the global settings configure any additional settings for session timeouts, login messages and forced logoff messages.
- Click Ok to save the settings.
Zerto vs vSphere Replication
Zerto vs vSphere Replication (focusing around data replication)
| Zerto Replication | vSphere Replication | |
| Generally recommended for: | Any size vSphere infrastructure | Small infrastructures, remote offices, and non-critical applications |
| Max number of VMs protected per appliance and vCenter Server: | 500/5000 | 500/500 |
| Linked clone and template support: | Yes | No |
| Physical RDM and Virtual RDM support: | Yes, virtual and physical mode RDMs are supported | No/Yes, Physical RDMs are not supported but virtual RDM are supported |
| RPO range: | Seconds | 15 minutes to 24 hours |
| Application consistent?: | Supports Windows VMs using VSS and Linux with Application Quesicense | Only with Windows VMs using VSS |
| How VMs are chosen: | VMs can be organized into Virtual Protection Groups | VMs can be selected individually or multi-select but virtual protection grouping is not available |
| Automated failback support: | Yes | No, VMware recommends SRM |
| Allows you to plan, test, and automate failover and failback: | Yes | No, VMware recommends SRM |
| Compression included: | Yes | No, and neither does SRM |
| RE-IP addressing of virtual machines: | Yes | No, VMware recommends SRM |
| Cloning of recovery sites: | Yes | No |
| Point in time recovery: | Yes, up to 5 days with standard recovery, up to 1 year with extended recovery using the Offsite Backup feature | Yes, up to 24 snapshots |
| Compatible with vApps: | Yes | No |
| vCloud Director integration: | Yes | No |
| Snapshot-based? | No | Yes/No, VMware says that vSR doesn’t use snapshots technology but does use a modified version of CBT, still many of the same snapshot-based limitations apply. For example, vSR uses VM snapshots at the recovery site when recovering to a different point-in-time. |
Zerto vs VMware Site Recovery Manager (focusing around automation of disaster recovery planning, testing, and automation)
| Zerto | SRM (with vSphere Replication) | |
| Provides planning, testing, and execution of disaster recovery for vSphere: | Yes | Yes |
| Designed for: | Zerto was designed for hypervisor-based replication AND disaster recovery orchestration | SRM was designed for disaster recovery orchestration only |
| Licensed: | Per-VM | Per-VM |
| Replication granularity: | Per-VM and/or Per- Virtual Protection Group | Per-VM or multi-select but virtual protection grouping is not available |
| Configure consistency groups (virtual protection groups): | Yes | No |
| Replication recovery points: | Yes, up to 5 days with standard recovery, up to 1 year with extended recovery using the Offsite Backup feature | Yes, up to 24 snapshots |
| Compatibility: | Zerto works with ESX 4.0 U1 and above. Zerto can replicate between different versions of vCenter. | vSR works with ESX 5.x and above. SRM requires the same version of vCenter and SRM be installed at both sites. |
| Managed with: | vSphere Client Plugin and stand-alone browser UI | vSphere Client Plugin |
| Replication is performed with: | Zerto Hypervisor-based replication | vSphere Replication |
Command to get the ESXi host information from a running VM
Not able to find the VM in the vCenter/inventory? here is a way, there is a Command to get the ESXi host information from a running VM.
To get ESXi host name:
C:\>”C:\Program Files\VMware\Vmware Tools\vmtoolsd.exe” –cmd “info-get guestinfo.hypervisor.hostname”
To get the ESXi Build details:
C:\>”C:\Program Files\VMware\Vmware Tools\vmtoolsd.exe” –cmd “info-get guestinfo.hypervisor.build”
How to cancel a hang task in vCenter or ESXi host?
Sometime we may need to cancel an hung task like active vmotion/backup which may show as disabled from the vSphere client.
- First check if there is an active task running for the VM in the Task and Events Tab.
- Log in to ESXi host via SSH (using e.g. putty). If the SSH service is not running on ESXi host, please enable it.
- Run ps command. use grep e.g. ps | grep VM_name
- Kill the parent process by running the command kill id_parent e.g. kill 859467
- The hang task should be canceled now and will reflect in the Tasks and Events in the vCenter.
A QUICK REFERENCE OF VSPHERE IDS
Here is a list of a number of the different IDs used in the virtual infrastructure and how they are used:
- VC Instance UUID(aka serverGuid): This is a GUID that identifies the vCenter server. This is accessible from the AboutInfo property in the VIM API. The property name is AboutInfo#instanceUuid. It’s set at install time and is persisted so the value is durable for a given VC instance.
To access this via PowerCLI you can use the following:
| 1
2 3
|
PS C:\> $vcenter = Connect-viserver vcsa-01a.corp.local -User Administrator@vsphere.local -Password VMware1!
PS C:\> $vcenter.InstanceUuid d322b019-58d4-4d6f-9f8b-d28695a716c0 |
- The ESX Host UUIDis read by the ESX host from the System Management BIOS (SMBIOS). This UUID is not generated by VMware, it is unique to the hardware and is set in the BIOS by the vendor.
To access this via PowerCLI you can use the following:
| 1 | (Get-VMHost | Select -first 1).ExtensionData.hardware.systeminfo.uuid |
- VC-VM Instance UUID: This is the vc.uuid property in the VM vmx configuration file and also the instanceUuid property on the VmConfigInfo for a VirtualMachine in the VIM API. This UUID is used by vCenter to uniquely identify VMs that it is managed. vCenter assigns this UUID to the VM after it is created. There are different workflows where a VM may not have a UUID initially or may have a duplicate. vCenter actively looks over the VM inventory and will automatically patch the VM instance UUID if it sees a duplicate.
The scope of this uniqueness scan is a vCenter instance. If there are duplicate VC-VM Instance UUIDs, they will not be detected as duplicates unless the VMs are managed by the same vCenter instance. This value can be changed through the API.
To access this via PowerCLI you can use the following:
| 1
2 3 |
PS C:\> (Get-VM | Select -first 1).extensiondata.config.InstanceUUID
502e363d-393c-b0a4-8ede-639db30a625e |
- VM SMBIOS UUID: This is the uuid.bios property in the VM vmx configuration file. In the VIM API, this is the uuid property on the VmConfigInfo for a VirtualMachine managed object. This UUID is visible to the guest OS as the SMBIOS UUID. VMware generally try to avoid changing this UUID since it is often used by applications that manage the guest OS instances. When the VM is migrated this UUID is maintained.
vCenter does a best effort to try to make sure these UUIDs are unique in an environment. For operations like clone and deploy that create a new VM, a new UUID is provided to the VM by clearing the uuid.bios from the VM’s vmx file. If the VM is copied without vCenter’s knowledge, 3rd party tools are advised to do the same thing as vCenter. A new uuid.bios is generated the next time the VM is powered on. This UUID is generated by the ESXi server so vCenter does not have to be in the control flow for the uuid.bios to be generated.
To access this via PowerCLI you can use the following:
| 1
2 3 |
PS C:\> (Get-VM | Select -first 1).extensiondata.Config.UUID422ee9f4-6cfd-1fb7-1376-a8ecb8eb8568 |
- VM Location ID: This identifier is stored in the VM configuration file as the variable uuid.location. In the VIM API, the name is locationId also on the VmConfigInfo of the VirtualMachine. This is one other detail that might be relevant to a 3rd party solution that might be moving the VM without vCenter’s knowledge. This property is used in conjunction with the VM SMBIOS UUID. This property is a hash of the VM’s configuration file and some UUID of the ESXi. The purpose of this UUID is to detect out-of-band migrations and copies of the VM. If vSphere (or Workstation/Fusion) detect that the locationId is no longer valid, it will pop up dialog/question/error asking the user why the locationId is no longer valid. The user is prompted to answer whether the VM was moved or copied. The purpose is so that vSphere can determine whether it should keep the existing the SMBIOS UUID or generate a new one.
Recall, I mentioned that vCenter is doing a best effort to ensure the SMBIOS UUID is unique. But when it detects a potential conflict, vCenter will not automatically patch the UUID since this could break 3rd party and VMware products that rely on the guest visible UUID to correlate the VM with other management entities in the environment.
The way 3rd party solutions can best interoperate with vCenter and it’s attempt to preserve a unique SMBIOS UUID is to be aware of these semantics. If a 3rd party solution or program is moving the VM, it should clear out the uuid.location (ie. ConfigInfo.locationId) property. On next power on, a new uuid.location will be generated, binding the VM to ESXi host and the file path where it is running.
Despite this however, there is a theoretical and real possibility that there could be duplicate SMBIOS UUIDs. Because vCenter is deferring to what the user of the system what the the SMBIOS UUID should be, it will not change the UUID automatically if it detects conflicts. If there SMBIOS UUIDs that are duplicated, it will not fix them.
To access this via PowerCLI you can use the following:
| 1
2 3 |
PS C:\> (Get-VM | Select -first 1).extensiondata.config.LocationId
564d043c-5dab-5413-c4a7-fb0837d354d9 |
- VM MoRef: The VM MoRef is a short key used by a vCenter instance to identify the VM. This is the primary identifier used by the VIM API to refer to the VM. The other identifiers can generally be used to find the VM, but the VM MoRef is the one that must ultimately be used to get data and issue operations to modify the VM.
In general, the MoRef is the important identifier because that’s what is used in the VC database to associate a VM to its stats, events, and configuration.
In environments where multiple vCenters are used, the MoRef will not necessarily be unique. As a result, another identifier needs to paired with the VM MoRef or used instead. In general, vSphere uses a combination of the vCenter instance UUID (ie. the serverGuid) with the MoRef to identify the VM for cross-vCenter scenarios like Linked Mode.
To access this via PowerCLI you can use the following:
| 1
2 |
PS C:\> (Get-VM | Select -first 1).ExtensionData.Moref.Value
vm-43 |
