
Lazy Admin
Setting Up Microsoft Entra Connect (Step-by-Step)
Why do manual user management when you can let a sync engine do the heavy lifting?
If you’re still manually creating users in both on-premises Active Directory and the Microsoft 365 portal, stop. You’re working too hard. Microsoft Entra Connect (formerly Azure AD Connect) is the “bridge” that syncs your local identities to the cloud. Set it up once, and your users get one identity for everything.
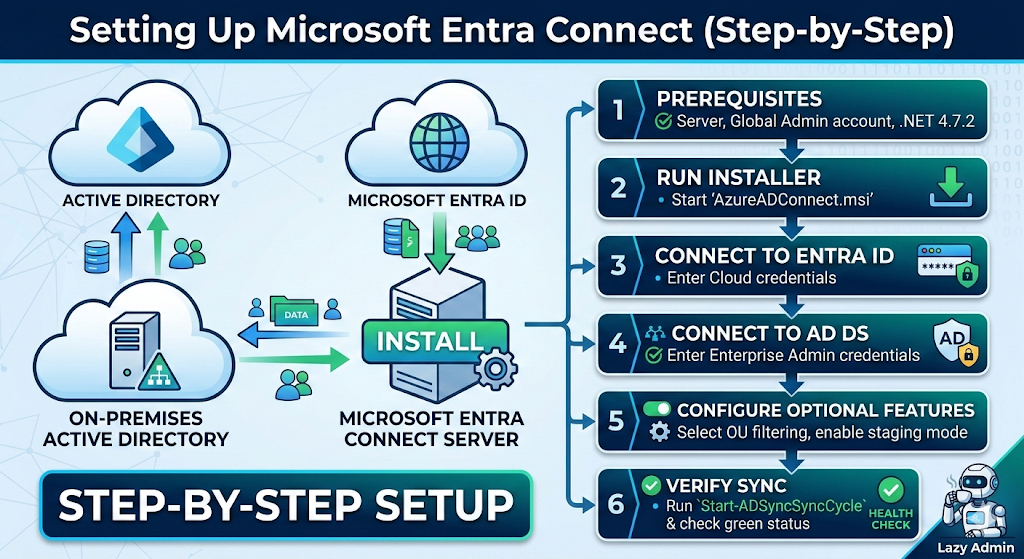
1. The “Pre-Flight” Checklist (Don’t skip this!)
The biggest mistake admins make is running the installer before the environment is ready. To be truly “lazy,” do the prep work so the installation doesn’t fail midway.
- Server: A domain-joined Windows Server 2016 or later (2022 is recommended).
- Hardware: Minimum 4GB RAM and a 70GB hard drive.
- Permissions: * Local: You need to be a Local Admin on the sync server.
- On-Prem: An Enterprise Admin account for the initial setup.
- Cloud: A Global Administrator or Hybrid Identity Administrator account in Entra ID.
- Software: .NET Framework 4.7.2 or higher and TLS 1.2 enabled.
Pro Tip: Run the Microsoft IdFix tool first. It finds duplicate emails and weird characters in your AD that would otherwise break the sync.
2. Step-by-Step Installation
Download the latest version of the Entra Connect MSI here.
Step A: The Express Route
- Launch
AzureADConnect.msi. - Agree to the terms and click Use Express Settings. (Note: Use “Custom” only if you have multiple forests or need specific attribute filtering).
- Connect to Entra ID: Enter your Cloud Admin credentials.
- Connect to AD DS: Enter your Enterprise Admin credentials.
- Entra ID Sign-in: Ensure your UPN suffixes match. If your local domain is
corp.localbut your email islazyadmin.com, you need to addlazyadmin.comas a UPN suffix in AD.
Step B: The “Staging Mode” Safety Net
Before you hit install, you’ll see a checkbox for “Start the synchronization process when configuration completes.” If you are replacing an old server or are nervous about what will happen to your 5,000 users, check the “Enable staging mode” box. This allows the server to calculate the sync results without actually exporting anything to the cloud. You can “peek” at the results before going live.
3. Post-Setup: The “Lazy” Health Check
Once installed, the sync runs every 30 minutes by default. You don’t need to babysit it, but you should know how to check it:
- The Desktop Tool: Open the Synchronization Service Manager to see a green “Success” status for every run.
- The PowerShell Way: To force a sync right now (because you’re too impatient for the 30-minute window), run:PowerShell
Start-ADSyncSyncCycle -PolicyType Delta
4. Troubleshooting Common “Gotchas”
- “Top-level domain not verified”: You forgot to add your domain (e.g., https://www.google.com/search?q=myblog.com) to the Entra ID portal.
- “Object Synchronization Triggered Deletion”: By default, Entra Connect won’t delete more than 500 objects at once. This is a safety feature to stop you from accidentally wiping your cloud directory. If you intended to delete them, you’ll need to disable the export deletion threshold.
The “Lazy Admin” Sync Monitor Script
Copy and save this as Monitor-EntraSync.ps1 on your sync server.
# --- CONFIGURATION ---$SMTPServer = "smtp.yourrelay.com"$From = "EntraAlert@lazyadminblog.com"$To = "you@yourcompany.com"$Subject = "⚠️ ALERT: Entra ID Sync Failure on $(hostname)"# --- THE LOGIC ---# Import the AdSync module (usually already loaded on the server)Import-Module ADSync# Get the statistics of the very last sync run$LastRun = Get-ADSyncRunProfileResult | Sort-Object StartDateTime -Descending | Select-Object -First 1# Check if the result was NOT 'success'if ($LastRun.Result -ne "success") { $Body = @" The last Entra ID Sync cycle failed! Server: $(hostname) Run Profile: $($LastRun.RunProfileName) End Time: $($LastRun.EndDateTime) Result: $($LastRun.Result) Please log in to the Synchronization Service Manager to investigate."@ # Send the alert Send-MailMessage -SmtpServer $SMTPServer -From $From -To $To -Subject $Subject -Body $Body -Priority High}🛠️ How to set it up (The Lazy Way)
To make this fully automated, follow these steps:
- Create a Scheduled Task: Open Task Scheduler on your Entra Connect server.
- Trigger: Set it to run every hour (or every 30 minutes to match your sync cycle).
- Action: * Program/script:
powershell.exe- Add arguments:
-ExecutionPolicy Bypass -File "C:\Scripts\Monitor-EntraSync.ps1"
- Add arguments:
- Security Options: Run it as SYSTEM or a Service Account that has local admin rights so it can access the ADSync module.
Why this is better than “Default” monitoring:
- No Noise: You only get an email if there is an actual problem.
- Proactive: You’ll likely know the sync is broken before your users start complaining that their new passwords aren’t working.
- Zero Cost: No need for expensive third-party monitoring tools for a single-server task.
